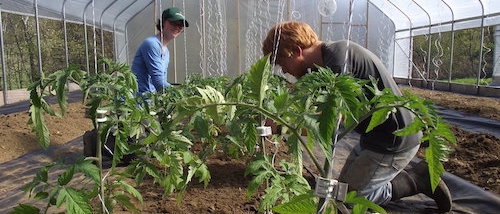
This article originally appeared in the January 2016 issue of Growing for Market Magazine.
Log-grown shiitake mushrooms have been a small but valued part of our central Missouri diversified farm since 2010 for several reasons. They have consistently been among our CSA members’ favorite items, and we think we know why: shiitakes contribute flavor-enhancing umami compounds, resulting in dishes that are extraordinarily delicious. Most of the work falls in the less-busy winter season, when logs are cut and inoculated. Production happens during the normal market/CSA season, generating extra income with a minimum of extra work during that busy time of year.
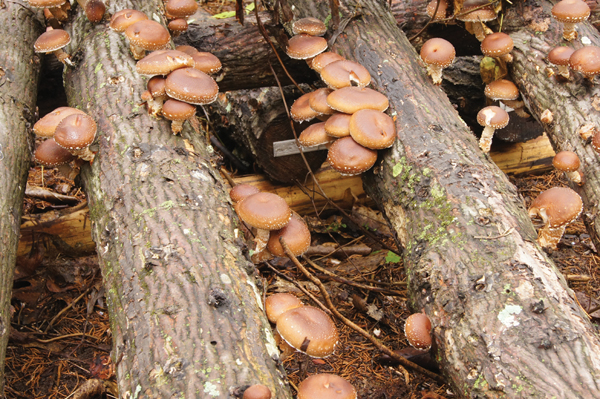
Shiitakes growing at Chert Hollow Farm in Missouri. All photos by Eric and Joanna Reuter.
According to the 2014 book Farming the Forest (cited below), each shiitake log might cost $1.50 - $3.00 to get started, but can yield $50-$60 of mushrooms in its lifetime at a price range of $10-$20/lb. Organic certification for mushroom production is straightforward. These factors make shiitake mushrooms an excellent addition to many diversified farms’ offerings.
Shiitake mushrooms are the reproductive fruiting bodies produced by a complex web of mycelium (strands of fungal cells) feeding on the energy contained in woody material. In effect, they eat logs from within, and form external “fruits” (mushrooms) for reproduction. Shiitake cultivation is, in essence, edible controlled rot. The trick is to inoculate logs of the right kind of wood with a desired strain of shiitake mycelium, nurture a healthy web of mycelium by providing proper conditions (shade, moisture), encourage or allow the organism to fruit, and then harvest the results at just the right time to be perfect for human consumption.
Management of “fruiting” can be passive or active. Passive management lets the logs produce naturally with the weather, while active management involves “forcing” the logs to produce on a regular schedule. The former is less labor-intensive but also lesspredictable, while the extra work of the latter pays off in regular production. Either way, the total yield of the log won’t change, only the distribution of mushrooms over time. Logs should last 3-5 years, until all the available woody food has been consumed and the spent log feels like a chunk of soggy styrofoam.
In this article we present an overview of shiitake management, based on our own experiences and recommendations from sources including the University of Missouri Center for Agroforestry, Cornell University, and multiple books (cited below). We currently have 110 logs producing; while this is a small operation by most standards, it’s been enough to supply a ~30-member CSA and our own household with tasty mushrooms.
Sourcing logs
The ideal wood for shiitake growth is a hardwood species with significant sapwood (mycelium can’t digest the inner heartwood) and dense, tough bark that holds in moisture. Oak, maple, and beech are all recommended choices, though we’ve also had success using hickory (the trick here is to select trees with non-shaggy bark that won’t peel off). Softwoods such as pine or cedar are unsuitable. Logs should be 3”-8” in diameter, fairly straight, and relatively free of defects. You’ll inevitably have to trim a few small branches, but the fewer the better. For our passive-management approach, we prefer thicker logs 4’ long as they retain more moisture and aren’t moved around much, but those intending to regularly soak the logs may prefer shorter, thinner logs.
Sourcing such logs can work hand-in-hand with good forestry practices. If your farm has a woodlot, the ideal log diameter tends to be the size of young trees that need thinning for forest health, or the upper portion of larger trees cut for firewood. If you don’t have your own woods, try contacting foresters or firewood cutters in your area, as your ideal logs will tend to be “waste” material for their purposes, and a productive partnership can be established. Thus, growing shiitakes can have the ecological side benefit of improved forest management and reduction of waste, a potential marketing tool for your mushrooms.
Our preferred time to cut logs is mid-late winter, before the sap begins to flow again; here in Missouri we do the work in February, the convenient low-point of our growing season. On our property, we can source, cut, haul, and stack 20 or more 4’ mushroom logs in a comfortable day, with a few more partial days for the overall work of surveying and selecting the trees and processing the remaining material (branches, firewood, etc.). It takes us another day to inoculate up to 40 logs with shiitake spawn, so in less than a week of winter work we’ve gotten 3-5 years of mushroom production started, along with a nice pile of firewood. We started out inoculating 20 logs per year, but later shifted to 40 every other year for greater efficiency. If we aren’t going to inoculate right after cutting, we stack the logs off the ground, under a tarp, to help conserve moisture.
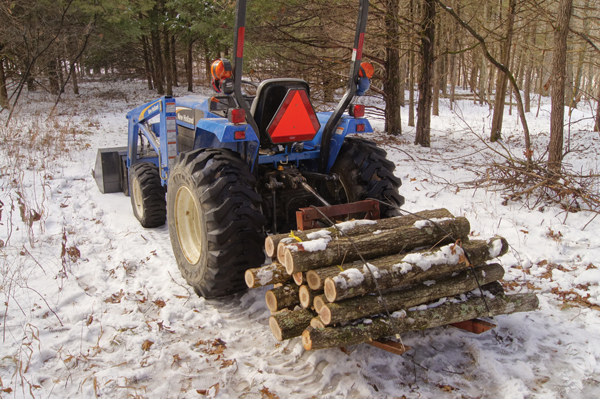
Logs are cut to 4-foot lengths and hauled in from the woods.
Inoculating logs
Inoculation is analogous to planting, and is achieved by introducing a desired shiitake strain into the logs, usually via sawdust that is heavily colonized with mycelium. This sawdust spawn is available for sale from various providers, and five pounds will inoculate roughly twenty 4’ logs. Like vegetable varieties, many strains of spawn are available depending on the preference of the grower. We’ve tended to choose spring/fall strains to buffer our CSA shares during those leaner months; we didn’t need mushrooms in our already-packed midsummer shares.
Proper inoculation gives the shiitakes mycelium a head start compared to competitor or “weed” fungi. Inoculation has three steps: drilling holes into the log, filling them with spawn, and sealing the holes with cheese wax to keep the spawn moist. Organic producers should ensure they use acceptable wax (free from colors or other additives).
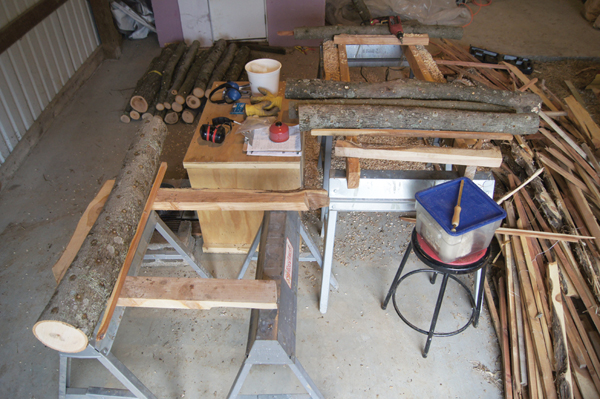
We’ve developed an efficient system for handling logs during inoculation, which appears similar to recommendations given elsewhere. We set up an L-shaped work area in our packing barn, consisting of 2”x4” beams set on sawhorses, on which logs can be placed and rolled from station to station. There are three main work stations, as shown in the image above.

Drilling
Each raw log has holes drilled into it, spaced 6” apart along the log in rows 1.5” apart wrapping around the log, offset to create a diamond pattern. Proper hole depth is achieved with a specialized bit. We use a scrap of wood with marks every 6” to guide the drilling, which need not be precise. In locations with large branch scars or other damage to the bark, we drill a few extra holes to give the spawn an extra-good start around these weak points.
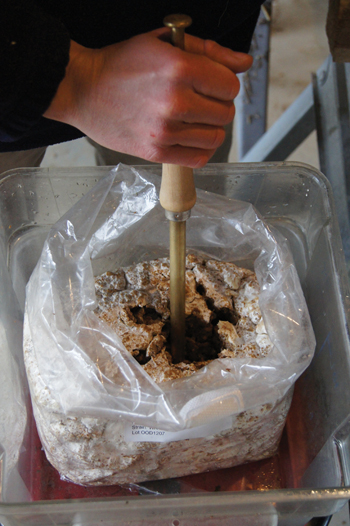
Inoculation. The logs are rolled along the beams to this station, where a bucket holds a 5 lb bag of sawdust spawn.
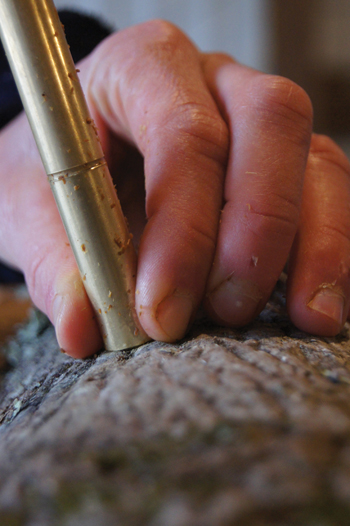
Using an inoculation tool, every hole is properly packed with spawn so it is full but not overflowing; then the log is turned 90 degrees onto the rollers toward the last station.
Sealing
Here the spawn-packed holes are sealed with wax to conserve moisture. On the floor next to this station is a gas camp stove with a pot of melted cheese wax; a special daubing tool is used to cover each hole. The ideal temperature for sealing each hole is around 375ºF, with an acceptable range of about 350ºF to 400ºF. We strive to keep the wax below 400ºF, as 450ºF is the flash point at which it will catch fire. We use a metal candy thermometer to monitor temperature, keeping a fire extinguisher close and flammable materials away. A bucket of water for minor burns is also a good idea. Once logs are sealed, they’re set aside to be labeled and moved outdoors.
Sealing the spawn-packed holes with wax.
Although there are three stations to this system (drilling, inoculation, and waxing), we’ve found it quite efficient with two people, who can shift between stations as needed. Inoculation is the slowest station, so if inoculating with three people, it is essential to have two inoculation tools. The rollers ensure that logs between stages can build up without being in the way. We also label the end of each log with an aluminum tag to help track how different strains grow in different woods, and to monitor the age of the logs. Once everything is up and running, the two of us can achieve an inoculation rate of 8-10 logs per hour. Including set up and clean up, we plan on about a full work day for the two of us to inoculate, label, and lay out 40 4’ logs.

A few specialized inoculation tools are necessary, though the total initial investment is only around $200 plus annual supplies like spawn and wax. We’ve purchased our supplies from Wisconsin-based Field & Forest (http://www.fieldforest.net/), which has provided excellent service and advice. They offer certified organic spawn and wax suitable for organic production. Here’s what we use, though other combinations are possible:
One-time supplies:
High-speed hand drill, essential for one or more days of incessant hole-drilling; ours cost around $100 and has been very handy elsewhere on the farm. Some sources suggest using an angle grinder with proper attachment.
Specialized drill bit, around $15, which cuts just the right size and depth of hole, saving a great deal of time over thousands of holes.
Hand-held inoculation tool, around $35, collects and inserts proper amount of sawdust spawn; an inoculators repair kit (<$10) is also a good idea
Basic camp stove for melting wax. We’ve tried a hot plate, but the element burned out after a few hours of maintaining wax at 375ºF, and we were unable to find a hot plate rated for this task at a price that made sense for inoculating a small number of logs.
Dedicated wax pan. A used pan will work just fine.
Candy thermometer, <$15.
Annual supplies
Logs: if you’re not cutting them yourself, Farming the Forest suggests a value of $1-$2/raw log.
Sawdust spawn: a 5 lb bag, enough for 20 4’ logs, costs around $24, though price varies depending on the specific strain.
Cheese wax, around $15 for enough to do 40 logs.
Wax daubers and aluminum tags are inexpensive.
Fuel for camp stove.
Stacking logs
After inoculation, the logs need to be laid out somewhere they can reside for the next 3-5 years while they produce. Ideally, this would be outdoors where rain and snowfall can maintain their moisture, but shaded and cool to minimize drying. At first we stacked our logs in a somewhat remote stream-bottom location, reasoning that the cool, moist microclimate was ideal. However, we quickly learned that we didn’t check on them there often enough, and lost several rounds of over-grown mushrooms. After that we moved our logs to a site next to our main barn, where a thick grove of cedar trees provides year-round cover so dense that moss grows even on that upland slope. We walk by this location almost every day, making it much easier to keep an eye on production and log condition.
There are many ways to stack mushroom logs; some people stack them in near-vertical teepees or pyramids, others in overlapping cribs, others in one separate layer. This partially depends on your climate; very wet climates may want more airflow around the logs, while drier climates may want the logs close to the ground. It also depends on your fruiting strategy: logs intended for forcing can be stacked tightly as they’ll only produce when desired, while logs intended for natural fruiting need to be more visible and easily accessible for harvest.
Keep the logs from actually touching the ground to avoid colonization by wild “weed” fungi. With our hot, drought-prone Missouri summers, we laid out rails of rot-resistant cedar posts that hold the logs a few inches off the soil. At first we stacked our logs in angled cribs, reasoning that the dense packing would conserve moisture. However, we found that harvest and handling were unwieldy, as getting to mushrooms on the underside of logs meant a lot of manhandling. We switched to laying the logs out in a single layer on long rails with extra space at one end, so they can be rolled aside as needed. This saved a lot of back strain and damage to the bark during harvest and handling.

The current log arrangement at the authors’ farm; side by side on wooden rollers for easy access. Image shows most of their 110 logs.
Maintaining logs
Ideally, mushroom logs should remain relatively moist; if they dry out too much, the mycelium will die. You can take careful measurements of initial log weight and compare them to later measurements to calculate the moisture content of each log, a rough proxy for the health of the organism; this technique is described in both Shiitake Growers Handbook and Farming the Woods (both cited below). After a few years of doing this, and learning about our logs’ behavior in general, we began taking a more intuitive approach to judging log health rather than the significant work involved in weighing logs and making calculations.
We also shifted towards slightly larger diameter logs, since they dry out more slowly. During the severe drought and brutal heat of 2012, we set up a misting system to provide regular moisture, and the logs made it through that awful time. We’ve heard from other growers who practice “benign neglect” with good results, an approach we’ve moved toward as well.
Harvesting mushrooms
So far we’ve chosen the passive approach to mushroom fruiting, letting weather conditions dictate when we got mushrooms. This worked fine in our CSA model, as we just told members they’d get mushrooms when nature wanted them to, and added them to the shares whenever possible. Logs can also be set up for a regular production cycle, soaking a subset each week to induce fruiting, then letting the logs rest for 7-8 weeks before forcing them again.
This is more work, but good for trying to supply a wholesale customer or a regular market presence. Passive management will likely produce two large crops per year, while forced fruiting can produce up to five relatively smaller crops. The total production should remain roughly the same, as will the total production life of the log.
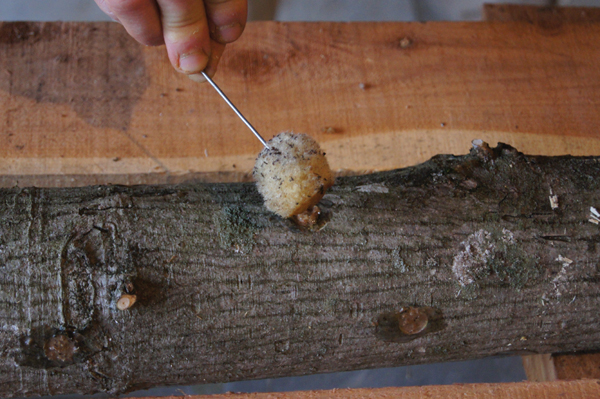
Once the mushrooms form (and they can grow FAST), it’s best to cut them when the veil has just separated from the stem, leaving a nice curled underside, but while the cap is also nicely rounded and not spread out thin and wide. In our experience, getting the timing right usually takes several rounds of harvesting over 24-48 hours as each mushroom grows at its own pace. Another reported benefit of forced fruiting is a narrower maturation window. We use a pair of garden clippers to lop off each mushroom where the stem meets the log, rolling the logs along their rails to ensure harvest from all sides.
Economics of shiitakes
We chose to begin raising shiitakes because the work/reward ratio looked attractive, particularly because most of the former fell during our winter down-season. In a few days’ work, which combined nicely with our existing work cutting firewood and improving our woodlot, we could generate pulses of high-value food for ourselves and our customers. Our 110 logs under passive management have provided on average two harvests per years for our CSA and a nice supply for home use and preservation. We are now considering expanding our shiitake production into a larger, forced approach to generate a regular supply of mushrooms for wholesale and retail, having gained valuable experience at low cost by managing a smaller number of logs for many years.
Another grower in our region, Liz Graznak of Happy Hollow Farm, has followed a similar path in experimenting with minor mushroom production before expanding. Liz started out in 2012 with 35 oak & hickory logs (cut on her farm), adding another 50 in 2014 after three years of successful production. Her logs are laid out teepee style on a frame of wire strung between T-posts, on ground heavily mulched with woodchips, under a dense hardwood canopy. She chooses to force-fruit her logs twice a year and bring the results to market in Columbia, MO, where she sells 35-40 quarter-pound pints for $8 each (roughly $30/lb). She intends to increase her logs again this winter, as she has no trouble selling her current crop, which she considers “very low maintenance, and not much work.” She would like to increase production enough to supply her 80-member CSA as well.
Other resources, such as Farming the Woods, contain detailed and realistic economic analyses of shiitake production. In one example, they suggest that a total of 320 logs, soaked in batches of 40 logs per week during the production season, should yield up to $160/week with about five hours of weekly work, plus the winter setup work. Full-time mushroom production requires a much larger investment of time and resources, but as a diversification crop, shiitakes can be well worth your while.
Shiitakes certainly aren’t the only mushroom that can be grown by market farmers, but they’re one of the easiest and most reliable. A farm can get started with even 10 logs for home production, and expand from there as needed after gaining some experience. Mushrooms are more self-sufficient than most vegetable crops, with relatively few weed or pest problems (other than squirrels and slugs), and a work-reward balance that fits well into the busy lives of market farmers. We consider them akin to perennial fruit plantings, a long-term investment in a specialty crop that should pay off the start-up work with regular crops of high-value products. They’re worth a try!
Resources
University of Missouri Center for Agroforestry, 2008, Growing Shiitake Mushrooms in an Agroforestry Practice, 12 p., http://www.centerforagroforestry.org/pubs/mushguide.pdf.
Cornell University, http://blogs.cornell.edu/mushrooms/factsheets/
Field & Forest Products, a Wisconsin-based dealer in mushroom spawn and supplies (http://www.fieldforest.net/)
Overview of our own farm’s shiitake management on our website, including record sheet templates: (http://cherthollowfarm.com/farm-management/forest-management/shiitake-overview/)
Ken Mudge and Steve Gabriel, 2014, Farming the Woods, Chelsea Green Publishing.
Paul Przybylowicz & John Donaghue, 1990, Shiitake Growers Handbook, Kendall/Hunt Publishing Company.
Mary Ellen Kozak and Joe Krawczyk, 2008, Growing Shiitake Mushrooms in a Continental Climate, 2nd edition, Field & Forest Products, Inc.
Eric and Joanna Reuter own Chert Hollow Farm in central Missouri and they are frequent contributors to Growing for Market.