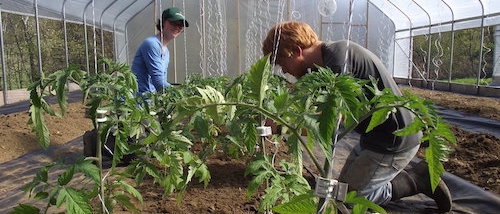
Blueberries have been one of our most successful fruit crops in central Virginia. We have a patch of 40 bushes, some more than 20 years old, some recent gap fillers. We also have a newer patch of 20 bushes. Bushes can begin to bear fruit the second or third year after planting, and reach full production in the sixth year. Highbush blueberries can produce for 30-40 years. Yields settle at about 3 tons per acre, or 4-8 pints (10 pounds) per bush. Exceptional plants can even yield 25 pints per bush.
Blueberries have more holding power than softer berries, and need harvesting only once or twice a week. You could pick a certain number of bushes each day of the week. If carefully harvested, berries can be stored for up to two weeks, but try to avoid chilling them too much or the skins will become tough. The berries do freeze quite well.
A growing season of 120-160 days between killing frosts (20°F) is needed for blueberries. Compared to most fruits, blueberries are relatively cold tolerant. Dormant buds can survive temperatures as low as -30°F. Swollen buds can tolerate 15-20°F. “Pink bud” stages can take 25-28°F. Open flowers can withstand 28°F. Green fruit, however, can be damaged at 31°F.
Blueberries need plenty of bees (honeybees, bumble bees and native bees) for pollination to give a good-sized crop. The average time from pollination to ripe fruit is 50-60 days. The harvest period can be spread over about a month.
Types of blueberries
Apart from the lowbush blueberries grown in the far north, there are three kinds. Northern Highbush are best suited to winter hardiness zones 3-7 (-40°F to 0°F); Southern Highbush zones 6-10; and Rabbiteye to zones 6-10, south of I-40, with winter temperatures above 10°F. Two or more varieties should be planted together for cross-pollination to increase yield and berry size. With rabbiteyes, cross-pollination is essential. Rabbiteyes and highbush types do not cross-pollinate each other.
Rabbiteyes can survive in drier soils than highbush types, and require only one third as many chilling hours as highbush types, which need 650-850 hours below 45°F.
Rabbiteyes grow up to 30’ tall, if not pruned. Highbush blueberries grow from 4 to 10 feet tall. Southern Highbush varieties have been bred for resistance to cane canker.
We grow Northern Highbush in zone 7, and we have not had any trouble with providing them enough chilling hours. I’ve never grown rabbiteyes or lowbush bleberries, so this article is about highbush types.
Highbush varieties
In November 2007 we planted four each of five varieties with differing days to maturity: Duke, Spartan, Bluecrop, Chandler and Aurora. It quickly became obvious that Spartan wasn’t suited to our climate – 3 of the 4 died. Duke is very early and has a good flavor. Bluecrop is early-mid, with large berries of very good flavor. Chandler is mid- to late-season and also tastes good. In some years it matures here before Bluecrop. Aurora has large berries, with only a so-so flavor compared to the others. But its late maturity extends the season, and we like it for that.
We have replaced dead bushes mostly with Duke or Aurora, but also some Bounty. Another grower near us recommends Duke and Ozark. He has had several Daro die on him.
We have been pleased with Finch Nurseries in North Carolina danfinch.com/berrys.htm (800-245-4662). They sell Northern Highbush, Southern Highbush and Rabbiteye varieties, all bare root, in quantities from one to 1000, and at ages of 1, 2, 3 and 4 years old. Buying 1000 reduces the cost per plant to half of the individual plant price. Fall Creek Nursery fallcreeknursery.com (541) 937-2973 is a big wholesale nursery in Oregon. 500 plants is their minimum order for most types. Their website has lots of useful information, and will help you choose suitable varieties. They also provide information about field planning, planting and care. Nourse Farms noursefarms.com sells 11 varieties of Northern highbush in 10-500+ lots for commercial growers.
Planting
If your goal is to produce maximum fruit, then choose a site with full sun. The site must be well-drained - blueberries will not tolerate standing water or waterlogged soil. Soils high in organic matter, capable of holding moisture without becoming sodden, are ideal.
Blueberries will grow in shade (among mature trees), but the yield will be less due to shortage of light. Because blueberries are shallow rooted it is possible to grow them in normally wet areas if well-raised beds are used.
Spacing within the row is generally 3-8 feet. Three feet will form a hedge, 5-6 feet is a more common spacing. Rows are generally 8-12 feet apart. For large plantings, 900-1100 plants per acre will be required for highbush varieties. Cheaper than mulch between the rows is a fine-leaved fescue, bluegrass or orchardgrass, mowed monthly, which is competitive with weeds.

Growing cover crops 4-12 months ahead of planting will help stabilize pH, control weeds and provide the high organic matter blueberries thrive in. Blueberries grow well with a soil pH of 4.5-5.5, so get your soil tested and, if necessary, amended. On loam soils, add 1.2#/100 sq ft of sulfur to reduce pH from 5.0 to 4.5; 3.5#/100 sq ft to reduce from 6.0 to 4.5. Sandy soils require only half as much sulfur; clay soils need 50% more. Retest every couple of years. Organic fertilizers release nitrogen initially in the ammonium form, which converts into (less useful to blueberries) nitrates. Having acidic soil slows this bacteria-controlled conversion. Additionally, acid soil makes iron available to the plant. Iron is essential for strong plant growth but blueberries, unlike many other plants, are unable to secrete their own acid to dissolve the soil iron. Iron deficiency shows as leaf yellowing only between the veins. Some organic growers report that blueberries grown with high organic matter will perform well at pH as high as 6.0. Blueberries have a medium level requirement for potassium and a low phosphorus need.
Planting season is while the plants are dormant, November to May depending on your climate zone. Build beds or ridges and incorporate compost into the top 8” of the soil – blueberries have no tap roots. If you have access to an established blueberry planting, get some soil from there to add to planting holes for new bushes. This soil is more likely to contain the mycorrhizal fungi that form symbiotic associations with blueberries, giving them more access to nitrogen and phosphorus from the soil.
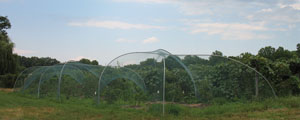 Bird netting is suspended above the blueberry bushes on "spider-house" frames of PVC electrical conduit.
During planting do not let the fibrous roots dry out, freeze or be exposed to sunlight. They are easily killed. Dig appropriate sized holes, add compost, then fan the roots out in all directions in the hole. The roots should be only 0.5-1” below the surface. Bring the soil back over the roots and firm well around the stem. Add a 3-6” layer of organic mulch after planting (which the roots will later grow into). Only 10% of the roots will go deeper than 24”. The mulch will help conserve moisture, as well as deter weeds and can double the yield you would get without organic mulch. Pine needles, wood chips and coarse sawdust are ideal. Avoid fine sawdust which can clog into layers impervious to water. If you have provided plenty of compost in the planting hole you will not have any of those famous problems of wood-based mulches tying up the nitrogen and causing plant deficiency.
The entire root zone should always be kept damp. Mature plants need 30-40 gallons of water per week, or 1-2” three times per week. In most situations, an irrigation system is needed. We have used drip tape, and are pondering switching to Orchard Tubing (heavier duty pipe with enclosed emitters, also known as in-line dripper tubing.) Some growers prefer microsprinklers because they wet more of the area. It is better not to water every day – the intervals encourage the roots to go a bit deeper and become more resilient.
Pruning
Blueberries are sensitive to daylength. Next year’s buds form in August and initially all buds are vegetative (leaf buds). As the days shorten going into fall, some vegetative buds at the tips of the canes convert into flower buds. Long daylength and high temperatures will reduce the number of buds that convert to fruit buds, as will early fall leaf drop. This is explained well in Reproductive Growth and Development of Blueberry from IFAS, University of Florida: edis.ifas.ufl.edu/pdffiles/HS/HS22000.pdf.
Some sources recommend pruning right after the fruiting period. We prune in February in a mild spell. Late winter pruning is easier in that the fruit buds and the vegetative buds are easy to tell apart. Pruning reduces the yield for the next season but increases the size of the berries and causes an earlier and shorter harvest period. It induces longer and thicker shoot growth the next season, which improves the fruiting potential for the year after next. Each year, new canes will grow up from the base of the plant. Each succeeding year, the canes produce laterals (branches), and existing laterals sprout smaller laterals, which can lead to a twiggy mass of spindly unproductive growth, and berries that are very small.
1-2 year old bushes: remove all flower buds (the plump round ones). Remove tiny weak shoots and leave a sturdy bush. Remove all dead, diseased, damaged and dying wood.
Bushes 3 years and older:
Remove all dead, diseased, damaged and dying wood.
Decide whether to propagate. If so, scrape the bark on the underside of a low-lying branch, pin it down to the ground, weight the pin down, and flag it. Or cut 3-5 bud hardwood sticks (not flowering tips) and root under misters. (We have had much more success with the layering method.)
Remove branches that rub on each other, low-lying branches, those heading towards the center of the bush, those that will hit the roof or walls of the netting.
Steps 1 and 3 constitute “Shaping Cuts.” Steps 4-6 are “Thinning Cuts.”
Count the thick old trunks bigger than 1.5” diameter, divide by 5 and saw out this many, at ground level, (unless it would leave fewer than 6). Choose the oldest, scaliest, darkest ones for removal.
Remove a portion of the younger canes, to leave a balance. The ideal is roughly 20% thinner than 1” diameter, 60% 1-1.5”, 20% larger than 1.5” diameter. Don’t remove more than 50% of the fruit buds in total, but don’t fret about removing up to this number. If the bush carries too much fruit, berries will be small, branches break and the lifespan of the bush gets shortened.
Remove spindly twiggy clusters. Berry size is directly related to wood thickness. Wood less than 0.1” in diameter produces very small berries.
Fencing & bird protection
Large blueberry patches rely on bird scaring techniques like attracting barn owls and purple martins (which are insectivorous and territorial), or reflective tape, fake owls, or sound devices broadcasting robin distress calls.
Our older blueberry patch is alongside some trees which harbor birds, deer and groundhogs (bad choice!). I inherited it along with its post and wire structure to support bird netting. We put old basket balls and soccer balls on the tops of the posts so that the netting slides over more easily. Just cut a cross in the ball big enough to let you push the ball down onto the post, with the horizontal wires coming out of the cuts in the ball. This works well unless wasps or squirrels nest inside the balls during the off season! We have a Tenax Cintoflex M 6.5’ Black Heavy Duty Deer Fence ($220 for 300’ in 2008 and still doing well in 2014). Then we added a wire mesh fence over the bottom couple of feet and down into the ground and flat under the surface, to keep rabbits and groundhogs out. We had heavy critter presence! During the flowering and fruiting season we add bird netting over the top. We have used the standard 0.75” square mesh plastic netting, clipped together to make one big piece.
In future I would buy the nylon netting that we have on our new patch, as it’s so much easier to use, to store and it’s much longer lasting (less likely to produce holes in any given season.) It’s from Lee Valley leevalley.com/US/garden/page.aspx?p=10444&cat=2,51555 We chose the 12’ width, 0.5” mesh, and stitched two lengths together using nylon thread making a piece 24’ wide. It should last a long time. It isn’t cheap, but it does not ravel when cut, or snag on itself. At the end of the season it can be stuffed in a bag, with just one end poking out of the neck of the bag. Each May, we drop the bag at one end of the patch, pull the free end of the netting up over the framework and along to the other end.
Our newer patch is not beside the woods, but near a busy path. (We learned our lesson from the old patch!) We had hoped not to need any netting at all, but that was a dream. We considered several options for a hooped structure that is seasonal only, and easy to use.
PVC piping is often recommended for small hooped structures. See Constructing a Simple PVC High Tunnel hightunnels.org/constructing-a-simple-pvc-high-tunnel. There is a smaller design “Portable Field Hoophouse” at cru.cahe.wsu.edu/CEPublications/em015/em015.pdf
How we did it
We made a “Spider-House” temporary framework, an idea used for temporary field hoophouses. It consists of pairs of bows fastened together at the apex, and spread out into a 4-legged structure. A row of these make up the frame. The spiders are stronger than simple bows, and the whole thing can be dismantled relatively easily.
We chose PVC electrical conduit, which is relatively cheap. Plastic electrical conduit, unlike water pipe, is UV-inhibited for outdoor use. Lengths have swaged (flanged) ends, so can be glued without any separate connectors. It’s lightweight, no bending tools are needed (unlike for metal conduit or fencing top-rail). The hoops pack flat for out-of-season storage.
For our 16’ x 65’ patch, we decided on three “spiders.” We bought 18 x 10’ lengths of 3/4” PVC electrical conduit. We glued them in threes to make 30’ lengths. Our calculation was that 30’ hooped into a half circle would have a diameter of 19’ (circumference = pi x diameter). So we reckoned on having the ends of each pipe 19’ apart, across the patch. Applying Pythagoras leads to a 12.5’ spacing along the length of the patch for a width of 16’ and a diagonal of 19’. We don’t need perfect half-circles, but we did need a rough idea of a workable length.
We marked the center point of each length, then matching centers, tied a pair of lengths together with square lashing to form a cross shape.
We hammered six x 4’ lengths of rebar halfway in the ground along each long edge of the plot, 12’ 6” apart. We pop the spider legs over the rebar, making sure all the lumpy knots are on the underside of the hoop crossovers, to make it easier to pull the netting over. We pin the netting down every 18” round the edges with 6” sod staples/landscape pins. We have a doorway along the central seam, simply held closed with clothes pins. With hindsight I would put the spiders closer than 12’ 6” so that the netting doesn’t take such big dips between the apexes of the spiders.
Harvest
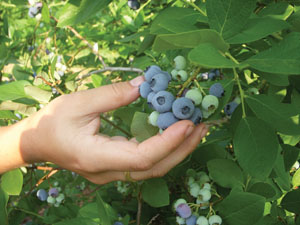
Berries are ripe when they are fully blue in the area around the stem. This is the hardest part to see, and we find the berries are easily knocked off before they are fully ripe. The dark blue color of the berries comes from the health-bestowing anthocyanins. Some varieties look pale due to a waxy bloom on the skin. This rubs off to demonstrate the full complement of anthocyanins, and it has the added advantage of protecting the berries from spoilage. If possible, pick berries for sale directly into the containers they will be sold in. Minimizing handling will help preserve quality. Use harvest containers that hang around the neck or tie around the waist, so that both hands are free for picking. Do not pack berries more than 5” deep, to prevent damage.
Picking the berries does take time (10-15 experienced pickers per acre), so this may be a good U-Pick crop, if you go for a large planting. At a workshop I attended, a U-pick grower recommended installing a “Sin Bin” near the exit, for people to make donations for the berries they ate! It is possible to use a homemade rolling catch frame or a toddler paddling pool to ease harvesting –search online for blueberry catch frame images or see fruit.usask.ca/articles/CherryCatchFrame.pdf.
ATTRA, Cornell and PALS Publishing all have guides to blueberry production. The Virginia Small Fruits Page virginiafruit.ento.vt.edu/VirginiaSmallFruitSite.html has information on pests.
Pam Dawling is the garden manager at Twin Oaks Community in central Virginia. Her book, Sustainable Market Farming: Intensive Vegetable Production on a Few Acres, is available at sustainablemarketfarming.com,


 It is challenging to manage apple pests with organic methods. Fortunately, this is one part of orcharding where it’s possible to improve over time. It’s hard to change varieties or tree spacing in an established orchard, but you can fine tune your pest management practices from year to year and learn as you go.