Managing weeds so they don’t interfere too much with crop growth or harvest can suck a lot of time from market growers. I’m grateful the weed-choked plots I had when I was growing full-time are now a distant memory. I recall afternoons as a new grower furiously pushing the wheel hoe between rows of veggies choked with foxtail grass or hand weeding so much that my hands cramped and when I closed my eyes to sleep I saw the outlines of weeds against the blackness of my eyelids.
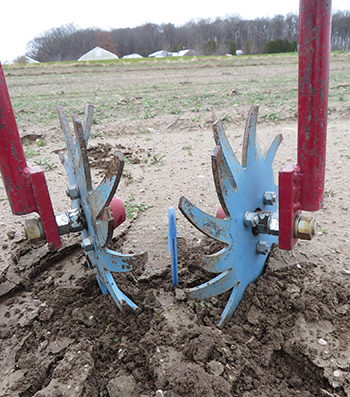
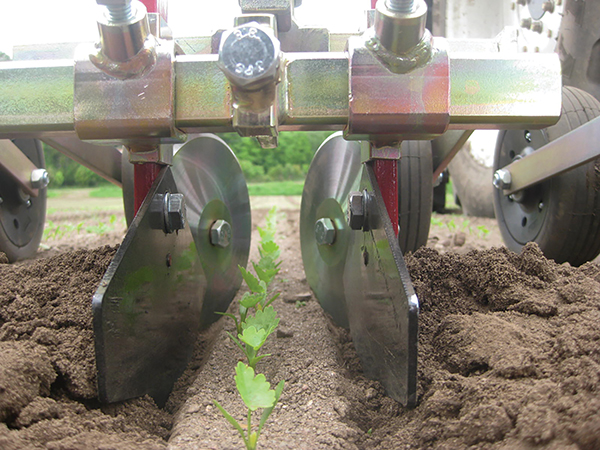 Looking from behind these KULT-Kress duo cut-away discs as the tractor moves forward. The cut-away discs up front are angled toward the row to cut soil away from the row. They get extremely close to the row. There are L-blades running behind them.
In my experience those times and feelings are a part of vegetable growing, but also nice to find oneself in that situation less. And so this article is about tools you might think about when considering improvements to manage weeds and techniques you can consider from a weed management perspective when designing your overall growing system.
There is an important distinction to be made before jumping in. There are two ways to think about weed management: the weeding tools to manage weeds and the system that those tools fit into. In this article we’ll discuss hilling, finger weeders, and other ways to physically control weeds, but remember that the tools are part of the bigger picture of your cropping system.
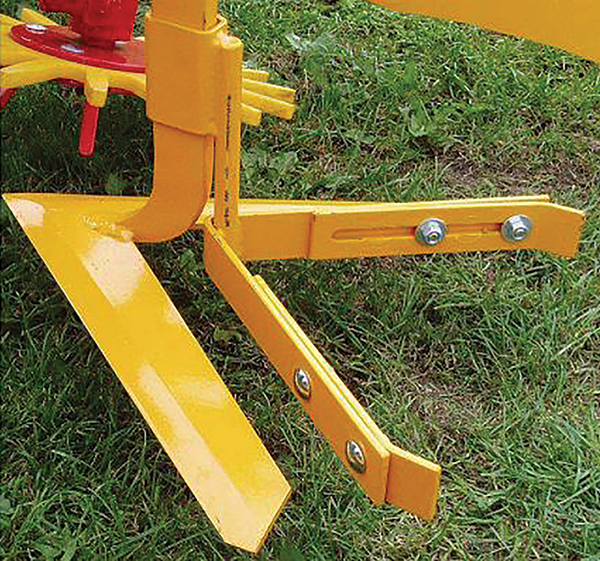
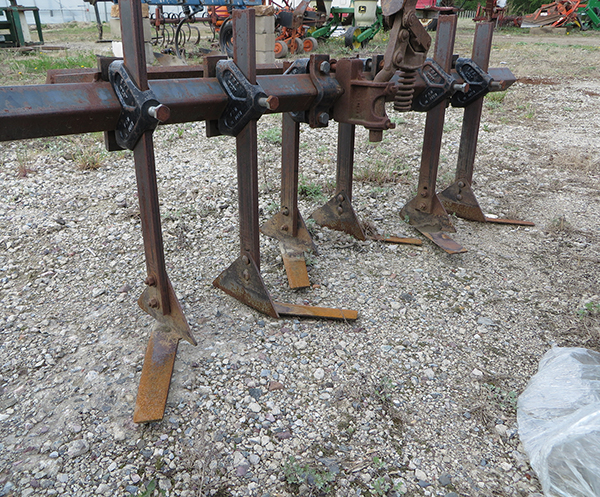 L-blades, also known as “beet knives.” L-blades can be used by themselves, as in this example, or behind another implement, as on the facing page where they are running behind cut-away discs.
Your cropping system can be designed to manage weeds. Your crop rotation sequence can control weeds, the rotation of your tillage can control weeds, and the cover crop varieties, densities, and management can be used to control weeds. These are the bigger systems that will really aid your weed management and make your weeding tools more effective. We’ll save for another article the discussion of how to design a bigger farming system to assist in managing weeds.
While we could spend time on the minutiae of different tools, let’s keep it simple. Being aware of some basic rules and applying them to your farming practice can bring big improvements. Here are some weeding principles that I have observed and learned from others that can’t steer you wrong.
Stale seedbedding
For small, slow growing and direct-seeded veggies (such as carrots and beets), plan the time for false-seedbedding. These vegetables germinate slowly and then grow slowly. They need a head start on the weeds. Use the false-seedbed technique to achieve this by encouraging weeds to germinate in your plot and then killing them just before planting. While insects and birds can kill weeds as seeds, we as farmers can only directly kill weeds once they have germinated.
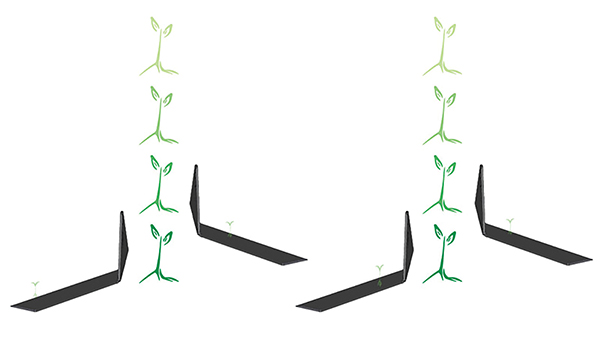 This diagram shows how L-blades are oriented to the row of young plants, courtesy of Tilmor. The front edge of the L-blade is sharpened so that it will cut crusted soils without pulling out chunks of soil from inside the row that might kill the crop. Tilmor shows the L-blades offset from each other. Offsetting cultivation tools allows residue to flow between them better and can prevent clods of soil and stems from clogging up weeding tools.
You can do this by preparing your seedbed seven to ten days before planting your crop. The fine soil exposes weed seeds to light and releases a flush of nutrients, both encourage weeds to germinate. Some farmers will even water their weeds by irrigating the weeds for germination. Once you have a carpet of weeds in their cotyledon stage, go through with light tillage to kill them and prepare your final seedbed.
A hot tip is to till as shallowly as possible to kill these weeds, so that your tool does not bring up more weed seeds from deeper than two inches. Alternatively, a tarp or landscape fabric can also be used to stimulate weed germination by warming the soil and keeping it moist, and it will also kill germinated weeds by denying them sunlight. If you want to learn more, this false-seedbedding article by Charles “Merf” Merfield is the best I’ve seen (https://tinyurl.com/59nyevap).
 A mini-ridger mounted behind a sweep. All images courtesy of the author except where noted otherwise.
Tools that work well for stale-seedbedding include a packer or roller to press down the stale seedbed after the initial tillage. This makes good seed-soil contact and re-establishes the soil’s capillary action, allowing the soil to wick water up to the surface from further below and watering the weed seeds you want to germinate. Implements for this purpose are cultipackers, a lawn roller, or anything heavy and round that will press the earth down and make it firm rather than fluffy. Cruise facebook marketplace, craigslist, auction listings, and your agricultural neighbors. Sixty-year-old cultipackers are often sitting in fence lines, and a 12 foot wide model can be split into several 4 foot widths for you and your false-seedbed pals.
To till shallowly to kill weeds but not bring up more weed seeds, fit your rototiller or rotary harrow with a depth gauge so that you control how deeply you till. It is for this reason that BCS came out with a precision depth gauge. There are others and you can make your own. On a 4-wheel tractor, attaching a roller off the back of the tillage implement that is controlled by a hydraulic cylinder makes it possible to control tillage depth accurately from the tractor seat.
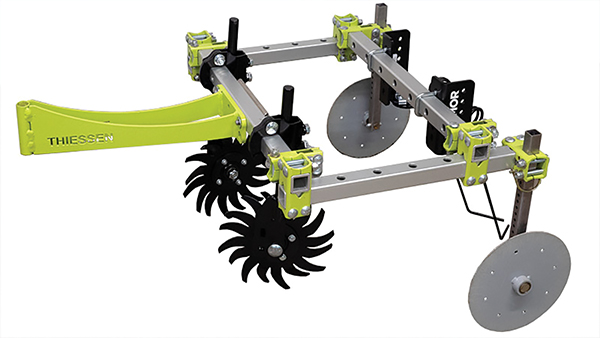 With this Thiessen walk-behind tractor cultivator, you can see the Spyders up front with the front of the Spyder angled towards the crop row (set to pull soil away from the row) with torsion weeders behind to weed in the crop row.
Alternatively, a basket-weeder with shallow sweeps set in the rows (between the baskets) can till a bed top shallowly to kill weeds. Both Buddingh and Tilmor offer such sweeps and clamps with their basket weeders.
Some growers make stale seedbedding implements designed specifically to till very shallowly. You can see an example in Merf’s article. A tine-weeder can also be used to work the soil shallowly and kill small weeds, but run it at least twice in opposite directions to kill most weeds. Also, the weather after your false-seedbedding tillage pass will determine whether exposed weed roots wither under the hot sun or if they are watered back in by a period of clouds and rain.
Timing of cultivation
So much of cultivation depends not on the tool, but on the timing — mostly soil and weather conditions. Often there are windows as short as a few hours when soil conditions are ideal for mechanical weed control. Be there. Even with a less-than-ideal tool, if you can observe when the soil and weeds are good for weeding and use that tool at the right time you’ll do an effective cultivation.
Also, for small, slow growing and direct-seeded veggies assure conditions for rapid crop growth and plan the time and tooling for flame weeding. The many days that these seeds take to germinate leave a big period of time for weeds to germinate before the crop creating a lot of hand weeding. After false-seedbedding you plant your crop, but carrots won’t be up for maybe five to seven days.
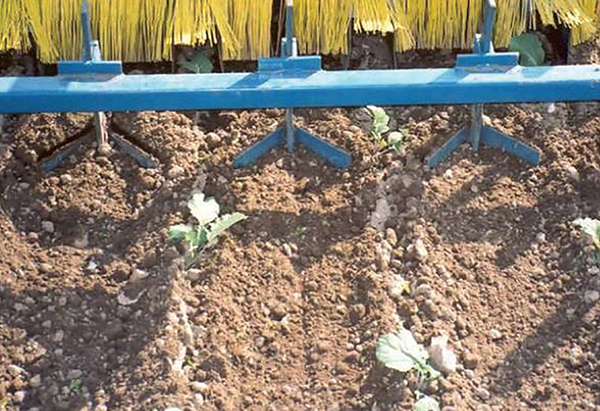 Mini-ridgers hilling up soil around cabbage transplants.
Provide the conditions those seeds need to germinate quickly. Generally, that means consistent moisture, healthy soil biology, and adequate pH and fertility. Observe your plant density. If you are running weeding tools right, then you will be killing a small percentage of your crop. You want plants dense enough in the row and rows close enough that mature plants shade out weeds. It may be that when using new weeding tools, or when you start using them more effectively, you need to increase your planting density.
The days before crop germination allow you time to kill weeds before your crop is up. Often growers will plant another veggie along with the slow-growing crop to act as an indicator. You can plant beets with carrots, or radishes with beets. The beets will pop up a day or two before the carrots, and the radishes will pop up a day or two before the beets. When that indicator plant faintly pops above the soil you know that you have let the maximum amount of time pass since planting your crop and your crop will germinate soon. So, it is time to flame-weed to kill weeds that have already germinated but just before your crop pops up. The consensus is that flame-weeding can reliably kill broad-leaved weeds but will only set grasses back by about a week, which can still be helpful.
Tools that work well for flame-weeding include, well, flame weeders. Even though a flame weeder may only be used a few times per season, like all weeding tools, when they are used in the right window of crop development, weed development, and soil conditions they will be worth their keep. Flame weeders can either be manually powered, with a propane tank pushed in front of you or strapped to your back, or mounted behind a 4-wheel tractor. Realize that the valuable real estate for a flame weeder to work on is right over the row and an inch or two on either side the in-row area and thereabouts.
Weeds that come up between crop rows are much easier to deal with. I prefer flame weeders with shrouds that block the wind and direct the flame right onto the soil. For example, Farmers Friend offers a separate shroud for their tool. Your goal is to produce enough heat (through propane supply, blocking wind, and speed of running the tool) to kill weeds. I would not use a roofing torch or an unshrouded flame weeder and expect it to kill weeds consistently in varied conditions. Don’t worry about hurting soil biology with a flame weeder because the temperature does not rise much in the soil. You’ll know you are killing weeds when after torching them, the leaf surface is glossy and your thumb pressed onto the leaf leaves an imprint.
Tine-weeders can be great when your crop is rooted better than the weeds and you don’t have a hard soil surface crust. When your crops have rooted, a tine-weeder can rake the top half inch to two inches of soil surface with vibrating tines that pull out shallowly rooted young weeds but not your better-anchored crop (mostly).
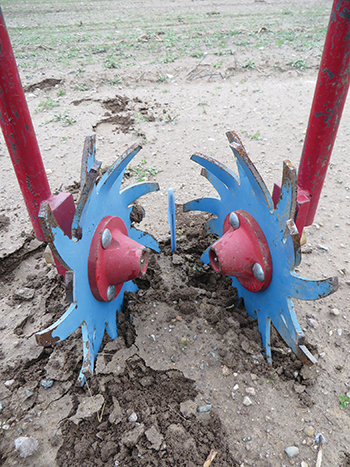 Spyders set to pull soil away from the crop. On heavier soils that can crust and wet soils, instead of hilling loose soil, hilling discs can throw a ribbon of clodded soil that can injure plants and not effectively bury weeds. For these conditions spyder weeders are better for hilling because spyders crumble soil as they move it. To hill soil, just reverse the tool working angle that was used to pull soil away from the row.
About seven to ten days after transplanting, plants usually pass the ‘tug test,’ where you pull on them to see if the roots have left the safety of the potting soil and ventured out into the great soil beyond. If the transplants are healthy and rooting in the soil, then they should stay rooted as a tine-weeder passes over them (same goes for established direct-seeded crops). Like most things on the farm and all cultivation being aware of crop, weed, and soil conditions allows you to identify that crucial window when tools will be effective.
You want to be aware of your soil type. Soils that develop a hard surface crust need to be tine weeded soon after a rain before they tighten up because that crust can be impenetrable to the tines. Some growers will irrigate not for their plants, but to make the right soil conditions for cultivation. Here is a link to a video explaining the tine-weeder made by my former classmate at Michigan State: https://tinyurl.com/ya8annht.
Tine weeders can be hand-tools (like the one from Two Bad Cats), walk-behind tractor tools (like the one from Tilmor), or 4-wheel tractor implements (like the ones from Einbock and Treffler, among others). The tines can be angled to be more or less aggressive, and faster speed will also be more aggressive. When using weeding tools the first adjustment to make is the easiest, play with your speed. Fast is more aggressive, slower will move less soil. Sometimes changing your speed is the only adjustment you’ll make.
Throwing soil
For the first cultivation pass with small plants you generally want to pull soil away from the plants and not move much soil towards the row. Generally, there is a progression in cultivating, changing how you move soil to match the crop’s growth. At first when the crop is small, soil is pulled away from the plants to kill weeds as close to the crop row as possible. The difficulty in this operation is getting close to the crop row without moving soil into the crop row that could bury young plants. This first cultivation is usually done slowly to get as close to the crop as possible. Later cultivations can be done at a faster speed.
Cut-away discs are my favorite tool to get close to the crop row. But they require precision to get close. Planet Jr. made these and you can find them used. Check out facebook groups for walk-behind tractors and Planet Jr. tools. KULT-Kress also makes the duo cut-away discs. You can see these in the picture looking behind the tool as it moves forward. The cut-away discs up front are angled toward the row to cut soil away from the row. They get extremely close to the row. There are L-blades running behind them. You see how those parsnips have their first true-leaves? I have found it a rule of thumb that smaller direct-seeded crops are ready for their first cultivation pass at first true-leaf.
.png)
Another tool that works on the same principle and can be used in rougher soils or larger crops are Spyder weeders. These are like serrated/toothed hilling discs. In the picture of a Thiessen walk-behind tractor cultivator, you can see the Spyders up front with the front of the Spyder angled towards the crop row (set to pull soil away from the row) with torsion weeders behind to weed in the crop row.
L-blades, also called vegetable knives or tender plant hoes, are shaped so that they cut the soil next to the crop row and do not move soil into the crop row. Pictured is a diagram of how they are oriented to the row of young plants, courtesy of Tilmor. You see that the front edge of the L-blade is sharpened so that it will cut crusted soils without pulling out chunks of soil from inside the row that might kill the crop. You’ll notice that Tilmor shows the L-blades offset from each other. Offsetting cultivation tools allows residue to flow between them better and can prevent clods of soil and stems from clogging up weeding tools.
Basket weeders look complicated, but are just rolling baskets connected with a chain, turning at different speeds to shallowly crumble the soil. This implement moves so little soil from side-to-side that it can be run close to the crop row when plants are small. Basket weeders can cultivate several rows at a time. I’ve seen them made for one row up to seven tightly spaced rows. Cultivating more than one row at once is a big leap in complexity and plants and seeds must be planted in accurate rows to allow cultivating more than one row at a time.
For multi-row cultivation you either need to accurately mark and then plant your rows, or better, seed all of your rows at once with a multi-row planter or transplanter. Basket weeders are available for both walking tractors and 4-wheel tractors from Buddingh and Tilmor. Here is a link to a video on basket and finger weeders from Sisters Hill Farm: https://tinyurl.com/36nzcr6e. And here is a link to a clip explaining basket weeders from the best weeding tool video series ever made (#OGWeedSlayer) https://tinyurl.com/3j5rzyda.
As crops mature, weeds in the row can be killed by throwing soil into the crop row. Through many cultural techniques (including the false-seedbed), you want your crop to always be larger than the weeds. If this is true, then hilling is a great way to control weeds later in the crop’s life. Throwing soil into the row was traditionally the only way to control in-row weeds.
Hilling soil
Hilling discs work well for controlling weeds in the row. These can be angled to throw more or less soil into the row. They will often be on round shanks set in clamps that attach to a toolbar. The round shank allows you to change the disc’s angle towards the row which changes how much soil is being thrown into the row. There are hand-tool models that hill soil that need to be run on either side of the crop row. There are wheel-hoe mounted models that also need to be run on both sides of the crop row. It is nice to hill both sides of the crop row at once in my opinion. In addition to half as many passes, it allows you as the operator to balance the soil flow.
On heavier soils that can crust and wet soils, instead of hilling loose soil, hilling discs can throw a ribbon of clodded soil that can injure plants and not effectively bury weeds. For these conditions I favor using Spyder weeders to hill because Spyders crumble soil as they move it. To hill soil, just reverse the tool working angle that was used to pull soil away from the row.
There is a seldom-used tool (at least in the United States) that does the most accurate hilling: mini-ridgers. While our field-crop farming counterparts use ridgers extensively to bury in-row weeds, they are not really used for vegetable production. In the photo you can see mini-ridgers hilling up soil around cabbage transplants and a mini-ridger mounted behind a sweep. Because the depth of the metal bar determines the height of soil hilling, these tools allow greater accuracy in how much soil is moved into the row. Again, for a deeper dive on these tools (and also burying weeds), Merf is the authority. Check out his article here: https://tinyurl.com/mpe4abxa. For veggies, mini-ridgers can be many types of bent metal. Heck, make them yourself. As far as I know, these tools are only commercially available from Sutton Ag (Steketee brand) and KULT-Kress.
Of course I could not talk about controlling in-row weeds without mentioning finger weeders. These are plastic fingers that rotate through the crop row disturbing the top inch or two of soil. Your crop needs to be rooted more deeply than the tool working depth to resist the finger’s crumbling, but if there are small weed roots in the top inch or two, they will be uprooted and pulled out of the row.
Here is a link to a video explaining the finger weeder from my professor Dan at Michigan State: https://tinyurl.com/283dx3bc. And this video from Willowsford farm shows L-blades working with finger-weeders: https://tinyurl.com/4uekwszk. Finger weeders only weed the narrow 2 to 3 inch in-row band. They will not bite into the soil if it is crusted. A good practice is to run some type of sweeps or knives ahead of the fingers so that soil is loose for the fingers.
You can either have sweeps mounted ahead of the finger-weeder (such as in the Willowsford farm video) or make a pass with sweeps, switch implements, and then make another pass with fingers. This will depend on how many rows you are cultivating at once. For 3-row walk-behind tractor cultivation there isn’t enough space on a walk-behind toolbar to fit both sweeps and fingers. But when cultivating one row at a time you can fit both knives and finger-weeders on a single implement.
While hand-powered tools are neat (and often cheaper) I would caution against relying on a wheel-hoe for accurate hilling or finger weeding. Speed is such a great way to control how aggressive these tools are, and you can’t really change that with a wheel-hoe. Instead, walk-behind tractors and 4-wheel tractors allow finger weeders and hilling tools to be used to their full potential.
Keep the big-picture of your farm in mind when it comes to your weeds. Weeds are only a problem when they interfere with crop growth or harvest. The goal is not perfectly clean fields (because those don’t make you money, unless you are an Instagram star). Rather, the goal is a population of weeds that don’t take too much time to manage and don’t interfere with our crop.
To do this, you want your weed population to be getting smaller each year, not growing. This means that weeds that produce seed will really set you back. Realize that one lamb’s-quarters or kochia or bindweed or galinsoga plant going to seed can be a much bigger problem next year than 10 or even 100 non-reproducing plants are now. So marshal your precious weeding resources smartly.
Field walks with time for hand pulling reproducing weeds is the tool that works well for preventing weeds from going to seed. It is important to train those who help you to know it is important and worthwhile to kill weeds going to seed and what to look for.
There you have six tips for cultivation that can’t steer you wrong and some tools to help you implement them. I hope that you find something helpful. I always enjoy talking vegetable growing, weed management practices, and weeding tools, so do feel free to get in touch.
Sam has worked in many roles on vegetable farms in Wisconsin. He earned a Master’s degree in Horticulture at Michigan State University focusing on weeding tools, then designed and sold weeding tools for KULT-Kress in Europe and the US. Sam organizes the Midwest Mechanical Weed Control Field Day. Currently he is a Direct Market Vegetable Specialist for UW-Madison Extension. He especially appreciates sharing his love of plants with children in his community. Feel free to contact Sam - [email protected].