


This article is about harvesting garlic, and also about the byproducts of garlic growing that make good crops in their own right: the scapes from hard-neck garlic, which are harvested about three weeks before the garlic bulbs, and garlic scallions, which can be harvested even earlier, in the spring. Here in zone 7, with a last frost date of 20-30 April, we are harvesting garlic scallions from early March until May, depending how long our supply lasts, and when we need the space for something else.
There are two basic kinds or garlic, hard-neck and soft-neck. (Elephant garlic is really a leek). We grow mostly hard-neck because we like big cloves to make life easier for cooks serving a hundred people, and because we only need bulbs, not braids. Soft-neck garlic is easier to braid, and stores later in the spring without sprouting, but usually has small cloves. We grow a small amount of a Polish White/New York White soft-neck, which has relatively large cloves, to use after the hard-neck is finished. Dr Gayle Volk has done DNA finger-printing on 211 varieties of garlic. She found massive duplication (the same garlic with many names), and created a Garlic DNA Map (see Resources).
Garlic scallions are small whole garlic plants, pulled, bunched like onion scallions and used chopped and cooked in stir-fries and other dishes. They are mostly green leaves at this point, although the remains of the clove can also be eaten. Hard-core garlic lovers eat them raw like onion scallions. They provide an attractive early spring crop. To grow garlic scallions, save the smallest cloves when you plant your main garlic crop, and plant them close together in furrows, simply dropping them in almost shoulder to shoulder, any way up that they fall. (If you’ve just finished a large planting of main-crop garlic, you’ll probably be too tired to fuss with them anyway!) Close the furrow and mulch over the top with spoiled hay or straw. You could plant these next to your main garlic patch, or in a part of the garden that’s easily accessible for harvest in spring. Or you could plant your regular garlic patch with cloves at half the usual spacing and pull out every other one early. Do think about quantities, though. If we double planted, we’d have over 7,000 scallions, far more than we could use. The danger with double planting is stunting the size of your main crop by not thinning out the ones intended for scallions in time. We plant our small cloves for scallions at one edge of the garden, and as we harvest, we use the weed free area revealed to sow the lettuce seedlings for that week.
Harvesting is simple, although depending on your soil, you may need to loosen the plants with a fork rather than just pulling. Trim the roots, rinse, bundle, set in a small bucket with a little water, and you’re done! Some people cut the greens at 10″ tall, and bunch them, allowing cuts to be made every two or three weeks. We tried this, but prefer to simply pull the whole plant once it reaches about 7-8″ tall. The leaves keep in better condition if still attached to the clove. Scallions can be sold in small bunches of 3-6 depending on size, for $1.50-2.00. If you do have more than you can sell in the spring, you could chop and dry them, or make pesto, for sale later in the year.
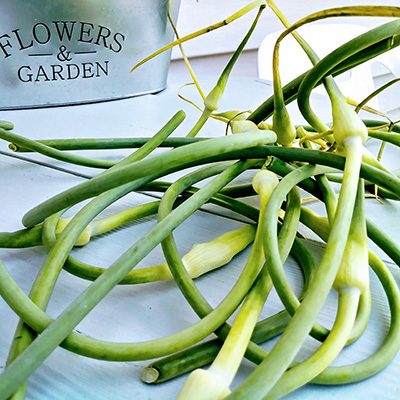
Garlic scapes (shown above) are the firm, round seed stems that grow from hard-neck garlic as the bulbs size up. If these are removed, the garlic bulbs will grow larger (and be easier to braid, if you want braids). Failing to remove the scapes can lead to a 30% loss in yield. Scapes make an early and visually attractive crop. Contrary to ideas mentioned by some sources, leaving scapes on does not increase the storage life of the garlic. Most people who remove scapes cut them where they emerge from the leaves. We prefer to pull ours, to get the most out. We don’t wait for the top of the scape to loop around, as the stems start to get tough then, and the presence of the scape is reducing the final yield of the garlic. As soon as the pointed caps of the scape have cleared the plant center, grasp the round stem just below the cap and pull slowly and steadily vertically upwards. The scape emerges with a strange popping sound and you have the full length of the scape, including the most tender lower portion. Sometimes the scapes will snap rather than pull right out, but the remainder of the stem can be pulled next time, when it has grown taller.
We gather into buckets, with the scapes standing upright, so we can put a little water in the bucket, and so that the scapes are aligned, easy to cut up. They will store well in a refrigerator for months if needed. Late morning is a good time to pull scapes (or early afternoon). The wound heals over in 15-20 minutes in the heat of the day, whereas otherwise it could drip for up to 24 hours, increasing the risk of disease, and losing water from the plant.
We harvest scapes two or three times a week, for about three weeks in May. The crew always enjoy this job, partly because it’s a stand-up job, and partly because we encourage a friendly competition to see who can get the longest scape of the day. This encourages everyone to perfect their technique too. Scapes can be chopped and used in stir-fries, pesto, garlic butter, pickles and other dishes in place of bulb garlic. They can also be frozen for out of season use. Searching the internet will reveal lots of recipe ideas. Scapes sell in bunches of 6-10 for $1.50-2.00.
Scapes will be ready about three weeks before the bulbs are mature. This is a good time to be paying more attention to your garlic crop, and what better way than walking through pulling scapes? We take the opportunity to remove any diseased plants from the patch at the same time. We mulch our garlic over the winter with spoilt hay, and weed it in the spring. Three weeks before the expected harvest, we cut back on irrigation and remove the mulch to help the bulbs dry down, and to prevent fungal diseases. In our rotation, the spring broccoli is usually next door to the garlic, and we move the old garlic mulch to the broccoli to top up the mulch there. It helps us stay on track with getting the broccoli weeded too. In some regions I’ve heard that oats may be sown over the top of garlic when fall-planting. The oats provide protection for the newly-emerging garlic at the beginning of winter, then are winter-killed which creates a mulch and prevents the soil from eroding. Suitable regions would be where the garlic planting date is also suitable for oats to make some growth before cold weather sets in, and where it is reliably cold enough to winter-kill the oats (20°F).
Garlic starts to bulb once the daylight hours exceed 13 and the soil temperatures pass 60°F. For us at latitude 38°N in central Virginia that’s April 10. This shows the importance of establishing garlic in good time so the roots and the vegetative growth are as big as possible before the plants turn their attention to making bulbs. Small plants on April 11 will only make small bulbs! Garlic doubles in size during its last month of growth. Our garlic is mature in early June, or even at the end of May. It has less than 50 days in which to grow the bulb. In cooler regions, it is possible to plant garlic in spring, as the bulbing conditions are not reached until later in the year.
While harvesting scapes, monitor the plants for signs of maturity. Garlic is ready to harvest when the 6th leaf down is starting to brown on 50% of the crop. For more on this, see Ron Engeland’s excellent book, Growing Great Garlic (available from GFM, www.growingformarket.com; 800-307-8949). For some years I was confused about which was the “6th leaf”, and I confess I was counting up instead of down. The point of the counting is to try to have 5 green leaves still on the plant, to provide the protection of 5 intact skins over the bulb. Each leaf corresponds to one wrapper on the cloves or bulb, and as the leaf dies, so the skin rots away. Keeping 5 intact skins on the garlic seems to be a challenge in our humid climate, and because we are not shipping our garlic anywhere, it seems less crucial. So I also use a second method of deciding when to harvest: I pull 3 or 4 plants and cut the bulbs across horizontally and look at the center of the bulb. When air space becomes visible between the round stem and the cloves, it’s time to harvest. Usually that’s June 7 – 14 for our main crop of hard-neck garlic, but it has been as early as May 30, and as late as June 18. Harvesting too early means smaller bulbs (harvesting way too early also means lots of wrappers that then shrivel up, or even an undifferentiated bulb).
Harvesting too late means the bulbs may “shatter” or have an exploded look, and not store as well. It is possible to take apart any small or shattered bulbs and replant them immediately after harvest to grow more scallions. They won’t start growing immediately if the weather is really hot, they’ll just stay dormant until cooler weather arrives. We don’t do this, because we’re busy enough at this time of year.
We don’t have a tractor-pulled undercutter, and our antique potato digger is not suitable for harvesting our garlic so we harvest by hand, with digging forks to loosen the soil. Some years, in a drought, we’ve needed to use some overhead irrigation the evening before, to loosen the soil enough for the harvest to go without damage to the bulbs. When harvesting, it’s important to treat the bulbs like precious sun-sensitive eggs! Bruised bulbs won’t store well, nor will sun-scalded ones. It’s better not to wash the bulbs when harvesting, as drying is what’s needed. We shake off the soil, without banging the bulbs, and harvest into buckets to keep the bulbs shaded, and because our curing space is the upstairs of an old tobacco barn, and we need containers that can be moved upstairs easily. Others might use crates.
Depending how hot it is outside, the indoor job of hanging the garlic as it comes in from the field may be more or less preferred. It takes us several morning shifts to get our 3,200 feet of garlic harvested and hung up. In less hot climates, some people cure garlic outdoors, but ours would bake! In less humid climates, people don’t need to pay as much attention to air flow as we do. Some growers tie the plants in loose bundles of about 8 plants and hang the bundles under cover. Whatever method you are using, get the garlic spread out immediately. Don’t leave it in plastic containers where the heat and moisture will incubate fungus! We prefer to hang our garlic in netting around the walls of the upstairs barn and use fans to move the air. The netting is nylon, with a diamond mesh about 2″ long. We start at knee height and thread a bulb in each diamond, by bending the tops of the leaves and feeding them through the space. The weight of the bulb causes it to bend down and stay in place. People take a section of netting and work upwards in rows, back and forth, covering the walls in garlic. Yes, sometimes we have overloaded the netting and had the nails pull out! We try to start out by adding nails and rope to hold the netting up before we start harvesting. A wall of garlic roots is quite a sight! Some people use square-meshed snow fencing for curing garlic.
We leave the garlic to cure for two to four weeks. Meanwhile we till the old garlic area and sow buckwheat. We have about 6 or 7 weeks before we’ll use these beds to sow our fall carrots at the very beginning of August. Soon the onions start to mature and we bring these to the same barn to cure horizontally on racks. The tops of onions are relatively weak compared to garlic and the netting on the walls does not work – the weight of the onion bulbs sends them crashing to the ground.
We test the state of curing of the garlic by rolling the neck of a few sample bulbs between thumb and forefinger. If it feels dry, rather than moist, it’s ready. We use scissors to cut off the roots close to the bulb and the tops 0.25-0.5″ above the bulb. Some growers brush any mud-covered bulbs with toothbrushes, but we find ours drop off the dust enough during storage to save us this tedious task. We measure the bulb and assess whether it’s a good bulb for seed garlic, or whether to eat it. We save for seed all bulbs 2-2.5″ in diameter, with an even shape, with the cloves tight, not opening up. We have many marks on posts, chairs, fans around the barn, for people to measure the bulbs against. Of course, after a while, people only need to measure the borderline ones, as they’ve developed a sense of what’s too small or too big. The reason not to just save all the biggest is that the biggest bulbs tend to be uneven (“rough”) in shape and quality, with cloves of all sizes. We really value large cloves! We put the seed bulbs in green net bags and the eating ones in red net bags (“Green for growing”). We also have a “Use First” category for non-storable bulbs, and compost buckets for all the tops and roots and any disasters. If we drop a bulb on the floor, we make it a “Use First” as the bruising would probably cause it to rot in storage. We weigh the filled bags for vanity reasons and to monitor the amount we are saving for seed. We have been selecting our seed garlic in this way for many years now and have no trouble getting plenty of seed garlic, so once we have enough we stop measuring and selecting and simply use all red bags. A reasonable yield is 1:6 or 7 with hard-neck garlic, 1:9 or 10 with soft-neck (you’re planting smaller cloves); a very impressive yield is 1:12.
The seed garlic goes on a high shelf in the garden shed, at quite variable ambient temperatures, and does fine until late October or early November when we plant it. The ideal storage conditions for seed garlic are 50-65°F and 65-70% relative humidity. Storing in a refrigerator is not such a good option for seed garlic, as prolonged cool storage results in “witches-brooming”, early maturity and therefore lower yields. Storage above 65°F results in delayed sprouting and late maturity. The eating garlic is stored in a dry, coolish basement at 60-70°F over the summer. In late September or sometime in October we move our eating garlic from the basement to the walk-in cooler at 32-35°F to make the basement space available for winter squash. By this time most of the apples have gone from the walk-in cooler, and space is available there. Also there is no longer the problem of ethylene emitted by the apples causing the garlic to sprout. Ideally they would never be in the same storage space.
I hear that garlic can be stored for up to nine months at 27°F, but I have not tried that myself (it does not freeze till 21°F). There is a middle temperature range of 40-50°F for garlic at which it should not be stored, as this encourages sprouting. This is another reason why we move the garlic from the basement in the fall – temperatures there are dropping below 50°F. (For onions the range to avoid is 45-55°F.)
Sources for Seed
•Check the classified ads in Growing for Market in late summer for farms that sell garlic seed.
•Filaree Farms, WA: www.filareefarm.com/ 509 422 6940. Over 100 varieties.
•Territorial Seeds, OR: www.territorialseed.com 800 626 0866. 21 varieties.
•Irish Eyes Garden Seeds, WA: www.gardencityseeds.net, 509 964 7000 or 509 925 6025. 19 varieties.
•Baker Creek, MO: www.rareseeds.com. 417 924 8917. 14 varieties.
•Southern Exposure Seed Exchange, VA: www.southernexposure.com 540-894-9480. 13 varieties.
•Johnny’s Selected Seeds, ME: http://www.johnnyseeds.com/ 877 564 6697. 4 varieties
•Garlic Seed Foundation, NY: www.garlicseedfoundation.info/index.htm Lists over 20 suppliers, and many resources, including the ARS Germplasm Resource which supplies small amounts of plant material to growers.
Other Resources
•ATTRA: Organic Garlic Production: www.attra.ncat.org/attra-pub/garlic.html
•Dr Gayle Volk’s Garlic DNA Analysis: http://www.garlicseedfoundation.info/allium_sativum_DNA.htm
Copyright Growing For Market Magazine.
All rights reserved. No portion of this article may be copied
in any manner for use other than by the subscriber without
permission from the publisher.