


I’m a big fan of rolling bed markers and I’ve built quite a few. The basic idea behind a rolling bed marker is that youcan walk or drive down a bed with the tool and by the time you get to the end of the bed there is a mark for exactly where to plant each plant or seed each line.
For crops that are going to be cultivated with a tractor it is critical that the crop be planted in the line that the cultivating tractor will be driving. Even when cultivating with a hoe, it is much easier to follow a straight line than a wandering one. In-line spacing similarly aids hoeing and hand weeding, and also contributes to even crop maturity, crop size and quality, not to mention productivity. A rolling bed marker is a quick, easy, and relatively accurate way to achieve both good between-row spacing and even in-row spacing.
The first rolling bed marker I built, which was dubbed “the dibbler,” was based on a design by the University of Wisconsin Healthy Farmers, Healthy Profits Project ( http://bse.wisc.edu/hfhp/tipsheets_html/dibble.htm). I didn’t like the idea that it was PVC so I used the concept but made it out of a steel 50-gallon drum and black pipe. I welded on pieces of steel pipe cut at a 45 degree angle for the dibbles, making three rows that marked at just over 12” apart. The version I built has survived multiple farms, literally hundreds of miles of pulling and being run over by the truck a few times. Benjamin Shute, from Hearty Roots Farm in Tivoli, New York, built his own with no welding needed by using small stainless steel cups (the kind you’d find at a restaurant supply) for the dibbles and bolting them to the drum using toggle nuts like you’d use in drywall.
If a cultivating tractor is being used with a hand-pulled dibbler like this, the lines for the dibbler should be marked with the cultivating tractor first, to line up the dibble marks for cultivation. We marked every bed to be transplanted with the same three-row dibbler. The dibbles were about 1’ apart so we could plant 1, 2 or 3 rows. If the in-line spacing was 1’ you plant on the marks, 6” you plant on the mark and between the mark, 4” plant three per mark, etc. This definitely speeds up planting, allows multiple people to work on the same line without having funny gaps where they come together, and is easy for anyone to follow no matter how little experience they have.
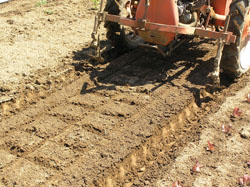
To cut out the step of walking the bed after the cultivating tractor has marked the lines, and to make the marks clearer I made a new version of the dibbler a few years ago. This one was put together to mount under the cultivating tractor and used three old press wheels from a Planet Jr. seeder and some steel rods. In our soil conditions it was beneficial to firm a path for pushing an Earthway seeder so this marker accomplished that task for direct-seeded crops and also gives very clear marks for transplanting. Because of the wheel size, the marks end up at about 11” in line so it’s a slight change from the old marks that were a little over 12”.
If you’re going to build your own, try not to be wed to a specific in-line spacing. It is surprisingly hard to get the marks at an exact distance apart, but it doesn’t matter because they will at least be evenly spaced. I also suggest making things simple by using one marker for most crops. If you’re planting lots of different crops, keeping track of, and pulling out separate dibblers for each different spacing will not save you time. Using a 1,2,3 row system and easy divisions and multiples of 1 mark (usually close to a foot) gives a really wide range of possible spacings, all from one marker.
Josh Volk farms and writes at the edge of Portland, Oregon. He also helps farmers around the country improve their farming systems. He can be found at www.slowhandfarm.com.
Copyright Growing For Market Magazine.
All rights reserved. No portion of this article may be copied
in any manner for use other than by the subscriber without
permission from the publisher.