


By Morgan Houk
Exchanging goods or services is a common way for farmers to interact with service providers and other farmers. In fact, as a bookkeeping consultant, I often accept payment in the form of pork chops or organic coffee. I know farmers who trade fresh bread for carpentry work and beef for hay mowing. Not all vendors are comfortable with this sort of payment, but when they are, it can add great value to both businesses.
It is important to track these kinds of income and expenses for two reasons. First, it contains important information about your business. If you don’t show all of your income, your bookkeeping records will indicate that your business is less profitable than it actually is. If you don’t record all of your expenses, your business will appear more profitable than it is.
The second reason to track barters or trades is because the IRS requires it. Just because no cash changed hands doesn’t mean a business transaction didn’t occur. The IRS wants you to pay taxes on the market value of that income. This is an important conversation to have with your accountant because there are various ways to record barter transactions on tax forms based on what you are trading. For a brief overview, check out this IRS fact sheet: irs.gov/taxtopics/tc420.
You and your accountant may choose to work with a different bookkeeping program, but I am going to use QuickBooks Online to offer a step-by-step tutorial on how to set up and process a barter transaction. I have found that the majority of my bookkeeping clients use QBO.
Intuit also offers a “Test Drive” feature that you can use to practice what I demonstrate below. This gives you a chance to make mistakes and understand exactly what you need to do when you setup your own bookkeeping file. You can find the QBO “Test Drive” here: qbo.intuit.com/redir/testdrive. Although the specific steps may be different in another program, the concept remains the same. Even if you don’t use QBO, you may find value in this example.

These screen shots show how to set up a new barter account in QuickBooks. All images courtesy of the author.
Barter transaction example
To walk through the process of setting up your bookkeeping software and processing a barter transaction, I will use an example from my personal bookkeeping business to give it a real life feel that is easy to follow. I often accept payment from farmers in the form of products rather than cash.
In this example, I’ve completed a monthly bank reconciliation for a customer valued at $150. In return, Allie from McDonald Farm pays me for my services with seconds tomatoes valued at $150. I have completed the bookkeeping, and Allie just dropped off ten flats of tomatoes ready to be processed into tomato sauce for the pantry.
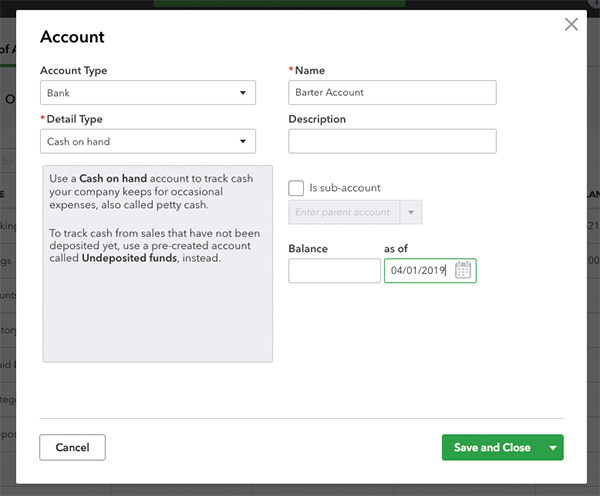
1- Set up a “Barter” bank account
•Navigate to the dropdown menu on the left of your screen and hover over “Accounting.”
•Select “Chart of Accounts.”
•In the top right corner of the screen select the green “New” button to set up a new account.
•Set up a new account. In the pop-up screen select Account Type, Bank; Detail Type, Cash on Hand; and name the account, “Barter Account.” You can add a description if it will help you remember the proper use of this account.
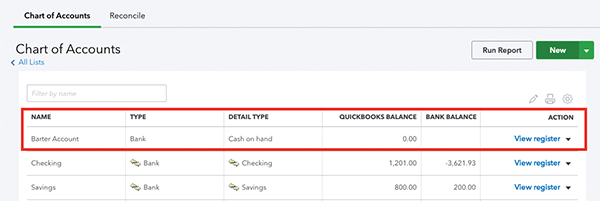
•When finished, select “Save and Close.” Your new “Barter Account” will now appear along with your other bank accounts in your Chart of Accounts.
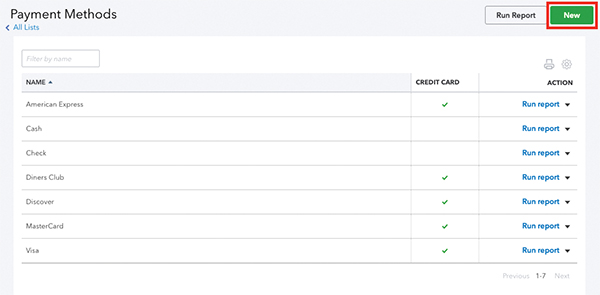
2- Create a new payment method
•Click on the gear icon in the top right corner of your screen.
•Select “All Lists.”
•Within the “All Lists” tab, select “Payment Methods.”
•Under “Payment Methods” you will see a list of all the different options QuickBooks has created to accept payment from customers. Select the green “New” button in the top right corner of the screen to create a new payment method for barter transactions.
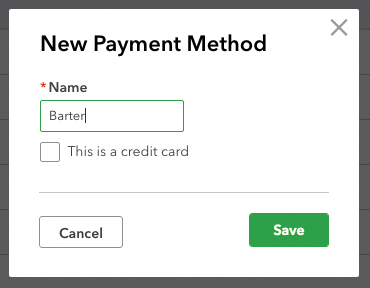
•In the pop-up screen, simply name the new payment method “Barter,” and click “Save.”
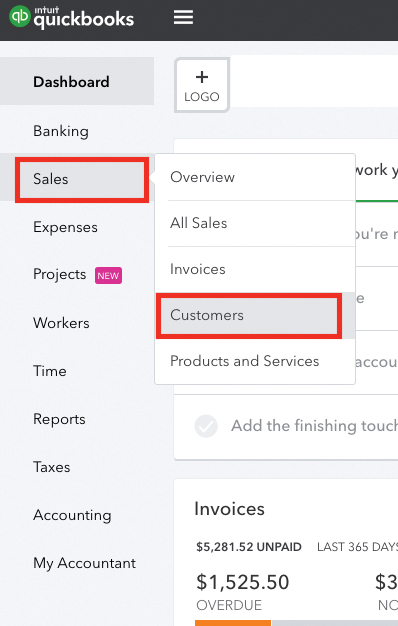
3- Vendor and customer accounts
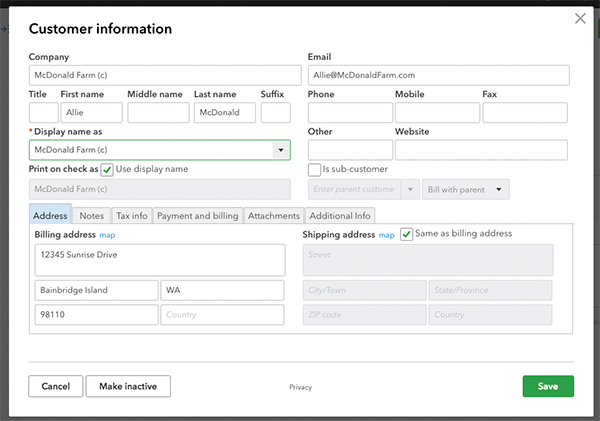
Because you will need to create both an invoice and a bill for the goods or services you provide and the goods or services you receive, you will need both a Vendor and a Customer account for the business you are trading with (in this example McDonald Farm). QuickBooks does not allow you to have a Vendor and a Customer with the same name, so you will need to differentiate between the two with a (v) and (c) in the display name.
Create the Customer account for this business first.
•On the left drop down menu hover over “Sales” and click on “Customers.”
•In the top right corner of the screen select the green “New Vendor” button.
•Fill in the form with all of the customers information, remembering to include a (c) to indicate that this is the customer account for this business in both the Company and Display Name lines.
•Click “Save.”
Now do the same for a new Vendor
•On the left drop down menu hover over “Expenses” and click on “Vendor.”
•In the top right corner of the screen select the green “New Customer” button.
•Fill in the form with all of the vendors information, remembering to include a (v) to indicate that this is the vendor account for this business.
•Click “Save.”
4- Invoice, receive payment
•Create an invoice just as you would for any other customer by going to the left-hand menu and selecting “Sales,” “Invoices.” Then, select the green “New Invoice” button at the top right of the screen. You can also use the quick create button by selecting the “+” in the top black bar.
•Fill in the market value of the goods/services you provided and select the customer account for the business. In this case, $150 for monthly bookkeeping.
•Click “Save & Close” in green at the bottom of the invoice screen. It may say either “Save & Send” or “Save & New.” Simply click on the small white arrow to drop down more choices.
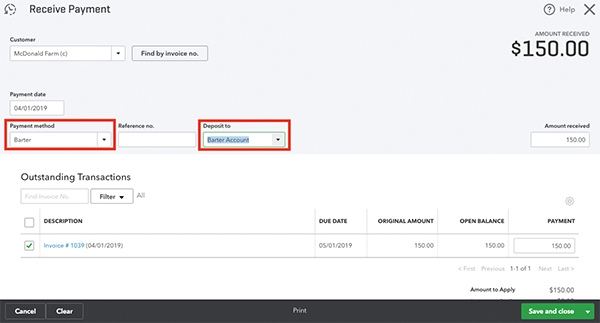
•Now you can receive payment on this invoice by finding the invoice in the Invoices screen and select “Receive Payment” in blue at the right of the screen. You can also make these steps through the quick create “+” button on the top black bar.
•Select Payment Method, “Barter” and Deposit To, “Barter Account” and enter the amount received through barter. In this case, it is the full amount of the invoice.
•If it were only partially paid through barter, say $100 worth of seconds tomatoes and the rest was due in cash, you would only enter $100 for now. You would then repeat this process but select the bank account you deposited the cash payment into.
•Finally, note the date when you receive payment. It is important to make this date the same when you receive payment on your invoice and make payment on the bill you are about to create.
•I also recommend writing a quick note in the memo section to indicate what product you took payment with and any other notes you had on the payment.
•Click “Save & Close.”
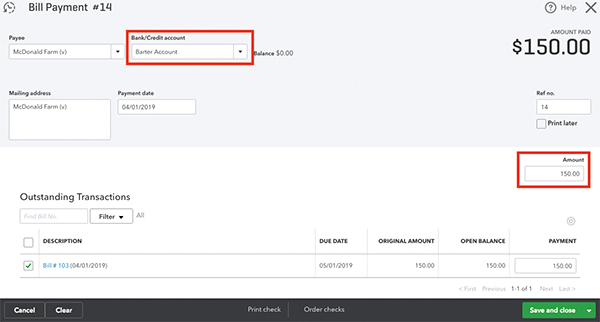
5- Create a bill and pay it
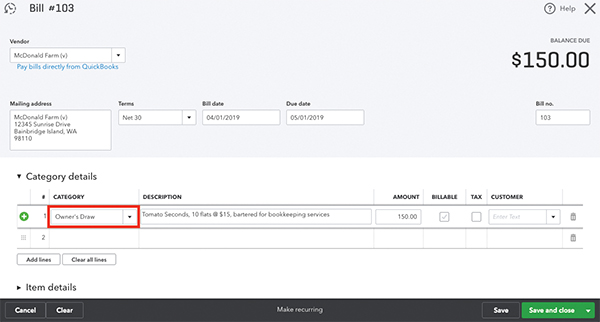
•Create a bill just as you would for any other vendor that you were paying for their time or goods by selecting from the left-hand menu Expenses, “Expenses” and then “Create New” and “Bill” in the top right of the Expenses screen. You can also execute these steps through the quick create “+” button on the top black bar.
•Fill in the market value of the goods/services you received and select the vendor account for the business. This should match the amount paid in seconds tomatoes on the invoice you just finished paying: $150.
•You will also need to categorize this bill in an expense account. If you made a trade for a good or service that is used for your business, simply select the expense category that fits. If, however, you made a trade for goods that are for personal use as I did in this example, you will need to categorize the expense as an “Owner’s Draw.” Meaning, I took payment from the business in the form of seconds tomatoes, rather than transferring $150 cash from my business checking account to my personal.
•Click “Save and Close.”
•Now, you can pay this bill by finding the bill in the Expenses screen and select “Make Payment” in blue at the right of the screen. Again, you can also execute these steps through the quick create “+” button on the top black bar.
•Select Bank/Credit Account, “Barter Account” and enter the amount received through barter.
•Lastly, as I mentioned above, be sure you match the date in the Make Payment screen with the date you input in the Receive Payment screen. It’s best to have these cancel each other out on the same date, particularly if you are using the cash accounting method.
•Click “Save & Close.”
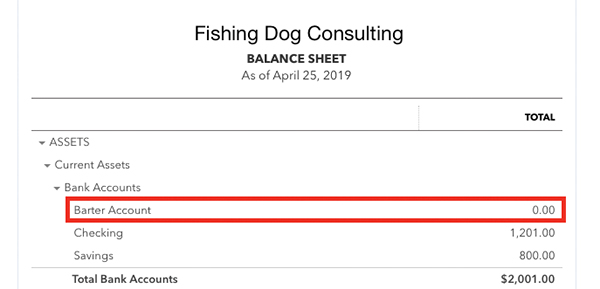
6- Check the balance sheet
As a last step, create an up-to-date Balance Sheet for your business to be sure that you properly entered the invoice and bill for the barter. If entered correctly, the balance of the Barter Account should be zero. This is because you sold and bought the same value of goods and services, bookkeeping in exchange for tomatoes.
•Navigate to “Reports” on the left-hand menu and select Balance Sheet.
•The Barter Account under Current Assets, Bank Accounts should equal zero.
•You can see in this example that I received payment for my bookkeeping services for $150 and made a payment for seconds tomatoes for $150. The first added to my “Barter Account” and the second took away from the same account.
Keeping track of trades for products or services takes just a few extra minutes of set up. It is important for a full understanding of your business’ profitability and correctly filing your taxes. My hope is that this tutorial offers some insight into working with QBO, but most importantly sparks a conversation between you and your bookkeeper or accountant.
Morgan Houk is the founder of Fishing Dog Consulting, and provides bookkeeping and QuickBooks support to farmers, food businesses and nonprofits. A farmer herself, Morgan works on a diversified vegetable farm on Bainbridge Island, WA. You can reach Morgan on her website, www.fishingdogconsulting.com.
Copyright Growing For Market Magazine.
All rights reserved. No portion of this article may be copied
in any manner for use other than by the subscriber without
permission from the publisher.