


Potatoes are a rewarding crop to grow, with a lot more flexibility about planting dates than the traditional instruction to plant on St. Patrick’s Day might have you believe.
Planting dates and temperatures
Potatoes are a cool-weather crop, but the tops are not frost tolerant. A good guideline for suitable spring planting conditions is three consecutive days with a temperature exceeding 43°F (6°C) at a depth of four inches (10 cm). Some growers wait for soil temperatures to reach 50°F (10°C) before planting. A traditional phenology sign is that the daffodils should be blooming.
 A frosted, hilled potato plant.
The spring planting is timed with the goal of having most of the shoots emerge after the frosts. A light frost will only nip the tops of the leaves and do no real damage (the plants will regrow), so a small risk is worth taking. It takes a temperature of 29°F (–2°C) to kill the shoots, and even then regrowth is possible.
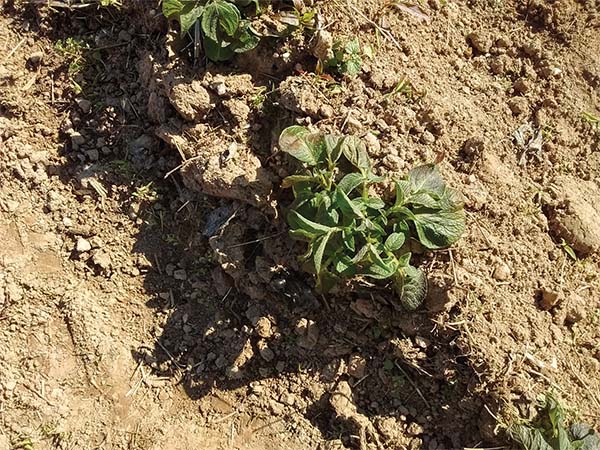 A frosted potato plant that made a complete recovery.
The practice of hilling soil over most of the leaves once the plants are six inches (15 cm) tall will protect against frost. So, if you have plants growing and a frost is predicted, a hilling that day may save them. In the fall, frosts will kill the foliage and growth will stop, so late plantings should be timed to get the tubers to maturity before the expected frost date. Some late varieties do not bulk up until the last moment, so if you are pushing the late end of your planting season, plant early varieties or fingerlings (“early” equals fast-maturing).
Here in central Virginia, we plant our first crop in mid-March, about four weeks before our last spring frost, and plant a second crop in mid-to-late June, which allows three and a half to four months before our average first frost date. We could plant any time mid-March to mid-June and harvest mature potatoes.
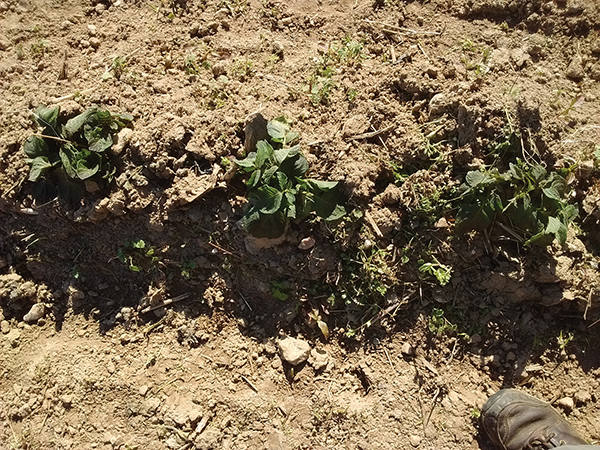
 The potato patch two weeks after near-death from frost.
In summer, the ideal soil temperature is 60°F to 75°F (15°C to 24°C). It’s possible to pre-irrigate to reduce the soil temperature in summer. We could plant a fast-maturing variety in July. An advantage of summer planting is that the harvested crop need only be stored from October or November, not over the hotter months.
Buying seed potatoes
A grower specializing in many kinds of fingerlings might want to plant once a month during their season for a continuous supply of fresh new potatoes. If you want to plant at unusual times of year, you may need to plan ahead, buy your seed when it’s available and store it in a cool dark place below 50°F (10°C), such as a refrigerator, until you need it.

Many suppliers only ship in March and April. Growers in zones 8 through 10 may need to buy their spring seed potatoes the previous fall. We buy our seed potatoes for the June planting in April, before suppliers sell out of spring stocks.
Potatoes have a dormant period of four to eight weeks after harvest before they will sprout, so if you plan to dig up an early crop and immediately replant some of the potatoes for a later crop, it won’t work. Work around this problem by refrigerating them for sixteen days, then pre-sprouting them in the light for two weeks.
If using 10” (25 cm) spacing, we buy enough to plant 16–17 lbs/100’ of row (around 1.2 kg/10 m). More common is 12” (30 cm) spacing, providing bigger potatoes than at 10” (25 cm), although yields may be lower. For 12” (30 cm) spacing, the recommendation is to allow 10–12 lbs/100’ (7–9 kg/10 m). In practice, we need a higher seed rate, maybe 15 lbs/100’ (11 kg/10 m).
Varieties
Varieties of potatoes are generally divided into four categories. Early potatoes take 55 to 65 days from planting to harvest. The more famous ones include ‘Yukon Gold,’ ‘Irish Cobbler,’ ‘Red Pontiac’ and ‘Caribe.’ Mid-season potatoes mature in 70 to 80 days, and include ‘Kennebec,’ ‘Katahdin,’ ‘Desirée’ and ‘Yellow Finn.’ Late-maturing varieties take a full 85 to 120 days to mature and include ‘Russet Burbank,’ ‘Butte’ and ‘Green Mountain.’ The fourth category is fingerling potatoes, which are small, attractive and have a high market value. They are prolific and no harder to grow than other potatoes.
Farms that are not certified organic have the option of buying non-organic seed potatoes locally, which saves money on shipping. Be sure, though, to buy seed potatoes that are certified disease-free. Late blight is a disease not worth risking. Some growers buy “B” potatoes that are small enough to plant without cutting. For most growers, “B” potatoes are not available, and we settle for larger seed potatoes, which have fewer eyes for the weight than small ones do, and need to be cut into pieces before planting.
Pre-sprouting seed potatoes
We routinely pre-sprout our seed potatoes before planting. Pre-sprouting, also called chitting or green-sprouting, is a technique to encourage seed potatoes to start growing sprouts before you put them in the ground.
It’s not essential, but advantages are: getting an earlier start on growth in the spring; being less dependent on outdoor weather conditions; giving the potatoes ideal growing conditions early on and so increasing final emergence rate; bringing harvest forward 10 to 14 days; increasing yields by optimizing the number of sprouts per plant; making the cutting of seed potato pieces easier (the sprouts are more obvious than eyes); enabling cover crops or food crops to grow longer before the land is needed for the potatoes; and giving more time to prepare and irrigate the soil as needed before planting.
To start the sprouting process, bring seed potatoes into a warm well-lit room, around 65°F–70°F (18°C–21°C), and set them upright in shallow crates or boxes, rose (eye) end up, stem (belly button) end down, for two to four weeks in spring, or one to two weeks in summer. If you have no space or time for chitting, warming the potatoes for a couple of weeks (maybe even just a couple of days) will be beneficial.
Some people like to warm the potatoes in the dark for two weeks, then spread them out in the light for the last two weeks before planting. I don’t know if the two-part process offers advantages, because I’ve never tried it. In the light, the growing shoots will grow green and sturdy, not leggy and fragile. Make sure the potatoes have a moist atmosphere so they don’t shrivel while they are sprouting. At this point don’t worry if a few sprouts break off; more will grow later.
In spring, the sprouts will grow considerably faster with indoor warmth than they would if planted unsprouted in cold ground, where they could take as long as four weeks to appear. Once planted, chitted potatoes will emerge sooner, and more evenly, which is always reassuring, and the weed competition will not be as fierce. Fewer seed pieces will die before emerging. And if weather prevents soil preparation when you had planned, just wait and know that your plants are growing anyway.
For summer planting, encourage sprouting success by storing seed potatoes in a cool place like a refrigerator, at 45°F–50°F (7°C–10°C) until two weeks before planting time, before sprouting and cutting them. This encourages the lower eyes as well as those at the rose end to sprout. Tubers with many sprouts can be cut into many seed pieces, which can save money.
Cutting seed pieces
Before planting, cut the seed potatoes (unless already small) into chunks about the volume of a ping-pong ball and weighing 1–2 oz (30–60 g) each, with the smaller fingerlings at 0.7–1 oz (20–30 g). Within a reasonable range, the size of the seed piece has little effect on the final yield, so long as it doesn’t shrivel before growing, and has enough food reserves to get the stem up into the sunshine. Cutting large potatoes is more economical than planting them whole.
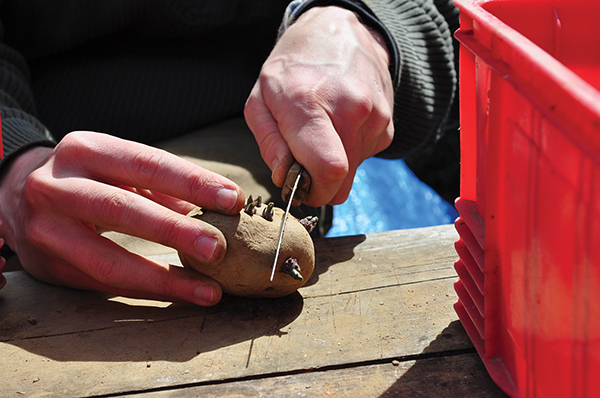 Seed potato cutting.
For cold-weather planting early in the year, aim for two sprouts per piece, which allows one for insurance if the first one gets frosted off after emergence. For warm-weather plantings, one sprout per piece is enough. Planting seed pieces with too many sprouts will cause only small potatoes to grow, as each stem is effectively a single plant and will be competing with the others for light and nutrients. Also, overcrowding can force tubers up through the soil, and they will turn green if they reach the surface.
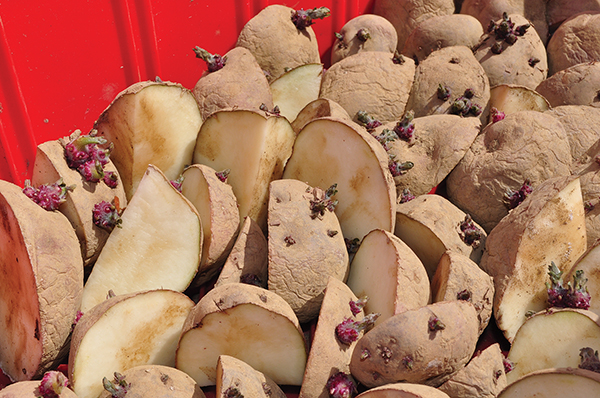 Cut pieces of presprouted seed potatoes. Photos by Kati Falger.
We usually cut our seed one to three days before planting. Varieties like ‘Atlantic’ and ‘Kennebec’ have slow healing abilities, and are best cut ahead of time. Up to 14 days ahead of planting is okay for cutting pre-sprouted potatoes.
Unsprouted potatoes can be cut as much as a month ahead, although my choice would be to sprout them for at least two weeks and then cut pieces. It is more challenging to cut unsprouted potatoes because there’s no knowing which eyes will actually sprout. I think cutting immediately before planting only works in warm, dry conditions, as the unhealed surfaces can rot in cool, wet conditions.
Delayed emergence and patchy stands are signs of planting the seed in soil that was too cold, too wet or even too dry. Erratic and slow plant growth interferes with timely hilling; smaller plant canopies offer less weed competition.
Make clean cuts with a sharp knife, aiming for blocky pieces about 1 to 2 oz (30–60 g) each. Avoid cutting thin slices or slivers, as these may dry out and die rather than grow. The cuts should not be too close to the eyes. Reject any potatoes with no sprouts.
Some people cut their potatoes a few days ahead of planting and put the pieces back into the crates to allow the cut surfaces to heal over. For large quantities you may need several layers deep. If so, use fans to keep a good air circulation. Relative humidity of 85 to 95 percent is needed to promote healing and avoid dehydration.
See the University of Maine Extension Service Bulletin #2412, Potato Facts: Selecting, Cutting and Handling Potato Seed for lots of details. Avoid tiny pieces, thin slivers or slices and ragged edges.
Planting
Potatoes benefit from generous amounts of compost or other organic matter (they can use 10 tons/ac, 22,400 kg/ha) and will grow in soils with a pH of 5.0–6.5. They use high amounts of phosphorus (P) and potassium (K), and need adequate soil levels of iron and manganese. They are less affected by low levels of copper and boron. As Carol Deppe points out, potatoes will still produce an okay crop in poor soil, where you might not be able to grow much else. See the ATTRA publication Potatoes: Organic Production and Marketing.
Potatoes need to have a good final depth of soil and or organic mulch above the seed piece. All the new potatoes grow from the stem that grows up from the seed piece. None will grow below the seed piece, so be sure to plant deep enough and hill up and or lay on thick organic mulch to provide plenty of space for your crop.
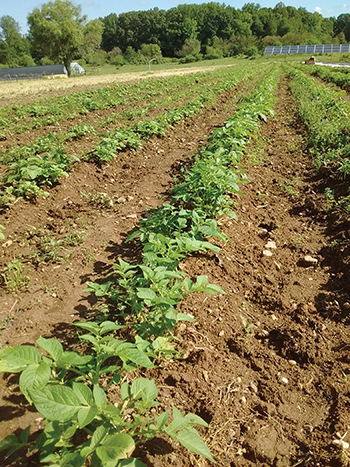
 June-planted Potatoes with hay mulch.
Row spacing of 32”–45” (80–115 cm) is common, with in-row spacing of 10”–15” (25–38 cm). In early spring when the soil is cold, if you want fast emergence and can hill up two or three times, you could plant shallow: as little as one inch (2.5 cm) deep in the North and four inches (10 cm) deep in the South. This technique helps avoid Sclerotinia problems. When the chilliness of deeper soil is not an issue, plant deeper, especially if your chances to hill might be restricted (for instance, by too much rain).
Make furrows at the chosen depth, normally 4-6” (10-15 cm). Add compost if possible. Plant the potatoes, sprouts up. Take care not to bruise the seed pieces when planting. If you are planting by hand, have some kind of measure — your foot, a stick or the width of the crate. Cover with at least 2” (5 cm) of soil. Later more soil will be piled up against the stems, in the process of hilling, which encourages stem growth and provides more sites for tubers to form.
Potato development stages and crop requirements
For the first 30 to 70 days the potato plant produces roots, stems and leaves. Bigger plants have more yield potential, so the goal for this stage is to produce large robust plants. Vegetative (leafy) growth of potatoes is favored by warm, 80°F (27°C) moist weather, but tuber growth is favored by cooler soil conditions of 60°F–70°F (15.5°C–21°C). This combination can be achieved either by planting in spring, when the soil temperature lags behind increasing air temperatures and is still cool enough for tuber formation, or by adding organic mulches to keep the soil cool if planting in early summer.
The second stage is a two-week process of tuber formation and branching of the stems. All the tubers (potatoes) that will grow on that plant are formed in those two weeks. The number of tubers produced per plant depends on hours of daylight, temperature and available water in that short period of tuber initiation. Watering stimulates the production of more tubers. A good amount to supply when tuber formation begins is 5 gal/yd2 (about 24,200 gals/acre) (22.8 l/m2).
Short day length is optimal, with a night temperature of 54°F (12°C). If temperatures at night are 68°F (20°C), initiation will be reduced; and at 84°F (29°C), will be inhibited. High nitrogen also inhibits initiation. During this stage, leaf growth continues. Flowering can happen too, but it’s not essential, so don’t worry if you get few or no flowers.
In the third stage, the tubers grow larger, but don’t increase in number. When the leaves start to turn pale, the plant has finished its leaf-growing stage and will be putting energy into sizing up the tubers under the ground. Adequate water and nutrients are important during this critical stage which lasts until the plant reaches maturity. Try to ensure at least one inch (2.5 cm) of water per week, up until two weeks before harvest. Avoid very uneven watering, or overwatering, as hollow heart could result.
The size of the tubers depends on various growing conditions. Two or three weeks after flowers appear (if they do), the baby potatoes will be 1–1.6” (2.5–4 cm) across. The best temperature is around 65°F (18°C), and I’ve read that potato size decreases by 4 percent for every Fahrenheit degree (7 percent per Celsius degree) above the optimal. Spacing is another factor. We got large potatoes one summer because we had poor emergence and therefore wide spacing. The heat of the summer didn’t stop them. Finally, the tops naturally yellow and die. The skins of the tubers thicken, which makes them suitable for storage. No more growth is possible.
Hilling
Start hilling (pulling soil up over the plants in a ridge, leaving only a tuft of leaf tips exposed) when the plants are 6” (15 cm) tall. Hill again two or three weeks later and two more weeks after that, if the plant canopy has not already closed over, making access impossible. Hilling also provides an opportunity for dealing with weeds, so if possible do this task in sunny breezy weather which won’t let the weeds re-root.
On a manual scale, use a rake or standard hoe to pull soil up from the side of the row opposite to where you are standing. If you are sharing the job, one person can work each side of the row at the same time. If you are alone, turn round and work back when you get to the end of the row. Don’t be tempted to twist your arms around and move the soil up the side nearest you. You will damage your body by this distortion of your spine and shoulders.
At the next scale up, use a rototiller with a hilling attachment, or perhaps a wheel hoe with a hiller, if your soil and stamina allows. We have used a semi-manual planting method, making single furrows with our BCS walk-behind tiller, planting by hand in the furrows, then using the tiller again to cover the seed pieces and hill. Nowadays we use a tractor-mounted furrower that can make two furrows in each pass, and disks turned inwards in pairs to ridge the soil.
If you can’t hill, you can increase the effective depth of planting by covering the rows with thick straw or hay mulch. This is easiest to do immediately after planting, before the plants emerge. We don’t mulch our spring-planted potatoes because we want the soil to warm up some from its winter temperatures.
When we plant in June, we cover the seed pieces, then hill, then unroll round bales of spoiled hay immediately, like wall-to-wall carpeting. We choose this method to help keep the soil cooler through the summer. In warm conditions, deeper planting, hilling and thick organic mulches all help keep the plants cooler, as does irrigation.
I will write more about potato plant development, weed control, pests and diseases and early harvesting in the June-July issue, with more about summer planting.
Pam Dawling works in the 3.5 acres of vegetable gardens at Twin Oaks Community in central Virginia. Her books, Sustainable Market Farming: Intensive Vegetable Production on a Few Acres, and The Year-Round Hoophouse, are available from Growing for Market. Her weekly blog is on her website and on facebook.com/SustainableMarketFarming.
Copyright Growing For Market Magazine.
All rights reserved. No portion of this article may be copied
in any manner for use other than by the subscriber without
permission from the publisher.