


Leeks are a versatile vegetable, with a potentially long harvest season from summer to the following spring. Though most customers don’t really get excited about leeks until the weather cools, they can add to the diversity of winter crop offerings, being neither a hardy leafy green nor a stored root vegetable. In the southern United States, where hard storage onions do not grow, they can provide an alternative to stored bulb onions.
Leeks are one of the easiest alliums to grow because they develop independently of day-length. With bulb onions and garlic, bulb formation and the start of (unwanted) flowering are triggered by the daylight hours reaching a certain length. Plants need to be a good size when bulbing initiation is triggered or only small bulbs can result. No such problem exists with leeks.
As a biennial, they will not attempt flowering until the spring after their planting year. Also, because they are not drying down bulbs in hot sunny weather, leeks avoid problems such as sunscald and some fungal diseases that can plague onions. Many people prefer the mellower, less pungent, flavor of leeks over onions.
The main challenges with leeks are planning for slow germination, a long growth period, weed management, and any pests and diseases in your area. Some leek varieties are available as bare-root transplants for those who don’t have space to grow their own. A lesser challenge is building a market, if leeks are unfamiliar. British cookery books and sites provide lots of recipes, beyond the widely known leek and potato soup.
Both the white and the green parts of the leek are delicious. Only the tougher parts of the outer leaves need to be composted. Contrary to myth, the white portion is not more tender or better flavored than the green part. Blind taste tests have proved this. But if your customers want white stems, what can you do?
Leek varieties
Leek varieties can be divided loosely according to cold-hardiness. Fall varieties grow faster and are less cold-hardy. Their leaves are usually a lighter green and grow in a more all-round habit. They are not winter-hardy in areas colder than zone 8. Winter leeks have a more blue-green color and a two-dimensional fan-shaped growth habit.
For fall harvests we grow ‘Lincoln’ (50 days to scallion-like bunching leeks, 75 days to mature leeks), and ‘King Richard’ (75 days). Days to maturity are from transplanting. We hedge our bets by growing both, but over many years, we have not had any pest or disease problems with either, and they do look very similar.
Other fast-maturing fall varieties include ‘Varna’ (60 to 80 days to bunching size), and the 70-85 day ‘Kilima,’ ‘Rikor,’ ‘Sherwood,’ ‘Rally,’ and the extra-tall ‘Imperial’ and ‘Falltime.’ A second group of fall varieties takes 90 to 110 days to mature: ‘Lancelot,’ ‘Jumper,’ ‘Dawn Giant,’ ‘Jersey,’ ‘Poncho,’ ‘Runner’ and ‘Baby Primor.’
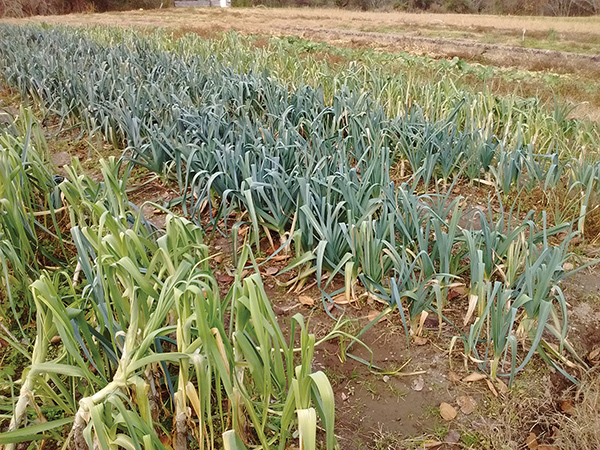 Photo of fall leeks and winter leeks. Winter varieties are a bluer green.
There are varieties with intermediate hardiness, more than the varieties above, but less than those that follow. Depending on your climate, these could provide fall or winter harvests. Listed from 80 days to 150 days: ‘Columbus,’ ‘Pandora,’ ‘Upton,’ ‘Krypton,’ ‘Ashton,’ ‘Belton,’ ‘Megaton,’ ‘Norton,’ ‘Parton,’ (there’s a naming theme here) ‘Takrima,’ ‘Comanche,’ ‘Surfer,’ ‘Titan,’ ‘American Flag’ (also known as ‘Giant Musselburgh’ and ‘Scotch Flag’), ‘Electra.’
Winter-tolerant varieties (listed in order from 84 days to 120 days) include: ‘King Sieg,’ ‘Scotland,’ ‘Tadorna,’ ‘Jolant,’ ‘Carantan,’ ‘Bleu de Solaize,’ ‘Arena,’ ‘Lexton,’ ‘Sheriff,’ ‘Arkansas,’ ‘Leefall,’ ‘Lyon Prizetaker,’ ‘Bandit,’ ‘Siegfried,’ ‘Durabel,’ and ‘Winter Giant,’ also known as ‘Alaska.’
Johnny’s Selected Seeds website has a Leek Harvesting Program, offering varieties for harvest from August to winter. Sow all at the same time to achieve an extended harvest season.
Sowing
Like most allium seeds, leek seed does not store well. We will use ours the second year after buying, but not after that. You might manage three years if you store the seed cold, dry and dark. In hot weather, chill the seed overnight before sowing, and keep the seedlings cool but well lit.
Germination temperature: 41°F (5°C) to a max at 86°F (30°C) — fastest germination (7 days) is at 77°F (25°C). Leek seed will take longer (at least 10 to 14 days) to germinate below that temperature, but will not germinate above 86°F (30°C). You can direct-seed leeks, but colder outdoor temperatures lead to slow growth and small seedlings are easily overcome by weeds.
To calculate your sowing date, count back from your planned first harvest, adding the number of days to maturity to the days from sowing to transplanting (often 10 to 12 weeks). For early harvests, you can start transplants 8 to 10 weeks before your last frost date. In most climates, for fall and winter leeks, sow January-early March, a fourth to half an inch (0.6-1.3 cm) deep in open flats or channel trays at four seeds per inch (2/cm).
In warm climates, to harvest from fall to late winter, start leeks indoors or direct sow 12 weeks before the first fall frost. In zones 8 to 9a, growers can produce two crops: one sown 12 to 14 weeks before the last spring frost, and the second in mid-July, to transplant late September to early October.
In zones 9b to 11, sow a bolt-resistant variety in July, for harvest in the new year. Spring sowings in such hot climates don’t make much growth before pausing for the summer. It isn’t worth tying up the space for the length of time they’d need to size up, meanwhile weeding every four weeks.
Here in zone 7, in the past, we used to sow in an outdoor nursery bed in rows 3” (8 cm) apart, in late March. We transplanted as bare-root plants in early June. We stopped this practice because the weed pressure was too high. We now sow in open flats which we put right away in cold frames outdoors. Leeks do not need greenhouse space in our climate. We sow six rows in a 12” x 24” (30 x 60 cm) flat, 4” (10 cm) tall, for 270 row feet (82 m). We aim for seedlings about 0.5” (1 cm) apart in the flat, but usually end up with them closer than that.
![]() Newly transplanted leeks in June, with dibble holes still visible.
Newly transplanted leeks in June, with dibble holes still visible.
Those with a short growing season might sow in open flats and later spot out to 2” (5 cm) apart. If you plan to grow bunching summer leeks, you can sow in plug flats in clumps of four or five to plant out either at 10” to 12” (25 to 30 cm) in-row spacing for easier hoeing, or at 6” (15 cm) for smaller bunching leeks.
Transplanting preparations
Before transplanting, establish your goals and planting methods. If you want large leeks, you need enough space and growing time. Close-packed leek plants will stay skinny. Skinny leeks might be fine for August, but most people want thicker leeks in winter.
Secondly, do you want to hill, to dibble holes, make furrows or none of the above? The reason for having leek stems covered with soil is to maximize the white portion of the stem.
Spacing can vary widely. The area each plant gets controls the size, and it doesn’t matter whether your leeks are 6” (15 cm) apart in rows 10” (25 cm) apart or vice versa. Decide the space between rows first. If you plan to hill up your leeks, or you want to lay the plants on the side of a deep furrow, then hoe the soil back over the roots bit by bit, you will need wider spaced rows than if you plant into dibbled holes or grow “on the flat” (with neither holes nor hilling).
Do a dry run without plants to see how much space between rows you need to do the cultivations you plan. I heard of a grower who planted leeks an inch or two apart in the row, with wide spaced rows to allow for tractor cultivation, including hilling. Some people plant leeks in closer rows than we do, harvesting out alternate rows in late summer, leaving every other row to grow to full size, perhaps hilled up.
Allow a minimum of 32 square inches (200cm2) each when planning leeks. Ours get 60 (387 cm2), with leeks 6” (15 cm) apart in rows about 10” (25 cm) apart. I have seen as much as 72 square inches (465 cm2) recommended for those hilling their leeks and wanting maximum yield of average sized leeks. Hilling does use more space.
Dibbling allows closer spacing, and saves work later. Although mature leeks are cold-hardy, seedlings are much more susceptible to frost damage. For the earliest summer leeks, plant as soon as the early spring weather has settled a bit, and daytime temperatures are at least 45°F (7°C). This may be around the last frost. Transplants should be in the ground no later than early summer for autumn harvest. Harden off greenhouse seedlings before the transplant date.
Growing requirements
Rich, well-draining soils with a pH of 6.5 grow the best leeks. Plenty of sunlight, and air temperatures in the range 55° to 75°F (13° to 24°C) are ideal. Optimum soil temperature is 70°F (21°C). Do not plant where alliums have grown in the past three years. Leeks have shallow roots and need consistent moisture and good weed control.
Water weekly if it doesn’t rain enough, and consider mulching to retain moisture and suppress weeds. We don’t mulch ours because the uneven surface of the bed (furrows, dibbled holes) makes the job technically difficult. If the rows are close, it is hard to lay down organic mulch in the spaces.
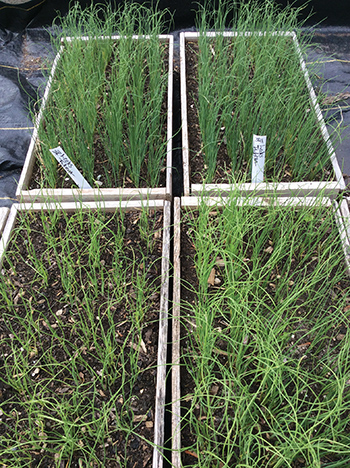 Flats of leek seedlings in a coldframe. All photos by Pam Dawling.
Above 77°F (25°C), leeks grow slowly, but growth resumes when cooler weather starts. Some varieties are hardy to 10°F (-12°C), or even below 0°F (-18°C) if protected by 12” (30 cm) of straw or hay mulch or by thick row cover. We grow ‘Tadorna’ as our winter leek, but I notice that after this January with three non-consecutive nights at 10°F (-12°C), they are quite damaged. December was mild – I think the sudden change caused the damage.
Transplanting
The ideal size for transplanting is between a pencil lead and a pencil in thickness. The length will be 4” to 12” (10 to 30 cm). Some people trim the roots to 1” (2.5 cm), and the tops to 10” (25 cm). I’ve never liked trimming plants, so we don’t trim at all. One year I did a trial to see if it was easier and faster to transplant leeks with trimmed roots. I found the extra time to trim them was equal to the time saved popping them into dibbled holes.
If the soil is dry, we water, preferably more than an hour ahead, so that the holes do not cave in. We divide the crew up and specialize in one part of the job. We make parallel V-shaped furrows, 3” (8 cm) deep, along the bed, then holes 6” (15 cm) apart in the furrows. We measure the spacing for one row of holes, then eyeball the other rows, so that alternating rows are staggered. This gives the fanning leaves more space to grow.
Dibbling tools include hoe handles, purpose-bought dibbles or dibblers, or ones homemade from broken digging fork handles, with the end sharpened to a point. The tool needs to have a diameter of 1½-2” (4-5 cm). The depth of the holes is determined by the height of the transplants. It’s likely to need to be 4” (10 cm) or more. The goal is to have only the tips of the leaves poking up out of the hole after planting. Deep planting reduces or removes the need for hilling to blanch the stems.
We carefully dig some of the transplants from the flat, shake them free from their neighbors, and decide which to plant. Do discard the ones thinner than pencil leads. We often transfer bunches of leek seedlings to a small bucket containing a little water, which makes it easier to separate the plants.
We make little buckets from 1 gallon (4 L) plastic jugs with the top cut off. A rope handle knotted into holes at the top of the bucket make it easy to carry. If a leek is a good size, and looks healthy, twirl and bob the plant up and down as you lower it into the hole. This task is easier if the roots are wet and sticking together.
Avoid having the roots folded back, pointing at the sky. If at first you don’t succeed, remove the plant from the hole, dip it back in the water and try again. Soon, you will develop this quirky planting skill, and will be able to move along at a good pace.
Ideally, only the tops of the leaves will poke out of the hole. Adjust the depth of the hole-making to suit the plant height. Surprisingly, it is not necessary or desirable to fill the holes with soil. This happens naturally as the plants grow.
Next, gently fill each hole with water, using a low pressure hose or a watering can. If the acreage is too vast, use an overhead sprinkler. The goal is to water the plant roots, adding only a little soil to each hole. The shelter of the hole helps the plant get over the transplant shock, and because leeks have slender tough leaves, they do not lose a lot of water by transpiration. This means that transplanting is possible in hot weather, and early in the day. Keep the soil damp for several days after planting, using the same method as on planting day. After that, give 1” (2.5 cm) water per week as needed.
Like other alliums, leeks compete poorly with weeds, so cultivate as needed. Hoeing will help fill the holes. Some people hill up their leeks, pulling soil around the stems several times as the leeks grow. A single large hilling while plants are young could cause them to rot. Be careful not to get soil above the point where the leaves fan out from the stem, or they will be very hard to clean later. Hilling also deals with weeds.
Johnny’s sells a Manual Leek Planter, a kind of jig to make several holes at once at consistent spacing. It has three rows of 9½” (24 cm) dibbles, and is designed for 30” (76 cm) wide beds. Similar tools could be handmade.
Pests and diseases
Leeks don’t have many pests in the U.S., but most insects and diseases that attack onions can also trouble leeks. Onion thrips (Thrips tabaci) are slim yellow-brown leaf-sucking insects. They mainly cause problems on succulent young leaves. Organic management includes small-mesh netting; biological control with beneficial insects, such as lacewing larvae and predatory thrips; the removal of heavily infested plants; and neem oil.
Onion maggots (Hylemya antiqua) can feed on the plant’s roots, causing wilting and reduced growth. The adult onion maggot flies are similar to houseflies, and lay eggs near the base of the plants, where their larvae will emerge and feed on the seedlings, roots and bulbs. Onion maggots thrive in cool damp conditions. Use netting or row cover to prevent infestations. Beneficial nematodes are effective organic controls.
Leek moths make pinholes and tunnels in the leaves. See the Ontario Ministry of Agriculture, Food and Rural Affairs website for more information. Allium Leaf Miners are currently only found in the Mid-Atlantic and Northeast U.S. and bordering regions of Canada. The brown-black flies pierce leaves and feed on plant sap, leaving white puncture marks. The eggs are laid within the plant tissues. Netting or row cover may keep them from infesting your plants.
In general, leeks are sturdier and less likely to succumb to diseases than bulb onions are. We rarely have a disease problem, although there are a large handful of fungal diseases that can affect leeks. The spread and damage caused by most fungal diseases can be reduced with neem oil or diluted potassium bicarbonate spray.
Leek Rust (Puccinia porri) can occur in mature crops in dry weather. Rust-colored spores appear on the leaves. Rust can seriously reduce yield and marketability of the crop. Other fungal diseases include purple blotch (Alternaria porri), white rot, pink root, downy mildew, botrytis leaf spot or blight, botrytis neck rot, and smudge.
Harvest
Leeks can be harvested whenever you like. Dig, don’t pull. Try to avoid spearing them: Remember how deep you planted them, and stab the tines of a digging fork (spading fork) vertically in the ground 2” to 3” (5 to 8 cm) away from the leeks. Line up the fork to dig up two at once for efficiency. Step on the fork, and lever back until the leeks move. Lift one leek, chop off the roots, invert the plant and cut the leaves in a V shape, leaving the younger inner leaves long, and shortening the tougher outer leaves.
If the ground is frozen too deep to dig with the fork, you can harvest a few leeks with no damage by pouring boiling water along the row at the base of the plants.
Clean up any obviously inedible outer layers, then put the leek in a crate or bucket. We like to put an inch of water in the bottom of a bucket to keep the leeks hydrated before taking the leeks to the cooler.
Storage
Leeks are best stored at 33°F (0.5°C) and 65 percent relative humidity. We use a walk-in cooler, and keep the root ends of the leeks in a little water. Leeks can be stored in plastic bags for a few months at this temperature, or they can be stored frozen. It is also possible to store leeks for two to six weeks in a root cellar with the roots packed in soil, shoulder to shoulder in a tub, crate or box.
Another option, if temperatures are below 10°F (-12°C), is to leave them in the ground, mulched with 12” (30 cm) of straw or hay, and row cover. Our winter temperatures fluctuate a lot, so heavy mulching doesn’t work well for us. We simply leave the plants growing in the open. Be guided by your coldest winter temperatures.
Lastly, more for the homesteader than the commercial grower, a good use for tougher outer leek leaves is to wash, chop and dry them, crumbling them into leek powder.
Pam Dawling works in the 3.5 acres of vegetable gardens at Twin Oaks Community in central Virginia. Her books, Sustainable Market Farming: Intensive Vegetable Production on a Few Acres, and The Year-Round Hoophouse, are available from Growing for Market. Her weekly blog is on her website and on facebook.com/SustainableMarketFarming.
Copyright Growing For Market Magazine.
All rights reserved. No portion of this article may be copied
in any manner for use other than by the subscriber without
permission from the publisher.