


Paths have always been a conundrum for me as a vegetable grower. They make up almost one of our three cultivated veggie acres, and we’ve spent hundreds of hours over the years scraping them of weeds. Yet, they produce nothing.
For most of my 12 years at Adamah, an educational and organic production farm in northwest Connecticut, we have rototilled in lush cover crop in the spring, planted vegetables, rototilled after harvest, planted cover crops, cycle repeat. This involved a ton of thrusting a wheel hoe back and forth, back and forth down miles of pathways on between 3 and 6 acres of vegetables, depending on the season.
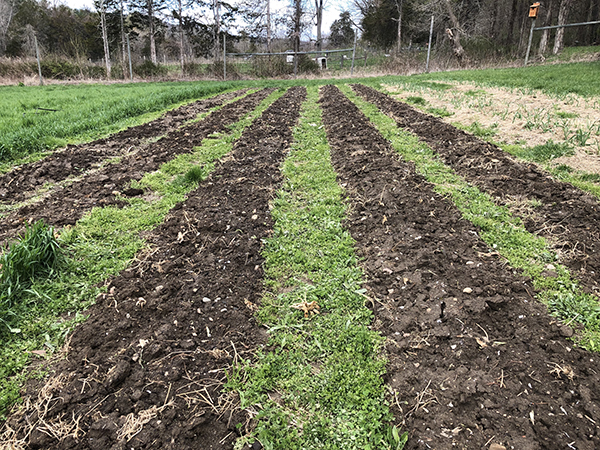
 Cover crop- peas and oats with clover living mulch paths.
It’s great upper body exercise, but it takes a ton of time and that darn bolt that connects the blade and the tool sure is hard to keep tight. One unique aspect of our farm is that participants in our residential fellowship work on the farm each day — 10 to 15 at a time — but even with this relative abundance of potential wheel hoe operators who can switch off when they get tired, it’s a lot. If you are a pre-reduced-tillage Adamahnik and you’re reading this, you know what I mean and thank you for your wheel hoeing energy!
Over the past few years we’ve reduced the amount of tillage we do by about 75 percent. Now we plant more intensively than we used to and stick to about 3 acres of veg. I’m not sure I’ll ever get rid of the rototiller, it’s just so useful in a pinch, but we do see major soil health improvements the longer a bed goes without disturbance.
Our intensive no-till approach opened up new possibilities for path management like mulching with hay, wood chips, or cardboard, but I wasn’t satisfied with any of them. Spreading hay mulch is time consuming, expensive, hard to cultivate around, and sometimes results in grassy weeds popping up if the hay wasn’t clean. Wood chips are heavy to move around and I find that the edges are more difficult to keep weeds out of than a full empty path. One year we stockpiled hundreds of boxes of cardboard, removed tape and stickers, and laid them down with compost on top for weight.
Despite the time sink of the process, I loved what the cardboard did for weed suppression and soil health. The problem was that ground nesting yellow jackets were also big fans and we had three different people step on three different nests with many stings to follow. So, cardboard is out. Perhaps we could outfit ourselves with wings, or stilts to do away with the need to cultivate so much unproductive space.
A separate puzzle for me has been to minimize erosion whenever soil is exposed. I told you already that Adamah is in Connecticut so you likely haven’t been picturing much of a slope. Before moving here, the image I always conjured when someone said ‘Connecticut’ was Angela Bower’s house from the sitcom “Who’s the Boss?” I have no idea if that show is actually set in Connecticut, but my perception that the state consisted solely of large houses and flat lawns persisted nonetheless.
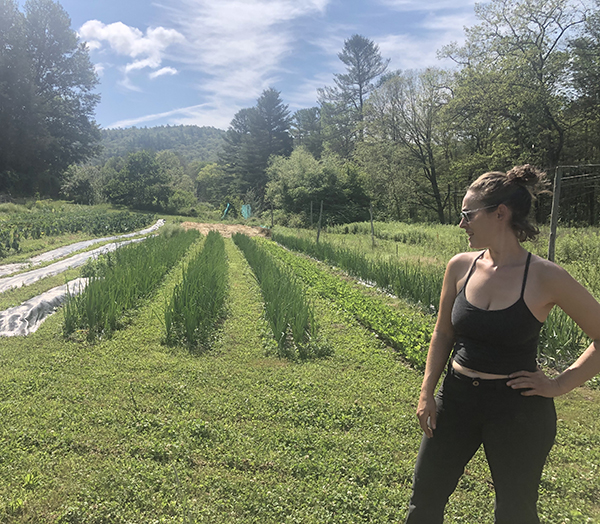
 Beds prepped with broadforking and composting in between living mulch clover paths. All images courtesy of the author.
While Connecticut overall is more topographically, ecologically, and demographically diverse than my “Who’s the Boss?” assumptions, the far northwest corner where the Berkshire mountains dip into the state has a particularly distinct terrain from Angela Bowers’ postage stamp yard.
These are hills compared to out West, but a pounding rain, which we get increasingly often, can send a lot of soil down exposed slopes. The farm is 20 acres overall. The 3 acres planted to vegetables are separated into six blocks surrounded by grass and clover roadways. About 1 acre is planted to perennial berries, fruit trees, and pollinator nectaries. The rest of the acreage is a mix of chestnut agroforestry and pasture for rotational goat grazing.
Up and downhill we are surrounded by brushy forest, hay fields, quiet roadways, and, this time of year, some epic sledding paths. We have a ton of plants holding soil in place. It’s just those pesky veggie fields when they’re empty that lose a bit of soil, a bit being too much for me to stomach.
Keeping the veg beds planted and undisturbed as much as possible is our primary erosion control treatment. We interplant whenever we can make it work: radishes down the edges of a zucchini bed for the first month before the squash plants poof out to full size; lettuce beside tomatoes with similar timing; scallions for a month between rows of onions that stay for five.
 Living mulch clover paths between no-till beds. Some beds are planted to onions, spinach and cauliflower, and some are tarped to prep for fall planting.
We flip beds as quickly as we can but there are inevitably moments when we just do have exposed soil: newly seeded carrots taking forever and a day to germinate; cover crops taking their sweet time to decompose; young transplants sending out a bit of a root here and another there before really taking off.
I’ve run through a lot of different potential scenarios in my mind for mitigating the gullies that inevitably cut through when soil finds itself exposed during a big storm. I considered hedgerows down the middle of each block but decided it would be a poor use of fertile vegetable bed space when we have so much excellent habitat for beneficials already right nearby. Terracing would be an aesthetic thrill but prohibitively time consuming to build and maintain. At points we painstakingly raised the beds up to allow water to drain more easily through the pathways but it didn’t make a huge difference and took tons of effort.
The above mentioned path mulching efforts brought their own challenges as described. We did put a drainage system underneath one of the blocks with a National Resource Conservation Service grant to handle erosion from a culvert uphill, but that project did not impact generalized rainwater gullies. The reality is that if you have 20,000-square-foot blocks of exposed soil on a slope with no plant roots holding it in place every so often, there are going to be erosion consequences.
Enter the namesake of this article, living pathways.
I’d considered living pathways before as an elegant solution to the twin challenges of time-consuming path hoeing and soil sliding downhill, but I didn’t think they were practical. The idea of a living pathway is simply that you let plants grow in the path. Of course, I couldn’t let my nemesis galinsoga — our most pernicious weed — grow in the paths, they’d go to seed and take over the farm in a hot second. Wouldn’t grass simply take over the crops? Would mowing really keep it at bay and, if so, how much mowing would it take?
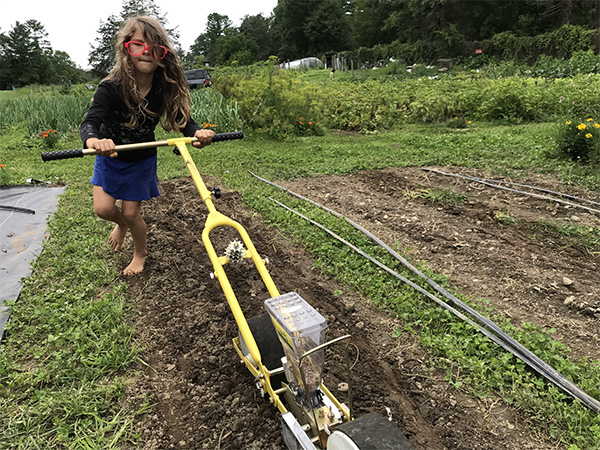 Seeding carrots in no-till beds while wearing fashion glasses, the paths are living mulch clover to prevent erosion and add carbon, the surrounding diversity of crops (onions, flowers, potatoes) builds resilience.
Then, I heard Jennie Love on the The No-Till Market Garden Podcast say that living mulch paths worked on her flower farm in Philadelphia. She mows her grassy paths weekly, edges them once or twice a year, and … that’s it. That one testimonial was enough to inspire me to suit up the farm with tools appropriate to the task and plant 18-inch living pathways of white clover between 30-inch-wide beds on about half the farm. And they really do work for us!
What I love about living pathways is that they eliminate the issue of soil washing down slope by catching it bed by bed, they are less time consuming to take care of than the wheel hoe epic, and they transform what was a waste-of-space into part of our soil health program. The plants that populate our living pathways do what plants do — photosynthesize, feed soil microbes, and keep nutrients in the system.
Here is what I don’t love about living pathways. They need to be mowed every week or two, which is a pain in the height of the season, but way less time-consuming overall than path weeding. They tend to creep into the beds over time and must be edged or hoed to stay in their lane. White clover works particularly well in our pathways because it is perfectly happy to be stepped on, mowed low, and deal with whatever amount of water comes its way. But it has an annoying habit of laying down flat on the edges of the bed when the mower comes by, leaving long tendrils reaching toward the crops intact. Edging and hoeing those tendrils back is effective but it takes a lot of time.
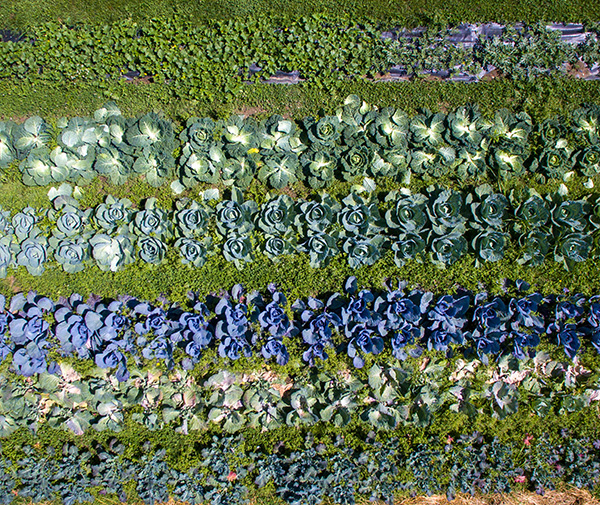 A shot from above of cabbage beds with living mulch clover paths at Adamah Farm.
Row cover is trickier with living pathways. We used to scoop shovel fulls of soil from the paths onto the edges of the row cover to secure it in place, but now that we are treating each speck of dirt like the precious gem that it is, we have to schlep sand bags around to weigh the cover down. We’ve had an increase in voles showing up to eat our beets and other sweet things since reducing tillage. I think that has a lot more to do with the tarps we use and a coincidental increase in drought conditions than the pathways, but I’m still a little suspicious and keeping my eye on whether or not the paths play a role in the vole toll.
Living pathways have definitely been a net positive for us because of our unique mix of factors: slope, a lack of mechanical cultivating tools, a reduced tillage approach, and an abundance of people who can walk back and forth with a mower and Lizzo in their headphones (hey, Adamahniks!) — again, less time consuming and less physically exhausting than wheel hoeing.
Below are a few tidbits you might find useful if you think living pathways are worth trying on your farm.
Tips for living pathways
We planted a super-duper thick stand of white clover to get our paths started and it has persisted. Jennie Love, mentioned above, and Jesse Frost, who has videos of his living pathways online, both rely on a mix of grasses and other plants that self-select their way into the paths. I think most any plant mix will work as long as it can be well managed with mowing, can handle food traffic, and can deal with whatever amount of rainwater, or lack thereof, your weather throws at them.
We use a battery powered mulching mower as close to once a week as we can on all living pathways. Mulching mowers chop plant debris up several times before dropping it rather than spraying it out the side. This is important since we don’t want clover puree all over our salad mix or lettuce heads. We allow debris to fall into the path but you could collect it in a bag attached to the machine. We have found our mulching mower to be powerful enough to handle the paths consistently, but when we do have a lot of plant matter it gums up the blades and has to be scooped out by hand every so often.
As I mentioned, our clover has a penchant to get low when we come by with the mower, so I find it useful to go down one direction, pushing the stems one way, and then come back from the other direction to clip them off.
Make sure your paths are the same width as the mower you have. For us, that’s 18 inches.
Have multiple batteries charged up if you are using an electric mower so that you don’t get held up when the empty light starts blinking. Despite the dead battery challenge, I find our electric mower way more pleasant to use than a gas powered one.
We often tarp individual beds one at a time with 3-foot-wide landscape fabric and ground staples in order to clear beds for planting. The fabric is a little wider than the beds to help knock back pathway creep.
Don’t get too attached to your pathways. Vining crops like winter squash take ours out completely, and sometimes we decide it is worthwhile to put a big silage tarp over an area with living pathways to best terminate the crops or cover crops underneath. We find our clover paths easy to reseed and the cost of seed isn’t too high.
Janna Siller is the Farm Director at Adamah, an organic production farm and educational program in Falls Village, CT. She also represents the nonprofit organization, Hazon, as a member of the National Sustainable Agriculture Coalition.
Copyright Growing For Market Magazine.
All rights reserved. No portion of this article may be copied
in any manner for use other than by the subscriber without
permission from the publisher.