


No one has the same farm as you. This article is an overview of our annual planning process. It will help you create a customized Field Manual to consult when anything is unclear during the hot days of a busy season.
Planning is circular, just like farming itself. For new farmers this can be daunting, but each year it becomes easier as you are only tweaking last year’s plan. It is possible to start at various places in the cycle.
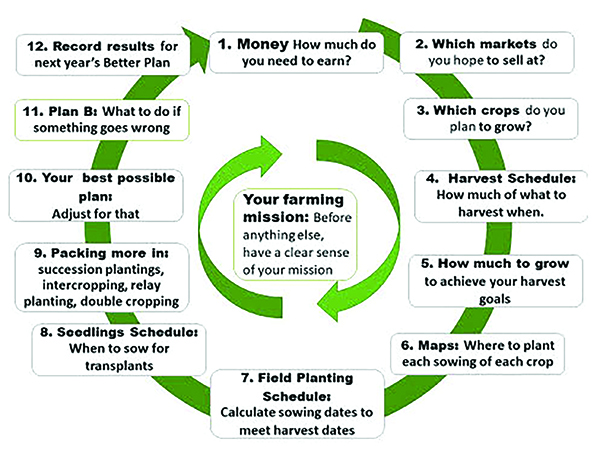 The crop planning cycle planning is circular just like farming.
First, a few words about plans. Some people seem fatalistic about plans: “Oh, plans never work out!” or “I hate to be controlled by a plan.” However, most market growers see the value in planning, even days when our plans unravel. A plan is just a plan. If a better idea comes along, or the situation changes, change your plan. In agriculture, many factors are outside our control.
A good set of plans streamlines making changes and shows how this will affect other parts of the farming year. A Notes column at the side of every spreadsheet or map offers space to write in alternative ideas, anything different you end up doing, and whether to make this a permanent change in the future.
Here are the main planning steps I use. Then I’ll list the contents of my Field Manual.
Start with your farming mission
What is your long-term vision? Why are you farming? Will the farm need to supply all your income? Will it be a service? Do you plan to provide good food for people who cannot pay full price? Are you planning to raise a family? Are you demonstrating a better way of life?
If the growing season is already underway, start wherever you are in the sequence and consider your vision and mission as soon as you can make time.
Step 1: How much money do you need to earn?
Figure out how much money you need to support your household, your farm, and your future. Then decide how to achieve this, given your resources, including land, climate, markets and labor. Jumping ahead to think about crops and quantities. Revisit this question every year. You may only tweak your plans, but if you need a major rethink, it’s best to know before you start planting.
For us at Twin Oaks Community, this step includes auditing and budgeting both money and labor. It doesn’t rely on the other tasks in the sequence, but we need to prepare our financial budget request. Once budgets are set, we cut our cloth to make best use of the funds we get. Other farms may have different timelines, but at some point it’s necessary to look at the money, sort out any errors, contemplate the financial well-being of the farm and decide if anything needs to be done differently.
At this point we see if we can afford to buy more tools or supplies. (It’s good to have a reward for tackling accounting.) At the end of one year, we had just the right amount for a Valley Oak wheel hoe, and what a boon it has been.
Planning the labor budget and recruiting help for the season are also independent of the other steps — figuring out how much labor we need, when we will need it, and then finding workers, whether interns, apprentices, full-time, or casual labor. We have a spreadsheet for planning this, slowly increasing the number of hours per week and the number of workers per day from January.
We try to pace ourselves to ensure we get enough people when harvesting takes a long time, and when we have lots of transplanting. We steel our hearts against the many people who want to help in April but will have gone indoors by July. Obviously, the issues are different depending on whether you are paying for this labor or it is voluntary. Even if it’s free, you still need to organize everyone and find them tools.
Step 2: At which markets will you sell?
New growers are often advised to start the first year with a farmer’s market rather than a CSA (Community Supported Agriculture, where members pay a subscription and receive a regular supply of produce based on what the farm has available), as you can sell a more erratic supply of crops at market. But if you have experience from apprenticing on another farm, a commitment to careful planning, and you need that upfront beginning-of-season cash, you may decide to start with a CSA.
If you have an off-farm job, this can tide you over until your financial footing is more secure. Also consider restaurants, schools and other institutions, wholesalers or farm stands. Often a flexible combination works best. Revisit this step every year, and give careful thought to changes.
Step 3: Which crops to grow
If you grew crops last year, I hope you had a Crop Review process to make use of information from as many workers as possible. This will make the coming year even better. If this is your first year, consult nearby growers, study market booths, read my book Sustainable Market Farming, and make a rough plan.
Step 4: When, how much to harvest
This article includes lists of which crops to expect when. When I revise these calendars, I change the date to halfway between what we had in print and what happened last year. This way we can gradually zero in on the likeliest date without lots of wild pendulum swings to dates based on variable weather. I have the same list sorted by date and alphabetically by crop.
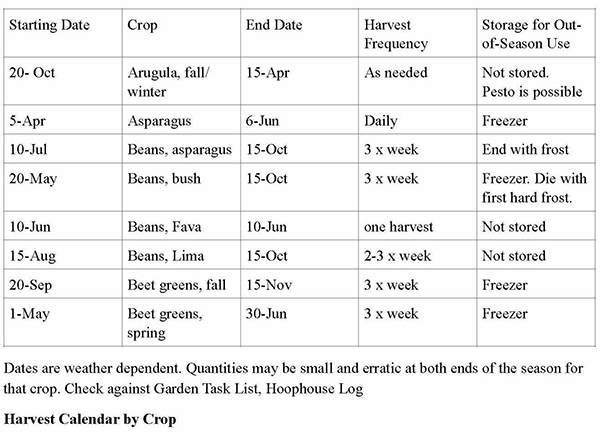
I also make a version that shows when crops are abundant enough for our food-processing crews to start canning and freezing. Unless you, too, live in the kind of intentional community I live in, you might plan not to have surpluses unless you have CSA sharers who want to can. An idea of when to expect lots of paste tomatoes can be very helpful in ensuring that people are available to process them and not on vacation.
Step 5: How much to grow
Most growers plant a bit extra “in case”, but you don’t want to waste your resources growing too much of the wrong thing.
Step 6: Maps
If you haven’t already, make a rough map of your growing space before you go any further. If you have the time, the best option is to make detailed field map layouts each year before you place your seed orders. We prioritize getting our seed orders in early, so if necessary we postpone our detailed maps. Making accurate maps after your seed order has the disadvantage that the space available for that crop might not be exactly as hoped, ideas sometimes change and the seed bought won’t exactly match the need. But it will be close. We use photocopied hand-drawn maps. Some growers make maps using a spreadsheet or online aerial photography.
We plan the main garden layout following a 10-year rotation and noting changes suggested by the Crop Review. Then, we fit in smaller succession crops. We also revise the Raised Bed Planning Chart and plan permanent raised bed crops for February through June.
Step 7: Sowing dates:
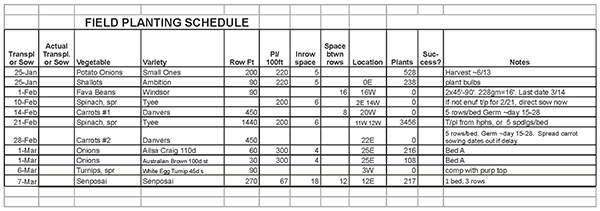
The outdoor (field) planting schedule is an important spreadsheet with the most information. It lists by date what we intend to plant, how much, the spacing and where. It’s assembled from seed order information as well as our field maps. It has an open column to write when we actually plant, a Notes column, and a “Success?” column to fill out during the harvest season — all to inform the next Crop Review.

We list the varieties, the row length and row spacing, and for transplants, how many plants will be needed to achieve in-row spacing (including 20 percent extra so we can select the sturdiest plants). We have a Location column listing the bed number or plot so we get the right plants in the right place nearly all of the time.
If we make changes, intentionally or accidentally, we cross out the planned information and write in what actually happened. If we think our change is an improvement to keep for next year’s plan, we circle the new information; otherwise we consider it a one-time anomaly. We keep this plan on a clipboard in the shed, and at the end of each shift, we enter on it the details of crops we’ve planted.
Step 8: Seedlings schedule
If you are growing your own transplants (starts) you will need a schedule for that.
Step 9: Packing more in
If space is at a premium, you will want to make best use of every bit. Consider succession plantings, intercropping, relay planting, and follow-on or double-cropping. Skip this step if the season is advancing faster than your planning!
Step 10: Adjust for your best possible plan
Before finalizing your plans for the growing season, look at the whole set of plans and see if something can be improved. Can you fit a short–term cover crop in a summer gap after one food crop, before the next gets planted? Would the work be easier if the summer squash and cucumbers were side by side each time? If possible, get two or three other growers to look over your maps and schedules. You could return the favor. When you make a change, follow through and update all the other charts, tables and spreadsheets as needed.
Step 11: Plan B — what to do if something goes wrong
This step is independent of the others, good for a rainy day. I have written more about this in my second book, The Year-Round Hoophouse, and the ideas apply equally (if sometimes differently in detail) to outdoor growing. The basic idea is a list of useful people to contact and first steps to take when something goes very wrong. It’s hard to think clearly when disaster strikes, and usual resources such as electricity, internet, clean water supply may have gone.
Step 12: Record results for next year’s better plan
This is the last task of our winter planning. I like to do house cleaning so that once things get busy, I can find what I need more easily instead of having important bits of information on tiny scraps of paper or lost. Once the backlog is filed, I can indulge in new research on crops I hope to improve in the coming year.
This step includes taking time to walk the farm regularly throughout the year, taking notes and photos and recording what is working well and what isn’t, along with your thoughts on why that is. An annual Crop Review is the best way I know to be sure this happens.
Revise the Seed Inventory Spreadsheet. Do the physical inventory of seeds leftover at the end of the year to determine what you need. Prepare the Seed Order Spreadsheet and place your seed orders.
Finish up any other planning tasks. Revise the Hoophouse Planting Schedule and maps. Revise the planning schedule, file notes, prune old files, and discard junk.
Gather your plans
Once we have completed each step in our winter planning process, we print out a good copy of each final spreadsheet, map or list and decorate it with a sticker. This whimsical feature lets us easily tell this year’s spreadsheet from another and the final corrected versions from earlier drafts. One year we had a beetle theme, another newts and lizards — well worth the dollar it costs for a sheet of stickers.
The order of these steps means that the information we need is gradually transferred along the chain. We don’t need to keep going back to consult different notes made during the previous year. Usually for each planning stage, at the top of the sheet we list which other charts, spreadsheets or maps are needed to compile the new one. At the bottom of the sheet we list places to post or file copies and which following planning stages to take that information on to.
At this point we usually write an annual report for the community — what worked, what didn’t, and changes we plan for next year. You might want to write up a similar report for your CSA subscribers, market customers or farmworkers.
Different styles of planning
Each farm has its own planning style. Some farmers prefer hardback notebooks or loose-leaf binders of worksheets. We use mostly spreadsheets, with our “Colored Spots Plan” for raised bed planning being our most obvious exception. During the year we work off the printed sheets; we don’t often go back to the computer. All our important sheets are in our Field Manual.
The main value for us in using spreadsheets is that the program will do calculations after we provide the basic information one time. We enter how many cabbages we want, the in-row spacing and row length, and out pops the projected number of rows. We can quickly switch to a different number to make a whole number of rows. Then, we can enter the harvest date and the days to maturity and out pops the transplant date, the sowing date, along with the number of starts and flats to sow — allowing a percentage extra.
The second advantage of spreadsheets is the ability to quickly sift out selected parts of the information and rearrange it to give us, say, a list with just the 46 lettuce sowings in date order, or a list of just the crops planted in the East Garden, or the seed orders sorted by supplier, to use for entering online.
Some farms are so well-organized and generous that they post their plans on their website. Jean-Paul Courtens of Roxbury Agriculture Institute at Philia Farm, connected with Roxbury Farm, a 1,000-share CSA farm on 300 acres in Kinderhook, New York, has posted an impressive array of information. On his website you’ll find details of CSA share amounts, greenhouse schedule and planting schedule for a CSA, crop manuals, harvest and storage manuals, soil fertility management plan, crop rotation details.
Excel spreadsheets developed by Dr Joel Gruver are available free on the Growing Small Farms website of North Carolina State University. If you would rather use worksheets, a valuable resource is the ATTRA publication Organic Market Farm Documentation Forms.
It is possible to put every piece of information about every crop on one giant spreadsheet, then select the columns you want and hide the rest. These separate groupings of different types of information become the various schedules and lists needed for seedling production, field planting, harvesting, etc. This is how we started out, but we soon found that our farm has relatively minor tweaks each year and it was easier for us to deal with smaller spreadsheets and just update each one. Careful proofreading is easier for us than manipulating giant spreadsheets.
Using a web-based vegetable farm crop planning system offers easier access to information for less time spent inputting. Someone else runs the software. There are free ones (such as AgriXP) and many paid ones (such as Tend, AgSquared and VeggieCropper) that offer a free trial of about two weeks. But if your internet service is poor, don’t try it. We’re one technological step back, so we rely on spreadsheets.
My dedication to winter planning is from the time I was standing in the full sun in the middle of the field with a tape measure, notebook and pencil, trying to figure out how many rows of sweet corn I could fit in and how long to make them. My brain wasn’t functioning at its best, and I was under pressure to get seeds in the ground. There had to be a saner way — ah, do the planning in winter. We enjoy taking life slower in the winter, so we do one or two planning steps each week (with a two-week break for holidays). If you prefer a complete break during the winter, you could devise a more compressed planning schedule, perhaps a whole week before the end of the year and another in early spring.
Make your own field manual
As our planning got more detailed, I needed to keep the information close by in a relatively weatherproof and portable package. You might keep yours on your phone. My solution is clear plastic sheet protectors you can file in a ring binder. I prefer not to have the binder, just three metal binder rings. This way, I can open the manual at any page and fold it round to single page size, keeping whichever page I need to look at on the top until the current task is dealt with. The plastic keeps the pages fairly clean and dry, so I can take it out to the field and set it down on the ground with no worries. You can include whatever is useful to you and also customize the manual to make crew versions, shed clipboard versions, customer versions and website versions.
My Field Manual consists of about 40 sheet protectors. The spreadsheets, maps, charts and lists from our planning are included as well as other useful pages:
- Garden Calendar (Monthly Task List). Creating this is a semi-independent task and a refreshing change from all the spreadsheets. It’s a month-by-month list of the tasks, taking a half to a whole page for each month. This calendar gives new workers an accessible overview of what we hope to accomplish each month and reminds us of tasks we might otherwise forget. It includes not just the seeding and transplanting jobs, but also prompts us to weed the strawberries, sort through the potatoes two weeks after harvest, look out for Mexican bean beetles, divide the rhubarb and so on. It includes a section that I find particularly useful, on climate information, latitude and daylight length. We make sure when we revise it to include things we plan to do differently this year to prevent autopilot taking over.
- Ten-Year Crop Rotation Pinwheel.
- Crop Planting Quantities Chart. This is another planning step that can be fitted in between other main steps in the chain. It’s independent and is used for long-term planning/musing. It’s simply a chart of how much of each crop we plant each year. We have about 20 years of data collected. The chart helps us see if we are unconsciously drifting towards more or less of certain crops when we adjust our plans to fit available space. It’s also useful to look at how we did things in “Olden Days” — different plant or row spacings, etc., — and helps us be more intentional about what we do now.
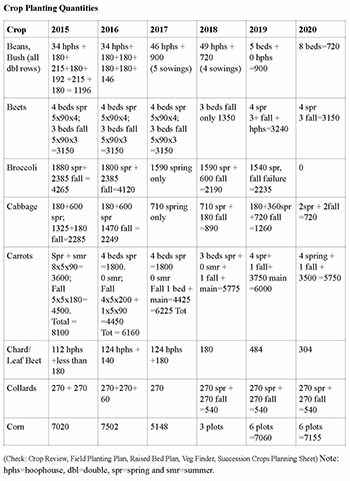 A few years worth of crop planting quantities from the author’s farm. The abbreviations used include: hphs = hoophouse, dbl = double, spr = spring and smr = summer. All images courtesy of the author.
- Tables of Soil Temperatures for vegetable seed germination, and Days to Emergence at different temperatures (for sowing and flame-weeding decisions).
- Virginia Extension Vegetable Planting Guide.
- Sunrise and Sunset Timetable.
- Phenology Log.
- Plastic Card Calendar (free from an insurance company).
- Lettuce List and Lettuce Log. This is a crop where sowing and transplanting dates need to be quite precise if you want a continuous supply. It took me several years of fine-tuning to get an almost year-round supply without huge gluts.
- Onion Planting Plan and Log. This is a crop we must pay close attention to. We trialed different varieties, so the planning is complicated and the record-keeping important. We track what’s where and monitor growth a few times during the season, then record the harvest of each variety separately to compare yields. Later we compare the keeping qualities. Any crop you are focusing on improving may warrant its own plan and recording sheet.
- Sweet Potato Slip Growing Plan and Worksheet.
- Fall Brassica Spreadsheet. Planting dates for fall crops can be exacting, because the cooling weather slows down the plant growth, and a day or two difference in sowing date can make a week or two difference in harvest date. With a crop like broccoli, this can make the difference between four weeks of harvest and six, where the extra 50 percent of time means more than 50 percent extra yield because it takes place during warmer weather. We may plant six to eight broccoli varieties with varying days to maturity, four to eight types of cabbage, up to eight types of Asian greens, two kohlrabies, one variety of kale and one of collards. All this means lots of seedlings to track.
- Farmscaping Worksheet and Suggestions.
- Winter Cover Crops Maps.
- Cover Crops Information and Chart.
- Map of the Blueberry Patches, Grape Rows and Monthly Care List and Logs.
- If you find yourself often seeking a particular table, diagram or list, then that piece of paper has earned a place in your Field Manual.
Pam Dawling has worked at Twin Oaks Community in Virginia for over 30 years, growing vegetables for 100 people on 3.5 acres, and training many members in sustainable vegetable production with an emphasis on feeding people year-round. She is the author of Sustainable Market Farming and The Year-Round Hoophouse. She often presents workshops at sustainable agriculture conferences. She is a contributing editor with Growing for Market magazine, an occasional writer for other magazines, a consultant and a weekly blogger on www.sustainablemarketfarming.com.
Copyright Growing For Market Magazine.
All rights reserved. No portion of this article may be copied
in any manner for use other than by the subscriber without
permission from the publisher.