


Perkins’ Good Earth Farm is a permanent-bed, deep-compost, no-till, and certified organic farm. My wife Julie and I are currently in our 16th year of farming (6th year of full-time farming) in rural northwest Indiana. Our gross sales in 2024 from farm produce on 1.25 acres and value-added kitchen items is over $239,000.
For more farm background see the April 2024 GFM article “Developing youth farm team members.” Here, I describe the steps and economics of our permanent-bed, deep-compost production system in comparison to other common farming systems.
Initial establishment steps
Step 1: Plan out your bed spacing.
This is free, but priceless and critical to do thoughtfully and deliberately. This is for permanent bed systems. Each bed width has its pros and cons. Know why you’re choosing what you are for your context. Here are some common options:
A 30-inch bed top, 18-inch pathways, 4-foot-on-center bed spacing. Most common for market gardeners with 1 acre or fewer. A lot of hand tools exist for this spacing for planting, cultivating and harvesting. A walk behind tractor is often used for bed prep, seedbed prep, and flail mowing.
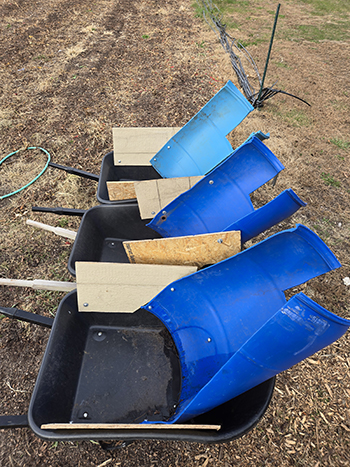
Wheelbarrows modified to dump material in a narrow band.
For our first four years of farming (2010-2014), we had a tillage/rowed system with no beds. We adopted the 30-inch bed top system for the next seven years (2015-2023). We got a 4-wheel drive tractor with a loader, with industrial tires for moving vegetables, compost, and other material in 2017.
We should have done that year one. I would advise getting equipment that can straddle whatever bed width you choose so you have options to expand if needed. Market gardening is about moving bulky/heavy materials from one spot to another efficiently. Initially, the 4-wheel tractor never went onto the beds, even though it could straddle the bed top just barely as it had 30 inches between the tires.
A 36-inch bed top, 18-inch pathways, 5-foot-on-center bed spacing is now our current system (see my May 2025 GFM article “Mechanizing the Deep Compost System”). We wanted a wider bed top so that we could interplant more on our beds. I cannot emphasize the wider bed’s role in almost doubling our yields per bed because of interplanting.
It was also a function of the center-to-center wheelbase of our 4-wheel drive Kubota L39 with Ag tires. Industrial tires give a narrow 30-inch bed top and wider paths. Go a bit wider than your bed width to give wiggle room. The 4-wheel tractors cannot adjust tire spacing very easily, unlike 2-wheel drive that can be much easier to adjust. A key factor is the turning radius needed for tractor and compost spreader.
![]()
Deep transplanting.
We need about 25 feet to turn at the end of our beds without having to do a bunch of back and forth. We can straddle the beds with our tractor and equipment for compost/mulch applications, and bulk harvesting. The 18-to-24-inch wide pathway allowed for some wiggle room with the tractor and ease of harvesting. It also allows for greater airflow among crops since spacing in the bed is so intensive. This system would enable us to farm up to 5 acres of permanent beds efficiently.
For larger-scale use equipment, a 48-inch bed top and 2-foot wide pathways would give a 6-foot-on-center wheel base and accommodate larger spreaders and equipment. A longer turning radius would be needed at the end of beds for larger equipment.
Step 2: Soil test and amend.
Pull a soil test so you know what you are working with as a base. Address any major soil issues, such as pH, fertility, or compaction. You should apply any amendments as part of Step 3. This is also a good time to address compaction issues, via deep ripping, or heavily ponded areas with tile or drainage improvements.
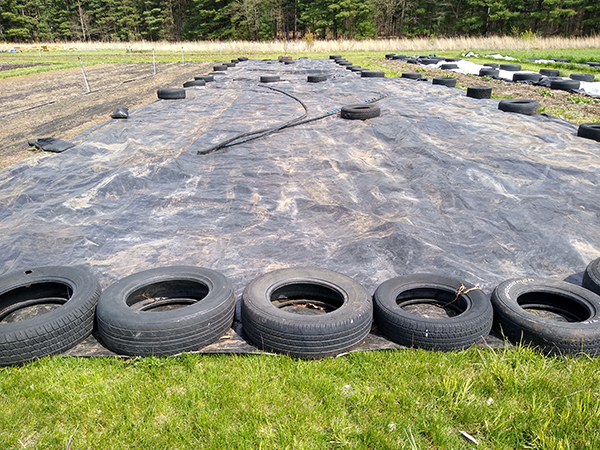
A 32’ by 105’ tarp.
Step 3: Irrigation system.
You must have a well-developed irrigation system. It took awhile to learn this the hard way. Our native soil is Morocco loamy sand. Our water holding capacity is very low. Combine that with the fact that our leaf and manure based compost never had clay added to the mix and therefore doesn’t have much water holding capacity, especially during the first two years after building a bed.
On more mature beds (2-plus years into the system) that have been cover cropped at least two times, we have reduced our need for watering overall after plant establishment. Plant and seed establishment must be managed carefully. The lack of aggregate stability from the compost and good drainage means we have to water a lot (daily) during plant establishment (first two weeks) and direct seed and transplant deeper than standard practices. My Jang seeder is set to 1.5-inches deep, and I never change it, even for small seeds. Our peas and beans are seeded with an Earthway, at 3-inches deep.
We have a high water table, good water, and a well-developed watering infrastructure, and I improve it every year. We continue to minimize moving hoses and added pulse watering this year. We learned to water often (every day during the heat of summer) to maintain soil biology and high yields. For example, when germinating direct seeded crops or establishing transplants, I water every day, or two times a day for carrots until germination or roots have established.
Once crops are germinated and established my goal is to keep the top 2 inches to 8 inches of the soil profile very moist. The top 2 inches typically dry out very fast, eight hours or fewer on hot, windy summer days. It gives the impression that one should water more so we always check with a soil probe deeper than 2 inches rather than judge by the top.
Step 4: Kill sod/vegetation.
If you have sod or perennial grasses/vegetation you must eliminate those first. Several methods exist to accomplish this step. I list these in no particular order, as they each have their own pros and cons. Always check existing roots for new white root growth and plant tops for new green growth. If new growth is present, it is not dead. Do this before moving onto next steps.
A 32’ by 105’ tarp folded to cover four beds instead of eight.
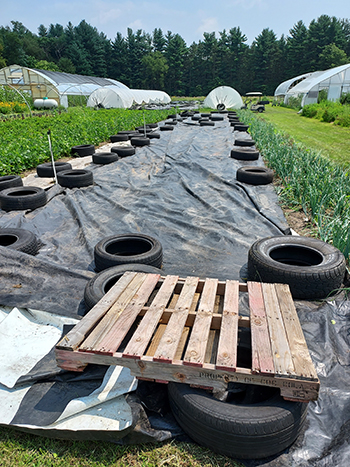
Tarping. The best resource and research on tarping can be found at the University of Maine’s Cooperative Extension, in particular Bulletin #1075 Tarping in the Northeast. Silage tarps cost about $0.10 a square foot. We use 32×105 foot tarps since we are often planting and harvesting in four-to-eight-bed units or cover cropping entire 12-bed blocks. We can easily move tarps to cover entire plots or fold the tarp to cover two, four or eight beds.
Think about using the largest size you can for your scale, but still being able to move it with two people. A 50×105 foot tarp can weigh 150 pounds, which we found too hard to work with, especially if trying to dump water off it when removing the tarp.
Tarping weights can be any variety of things. The smaller your tarps the more edge you have to weigh down. This means more weights, which means more labor to remove and put down. Just make sure they are easy to move and hold tarp for the winds in your area. An 8×8 inch cinder block costs about $1.75, and a 32×105 foot tarp requires a minimum of 32 blocks, 12 to each long side and five on each end. In a high wind area you would need about 55 to a tarp.
Sandbags can be used, but they break eventually, require filling, and are just difficult to move around. I prefer tires as they are free for us. Our local tire shop had to pay to dispose of them, so they were glad to bring trailer loads as we needed them. Make sure to pick smaller car tires and ones that are not worn so bad as metal wire can be sticking out of the tread area.
Tires are really easy to move and store neatly in rows. They also roll easily for placing and removing. We have a specific method of kicking to roll tires or “lift and bounce” a tire so they can roll up to 40 feet accurately. They almost never lay on soil surface so I am not concerned with leaching of tire residue. A tight tarp with edges overlapping by 1 foot minimum and with the prevailing wind direction in mind when overlapping makes a big difference in not having to “re-tarp.”
Tarping can be the most gentle on soil life and structure but requires the most amount of time to kill sod. This must be done for at least six months during spring, summer or fall if killing sod. Tarping in winter does not kill the sod or perennial weeds, because everything is dormant.
Plowing- I prefer the plow/disk method as it is much gentler on soil life and can significantly reduce rhizomatous weed pressure. We plow, let it sit for 10 days then disk, wait 10 days, then level with harrow or light discing. This allows a flush of weeds, and for perennial weeds to dry out at the surface.
Rototilling- This works well if you need to produce in an area quickly, but it will take two times. We did this a couple years as we expanded rapidly. First time deeply and second time shallowly. Typically with 10 days between tilling, with a rain to get another flush of weeds and dry up perennial weeds.
Equipment options/costs
In the May 2025 GFM article “Mechanizing the Deep Compost System,” I described the details of methods and equipment for deep compost production. The key to a good match is what fits to your scale, budget, and bed spacing.
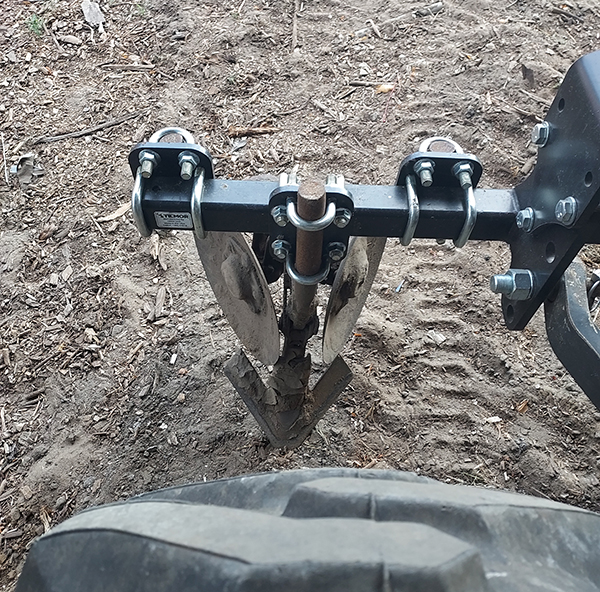
This is a pathway trencher.
Step 5: Apply 2-to-4-inch compost layers.
A 2-inch compost layer is the minimum for weed control. I use 4 inches at first application to build a strong base. The May 2025 GFM article describes how we applied mass amounts of material efficiently.
It is critical that the compost be weed and disease free. A compost analysis, temperature, and turning record of what you purchase, make, and/or get is the best way to ensure this happens. US Composting Council Certified STA Certified Compost is another way to ensure you have good compost since these records are required as part of this certification.
Free is never free in terms of weed seed. If you don’t have the data above, or know the history of the compost, do not use it. The main goal is a weed free base.
Spreading leaf compost in winter to reduce compaction.
For our first 4 inches I use a 50/50 mix of manure based compost and our own non-manure based leaf compost for initial bed creation. I have access to what I consider a base manure compost at $46.80/cubic yard by the semitrailer. It is good, but not an inoculating high quality compost which can run as high as $150/ton, and would tend to burn the plants and should not be put on more than ½ inch thick. High quality compost would be very expensive at the required volume anyways.
I use our own farm made non-manure based compost of leaves from the town leaf collection program. It is cold composted. About 1072 cubic yards each fall are delivered to the farm. I get these for free, and the town pays to hire a large loader to come and hill it into large windrows. I then barter with a neighbor who has a large loader to come turn it three times a year. Once in May, June, July for 1.5 years total.
Every turn cycle results in about 20 percent reduction in pile size, so by the next fall I have plenty of space for more leaves. I start using the leaves right away the first fall for mulching garlic after planting. By the next spring I do similar mulching with all our perennials (rhubarb and raspberries), cucurbits and solanaceous crops. This replaces my use of weed fabric and builds my soil at the same time.
Tarping with tires.
The 1.5 year cycle time results in a “cold composted leaf amendment” that is allowed under my organic certification since no manure is used. The 1,000 cubic yards gives me a total volume of 600 cubic yards of leaf compost that I use and sell. I pull compost analysis at the end of this time to watch my pH, salinity, germination percentage, and other nutrients.
Step 6: Wood chip pathways
In my May 2025 GFM article, I described the reasoning and method for using wood chips in our pathways in great detail. Here are the material and labor costs to use this method.
We dug trenches into the 2-to-4-inch compost layer with our pathway trencher (see photo). If you have a bed shaper that would work, too. This resulted in an 18-inch-wide by 8-inch-deep trench. We filled the paths with wood chips, 2 cubic yards per 100 ft path, which equaled nine wheelbarrow (6 cubic feet each) loads.
We then raked the ridge of soil along the edges of the bed into the middle of the bed. This is key since when we didn’t do this native soil could be on top which led to weeds on the edges of the beds. We used steel wheelbarrows for this since plastic wheelbarrows were too flimsy. One bed with compost and two paths with wood chips took about an hour for three people, a tractor loader, and three wheelbarrows to make each bed.
We tried 12 beds this way and loved it. With the addition of our modified wheelbarrows and compost spreading machine we reduced this labor expense significantly.
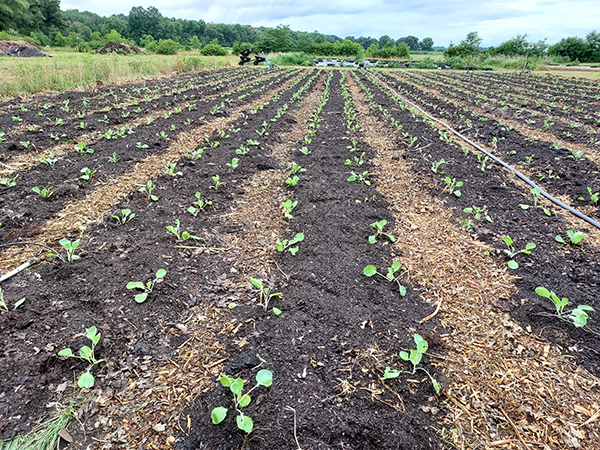
The final look.
Apply amendments and 1 inch compost layer
I want a fully mineralized and balanced soil so we amend heavily the first year with Nature Safe 10-2-8, kelp meal and azomite. We apply this amendment mix with hand drop spreaders or “hand flick” from buckets before our final 1-inch application of compost. As part of wood chipping the paths we applied an additional 1-inch layer of compost to form our bed top overlapping slightly with wood chip pathways. This ensures no native soil is showing. We are building for intensive production with three crops per bed on average so we need really high fertility.
Annual maintenance plan and cost
I plan on a top dressing of 1 inch every other year in the paths with wood chips or as needed depending on how it looks. My goal is annual winter application of 1 inch of leaf compost to all outdoor beds via compost spreading machine to armor the soil and until the soil P and K levels come down. I know using manure-based compost continuously at high rates is not advisable because it can lead to excess P levels and over fertility which can lead to disease and pest issues. I have experienced this in the past.
Other economic benefits of the system
The benefits of this system are many, but I wanted to highlight two specific aspects: 1) Productivity in terms of yield and labor and 2) Weed control. Our yield has doubled per bed foot, both from a yield per crop and yield per bed foot perspective. We know this because we have grown with a rowed and less intensive system and have the data. Granted our cost per bed foot is higher due to hand labor, but the value far outweighs the extra labor expense. Our outdoor beds would typically have up to 2.5 crops per bed per season versus 4.5 to 5 for the tunnels, but the principle is the same. We get higher yield per crop and more crops per bed foot per season.
Our labor is more focused on creating value for our customers. I’m writing this at the end of March 2025, and we have spread leaf mulch and/or compost on 80 percent of our beds, in depths ranging from ½ inch to 4 inches depending on what will be planted in 2025. That is 150, 32-inch-wide 100-foot beds. This is 2.75 miles worth, and we did this on frozen ground (to minimize compaction) in 10 hours with one person and a tractor and spreader.
Comparatively, three wheelbarrows and a tractor, with three people, would have taken about 100 labor hours to complete this same task. I can now take those 90 labor hours and utilize that time for our staff to plant, harvest, and wash/pack, which are the only three things on the farm that actually make money.
Weed control is typically the most challenging and costly part of organic vegetable farming. We spend very little time weeding. We still get some weeds coming in on the leaf compost or weed seed rain from birds and wind, but it is the exception that we are weeding by hand rather than the rule.
This frees up significant time to plant, harvest, and wash which, again, are the only three things that make us money from the vegetables. I believe this is from the synergy effect of the following practices.
Compost mix–There is no to very low weed seed bank, so we aren’t adding weed seed.
No till– We aren’t bringing weed seed to surface, nor are we triggering weeds to germinate as much since we are not providing light, disturbance or aerating the soil as much.
No weed to seed–We spot weed year round for any weeds that are bigger and going to go to seed.
Soil coverage at all times–By planting empty beds within hours, or covering with leaf mulch, tarps, or cover cropping, we give no reason for the weeds to be present.
Tarping–This covers soil so weeds die if present, then germinate if seed present, then die again. And invertebrates and mice may feed on weed seed if present.
Cover cropping–Nature abhors blank soil and will fill it. We cover so weeds don’t have to.
Scheduled lite weeding–Crab grass in the heat of summer is our number one weed along edges and ends, and due to our very sandy soil and droughtiness that comes from a deep compost system. Every Monday we check beds for “white thread stage” on bed surfaces to prioritize areas. Our general strategy is to tine weed every 14 days on schedule or three to four days after a rain, whichever comes first.
We do this all season long and add one cultivating/wire weeding before crop closure if needed. If we see weeds it is almost too late. This amounts to about $2.45 per bed for the labor to weed one crop per bed on average. In quick crops, like baby greens or radishes, we often don’t have to weed at all.
Conclusion
The no-till deep compost system is not without its challenges and is definitely not for every market gardener. It has to fit into the context of your knowledge and management skill, scale, labor availability, resources (access to compost and a carbon resource), and your goals for your farm. The system is ever evolving and we are always improving and adapting. We credit the system with doubling our yields, improving crop quality and storability, and income per bed foot. Our next step is to start investigating the nutrient density of our veggies . . .
To learn more about Perkins’ Good Earth Farm visit us at www.perkinsgoodearthfarm.com or on Facebook or Instagram.
Copyright Growing For Market Magazine.
All rights reserved. No portion of this article may be copied
in any manner for use other than by the subscriber without
permission from the publisher.