


Got weeds? So do most farms – probably all farms, although I’ve heard some deny it. Even if you manage to keep a field completely clean of weeds for a year, there is still a seed bank of weeds waiting to germinate the next season. Even if you were to keep any of those seeds from germinating, or eliminate all of those seeds, birds and other animals, as well as the wind, would import new ones into your field. There’s pretty much no way around having to deal with weeds in some way.
In an organic system there are a variety of weed control techniques, and as with most things they work best when they are all used together in a system. Timing, use of cover crops, tillage, irrigation, mechanical cultivation, and hand work all play significant roles in limiting weed pressure, eliminating competition with cash crops, and reducing the amount of work needed in the future.
To some, mechanical cultivation is one of those black arts, but it’s not as mysterious as it might appear. For farms that are small enough it may just involve a wheel hoe, or even just a hand hoe, both very versatile tools. Large scale operations can afford to set up multiple cultivating tools, dedicated to the different stages of single crops, very specialized tools. Farms in the middle, growing a diverse range of crops, in a variety of seasons and weather, need the versatility of the hand hoe, coupled with the productivity of tractors (or maybe even animal traction).
After a few years of working on farms I landed a job on a 7 acre farm that at the time was using no mechanical cultivation beyond a wheel hoe. That farm was an incredibly diverse CSA and direct market operation, growing mixed vegetables, cut flowers, and herbs. I showed up with an almost entirely blank slate and the responsibility of reducing the weed pressure and the labor needed to do it. I think the original hope was that hand weeding would be eliminated entirely. Let me just say outright that this is not impossible under ideal conditions with some crops, but for most crops, in most conditions, a little hand weeding will probably always be needed. Only a little hand weeding should be needed though, and that is something that you should be able to achieve through mechanical cultivation combined with good tillage practices, cover crops, and judicious irrigation.
From hand scale to tractor scale
When I showed up at the farm everything was done by hand. Hands are very flexible and can deal with all different crop spacings, uneven planting lines and beds, variations in soil and moisture. Tractors are less good at dealing with variation. The first step in transitioning to tractor cultivation is limiting the number of different row spacings, settling on one bed width (unless you have multiple cultivating tractors) and straightening things out, literally. Let me also mention that if you farm moderate slopes you’re going to have a hard time cultivating cross slope. Although it’s a potential erosion concern you’ll be much happier cultivating with the slope. What you start realizing immediately is that there are a lot of compromises needed to switch to tractor cultivation. The labor savings is probably worth it though. As much as I hate to admit it, a small tractor is probably about 10-50 times faster hoeing a bed than a person and probably only costs about twice as much per hour, including the driver, fuel, maintenance, and depreciation.
There are lots of ways to decide on bed spacing, or row spacings, but usually the tractor and existing equipment limits the options. For diversified vegetable production I like using a bed spacing that’s relatively tight and easy to step over. A 3-2-1 row system is convenient for cultivating. Small crops can be grown three lines to a bed, for slightly larger plants leave out the middle row and you have two rows, or for the largest plants only plant the center row and you have one row; thus 3-2-1. Most tractor cultivating happens when the plants are small, regardless of how big they will get. The same cultivating set up can be used in all three situations without ever changing the set up.
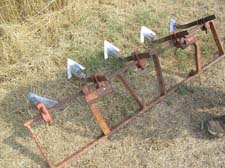
Basic set up for tractor cultivation
The most basic cultivating tool is the sweep. There are lots of variations but basically the sweep is a V shaped blade that attaches to a shank that is then attached to a tool bar. The point of the V faces forward and the blade, slices, or drags, or buries the weeds depending on the situation. A basic set up for a 3-2-1 bed would be to have two sweeps running behind the tire tracks, to clean up the path ways on the outsides of the plants. Two more sweeps would be mounted between the rows to clean up the bed top. If you want to get a little fancier, add a second tool bar, slightly behind the first, with three more sweeps, one directly in line with each row. If you’re cultivating a two row crop you would drop the middle sweep and mount the two outside sweeps upside down (with the shanks facing up) so that they’re effectively out of the row. If you’re cultivating a single line crop you would drop the two outside sweeps and lift the middle sweep. If you’re still with me you now see a simple cultivator for 3-2-1 beds, made from two tool bars and 7 sweeps.
As soon as you try to use this set up you’ll realize some of the problems and start thinking about solutions. This set up works, but only if the plants are in straight lines, evenly spaced, there’s minimal trash in the bed, the bed is absolutely flat (or at least pretty close to it), the soil isn’t too wet, and there aren’t too many rocks. If the lines aren’t straight (or if you don’t drive straight) you’ll take out a portion of the crop. If there’s significant trash in the bed the sweeps are likely to clog and you’ll have to get off and clear them before they start plowing dirt and tearing up plants or burying plants. If the bed isn’t flat from side to side, the sweeps have to be adjusted so that they are all at the proper depth, usually about 1” below the surface. If you don’t want to keep readjusting your sweeps every bed, you better hope all of your beds are the same. If the bed isn’t level from end to end, you’ll have to keep adjusting the depth of the sweeps as you travel down the bed – remember, this means it has to be the same within about 1”, everywhere. If the soil is too wet the sweeps will clog, or they’ll toss big clods that bury the crop. If there are lots of rocks, especially big ones, you might break your blades, or even bend shanks.
Sounds pretty miserable doesn’t it? There are lots of fixes that have been developed over the years for all of these problems, and they all add additional layers of complexity to the system, which also means expense. I’ll visit a few of them here.
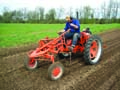
Guidance is one of the big issues in cultivating. The more accurate you can be with your cultivating, the closer you can get to the crop and the less hand weeding you’ll need to do. A lot of cultivating tractors have belly mounted tool bars so that the driver can see what he or she is cultivating. Farm All, Kubota, John Deere and others have all made tractors like this with offset motors to give the driver a view of the center row in front of them. Allis Chalmers made a tractor which is very popular for cultivating with the motor behind the driver so that there is an even more clear line of site. It is also possible to cultivate off the back of a tractor, and most larger cultivators are set up this way. To guide those, cone wheels, coulters, or even someone steering the cultivator separately from the tractor are all options. A second advantage to the belly mounted cultivating equipment is that corrections in steering make a smaller difference in the lateral correction of the tool bar and it corrects the same direction. For tools mounted off the back, if the operator turns slightly left, the tool bar actually moves slightly right.
When using sweeps if I have two rows that are 18” apart and I’m using a single sweep between them, I want to leave about 1-2” on either side of the row undisturbed and I can probably drive with 1-2” of lateral accuracy. This means I would use a sweep that’s 10-14” wide. A sweep will also move soil 1-2” on either side, so if the crop is small I definitely want to use the 10” sweep to avoid burying the crop. When I first started cultivating this would have sounded too narrow – only 10” for 18” of space? In most situations I actually use a 9” sweep for 24” of space – and I move soil all the way into the row. The wider the sweep and the faster you drive, the greater the amount of soil it will throw to the side.
The V shape of the sweep helps it shed minor trash, but any crop residue, and even weeds as small as thread stage, will start to clog the blade, especially in moister soil. Fine bed prep helps here, as does cultivating shallowly and in dry conditions. There are lots of rolling cultivators that help deal with this problem, as well as crusty soils. In positively wet conditions, cultivation may not be very effective, and sweeps are not a good tool. Their scraping action and tendency to throw clods can really tear up a field and leave it in horrible shape when it does dry out.
Big conventional farms in the Central Valley of California will use a land plane to completely level their fields before bedding up. The beds they make look like they were engineered to fine tolerances, and they were, because it makes them easier to drive equipment in, and easier to irrigate. Even then they use gage wheels, spring loaded levelers, and parallelogram followers to make sure that each cultivating blade is running at the correct depth. When the sweeps run too deep they disturb roots and throw soil, if they’re too shallow they don’t take out the weeds. In rocky situations you can get special shanks with spring trips to reduce the impact of hitting rocks.
After experiencing all of these issues with sweeps I looked for other tools to augment the sweeps and help me save time. What I started using was a tine rake. The rake has spring loaded tines every 1 1/2”. The tines are just stiff 1/8” wire that’s dragged through the soil at a slight angle. Because the tines are spring loaded they will follow the contours of a bed that’s not dead flat and they’ll bend around hard obstacles, like rocks or established crops. The tines are mounted on four separate bars so that they’re all about 6” from each other. That allows trash to easily flow around the tines. Because the tines are small they don’t throw a lot of soil so they work well around small crops. The version I used had Lely tines which are individually adjustable so I could pick up the tines that were in row and use the same cultivator on three, two, or one row crops.
The drawback to the tine weeder is that it only takes out very small weeds. It is easy to drive, and fast though, so if you use it weekly most of the weeds get taken out by it. It also works in fairly wet soil since the tines are small and the wiggling from the springs tends to clear soil from the tines. This can help loosen rain compacted bed tops in the wet season, improving infiltration and reducing erosion.
Eventually even the small farm that is cultivating with a tractor starts to collect more cultivating tools. The tine weeder is good, but it is better in conjunction with sweeps. In some situations disks, torsion hoes, spider wheels, finger weeders, brush weeders, or other specialized cultivating tools might be appropriate. We all have to start somewhere and usually it’s going to be with the most generalized tools. Those simple tools, even with all their problems, will save time, money, and backs if used properly.
Josh Volk does hands-on consulting with farmers and gardeners in the Pacific Northwest and around the country. More of his writing can be found at slowhandfarm.com and grainsandpulses.blogspot.com. He can be reached at josh@slowhandfarm.com.
Copyright Growing For Market Magazine.
All rights reserved. No portion of this article may be copied
in any manner for use other than by the subscriber without
permission from the publisher.