


This is the first in a quarterly series on alliums, the onion family. By growing a variety of allium species, there is not really a beginning or an end to the season. Even though alliums are usually not the most lucrative crop, the fact that they are used in almost all cuisines, and that many species can be stored for later sales, gives them special status. As a staple with year-round demand, stored product can be sold when fresh produce is scarce. This time of year, it’s mostly harvesting.
Onion scallions
Around May 10, our first outdoor onion scallions are big enough to harvest, just as the hoophouse ones finish up. We started plugs in January and February and clump-transplanted them in March and April. These scallions continue through June. In milder climates, you can schedule harvests through summer, but we cannot get good quality ones in Virginia after late June. We use Evergreen Hardy White, which is widely available and extremely cold tolerant.
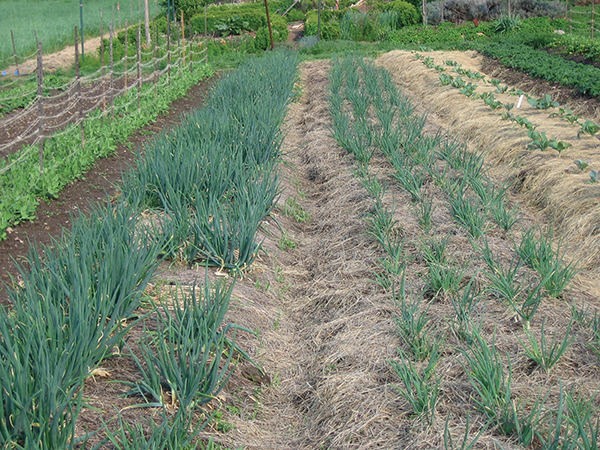 Beds of yellow potato onions in Virginia in the spring; September-planted on left, November-planted on right. Photo Kathryn Simmons.
An efficient harvest method with little scallions is important. Loosen the soil with a digging fork, then lift out a clump. Handle scallions in bunches as much as possible. Shake the plants, and trim off the roots and ragged tips. Holding the bunch in one hand, pass the scallions one at a time to the other hand, separating them and pulling off a single outer leaf, not more. Don’t fuss with them too much.
Next, set them in water in a small bucket to self clean while you continue. When the bucket is full enough, dunk the scallions up and down, and transfer them to a clean bucket with a small amount of water to keep them fresh.
If you are going to band them, start out with a bunch of rubber bands around three fingers on the hand holding the bunches (leaving the forefinger free for tasks demanding dexterity). When you’re ready to band them, use the other hand to pull a rubber band into position.
Garlic scallions
Garlic scallions (small whole garlic plants) provide our first allium harvest of the calendar year, starting in mid-to-late March and continuing (if we have planted enough) into May. See my May 2008 GFM article, “Garlic scallions, scapes and harvest how-to.”
Another spring allium harvest is garlic scapes (the firm, edible flower stems of hardneck garlic) when the tulip poplars flower. In a warm spring, that can be the end of April. Garlic scape arrival is partly temperature dependent. We harvest scapes two or three times a week for about three weeks until no more appear.
Many growers wait until the scape has curled round to cut it off. We harvest ours sooner to let the bulb grow as big as possible. We pull our garlic scapes to get the most out. We love this crop and appreciate a late-morning task that’s done standing up.
In our climate, the appearance of scapes indicates the garlic will be ready to harvest in three weeks. I’m not sure if the same timing works everywhere, so keep records to learn what to expect. Garlic harvest dates are partly day-length dependent.
In general, plant flowering is triggered by some combination of enough vernalization (chilling hours — maybe 10 weeks below 40°F/4.5°C), plant maturity, temperature and photo-period (the relative length of day and night). In cold weather the plants suppress the flowering signal.
The leaves perceive the amount of daylight, and when the temperature is also right, they trigger flowering by sending a signal (florigen) to the shoot tips. Florigen may be an actual compound, or may be some combination or ratio of several hormones produced by the plant. Almost all these factors are outside our control once the plant is in the ground, so the best we can do is pay attention and be ready to act.
There is a bit more information about the triggers for bulb initiation. Garlic bulb initiation (and the end of leaf growth) is triggered by daylight increasing above 13 hours (April 10 here at 38°N). Soil temperatures over 60°F (15.5°C) and air temperatures above 68°F (20°C) are secondary triggers.
When I was in Jamaica doing farmer-to-farmer training in 2017, I researched growing garlic in the tropics. It may be that temperature is a stronger trigger and day-length less important in latitudes where day-length does not vary much. Some growers produced garlic when I didn’t expect it to be possible. There are two specific challenges to growing garlic in the tropics: tricking it into thinking it’s had a winter and timing the planting to have big plants when they start to form bulbs. I’ll come back to the topic of tropical garlic growing in the next article, so that those in tropical regions get 10 to 12 weeks to vernalize their garlic before planting in the winter months.
For signs of garlic maturity watch the color of your garlic patch for a general “fading” of the green color and also count how many fully green inner leaves there are on a dozen random plants. Having at least four green leaves will help your bulbs store well. Another sign of maturity with hardneck garlic is the presence of small air spaces between the stem and the cloves. Dig a few sample bulbs and cut them in half horizontally.
Hot weather above 91°F (33°C) ends garlic bulb growth and starts the drying down process. If your temperatures don’t reach that level, other triggers end bulb growth. It is important to get good rapid growth before conditions halt growth. Garlic can double in size in its last month of growth, and removing the scapes can increase the bulb size 25 percent.
Hang garlic to cure for three to six weeks or even longer until the necks are dry. Don’t set fans too close to the curing garlic, or the closest bulbs will dry too much and shrivel.
For information on snipping, sorting and storing garlic, see my August 2015 GFM article, “Checklist for a successful garlic harvest.” Garlic can be stored cool, or at 60°F to 90°F (16°C to 32°C), provided it has never dropped into the sprouting temperature range of 40° to 55°F (5° to 13°C).
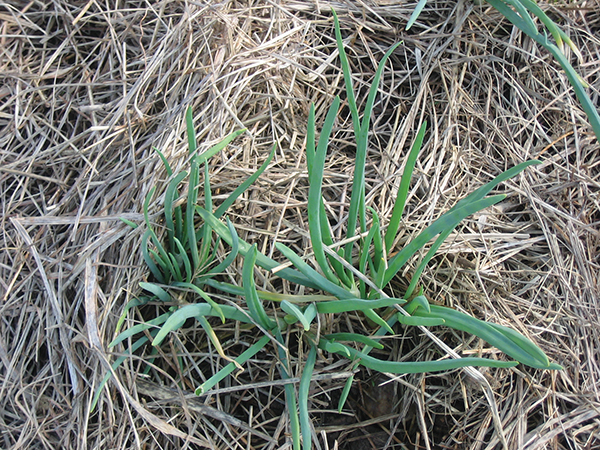 A yellow potato onion plant- a single onion has divided to grow a cluster of small onions. Photo Kathryn Simmons.
Softneck garlics tend to store longer than hardnecks, so we always save ours till the hardneck garlic is gone. The big reason we don’t grow mostly softneck garlic is that the bulbs have lots of tiny cloves in the center. According to Ira Wallace at Southern Exposure Seed Exchange, most hardnecks store four to six months, although ‘Music’ and ‘Chesnok Red’ can keep seven months or more in central Virginia. Softnecks such as ‘Italian Softneck,’ ‘Inchelium Red’ and ‘Silverskins’ can store for up to 12 months under good conditions.
Cipollini
Cipollini (cocktail onions, boiling onions, pickling onions) are small, attractive onion bulbs that can be easier in marginal onion climates than full-sized onions, or can be an additional allium crop. We sow in plug flats January 25 and transplant on March 21. The larger ones can be used as fresh bunching onions. All may be cured. We love ‘Red Marble’ and ‘Amethyst,’ which store really well. ‘Purplette’ and the flat ‘Gold Coin’ disappointed us; they don’t cure well here.
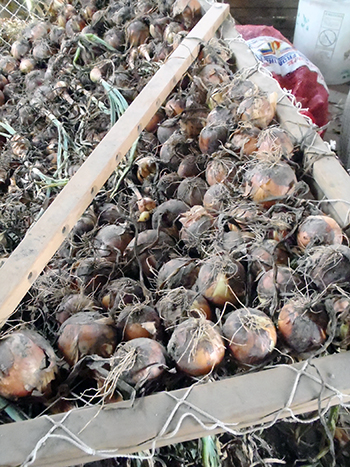 Curing bulb onions on netting. Photo by Wren Vile.
Cipollini naturally have more sugar than most onions, which makes them ideal for caramelizing or roasting whole. The scheduling and final size of your cipollini will depend on your latitude and temperatures.
Potato onions
Potato onions are a hardy, perennial multiplier onion. Once you have them you are self-sufficient. Select the best bulbs from your harvest to replant for the next crop. Also known as Hill Onions, Mother Onions and Pregnant Onions, they produce a cluster of tasty (but not pungent) bulbs from a single bulb, or a large bulb from a small one.
Potato onions have good resistance to drought, pink root and onion fly, and are widely adapted (not Florida or southern Texas). When properly planted they can withstand sub-freezing temperatures in the continental U.S.
You can order potato onions from Southern Exposure Seed Exchange and other suppliers for fall shipping. See SESE’s “Perennial Onion Growing Guide” and “Garlic and Perennial Onion Growing Guide.” See my November 2007 GFM article, “It’s time to plant potato onions” for information about harvest, curing and sorting.
Potato onions are ready to harvest when the tops die. Once you see the tops start to fall over, stop watering and let the onions dry down. Not all will be ready the same day, but because mature onions easily get sunscald, it’s best to harvest them every few days. Don’t break over the tops in hopes of a single harvest; it reduces the storage life. Don’t break up the clusters as you harvest; this triggers sprouting.
The potato onions sit on the surface and are easily picked up without tools. Handle them gently, to prevent bruising and scratching. The potato onions, which were planted in September, will be ready to harvest at the end of May or early in June in our central Virginia climate. The September-planted potato onions were the largest bulbs when planted, and they will usually have divided and produced clusters of small onions. Spring-planted potato onions will be ready for harvest a little later.
 An emerging garlic scape, before it has curled. Photo by Pam Dawling.
To cure potato onions, set the clusters on airy benches or racks in a barn. The tops break easily, so you cannot hang them as you might hang garlic. Curing is important for quality and long-term storage. Space the bulbs loosely to provide good air circulation. We use fans continuously in our high humidity. Dehumidifiers or air conditioners also improve drying. Growers on the West Coast have an easier (drier) climate.
Potato onions need sorting about once a month, starting a month or less after harvest. Timely sorting minimizes rot spread. Wait till the third sorting, in early August, to snip off tops, separate clusters, sort by size and decide what to save for replanting.
The small- and medium-sized bulbs keep eight to 12 months under good conditions, and are the best to replant. The giants, bigger than 2-2.5” (5-6 cm), do not store well. Go ahead and sell those. Alternatively, if you want to increase your crop as quickly as possible, refrigerate the large onions (since they don’t store as well) to plant in September. We plant our medium-sized ones in late November and our small ones in late January.
Bulb onions
If you have more than enough bulb onions planted than you need for storage, you can reduce the work of drying and curing by selling bunches of green bulb onions. One strategy is to overplant bulb onions beyond the amount you need for drying. If the crop looks good when they are starting to bulb you can get some early onion sales with green bulb onions. But if too much of the crop has succumbed to pests or disease and you need everything for storage, you can leave them all in the ground until they start to dry down.
For green bulb onions, pull the onions after they start to form a bulb but before any leaves die by grabbing the plants low on the neck to avoid crushing the green leaves. Remove most of the dirt in the field. If necessary, spray on a rack, but do not immerse them in water as washing shortens shelf life. Bunch two to four onions together. Store at 32°-41°F (0-5°C), 95 to 100 percent humidity, for one week.
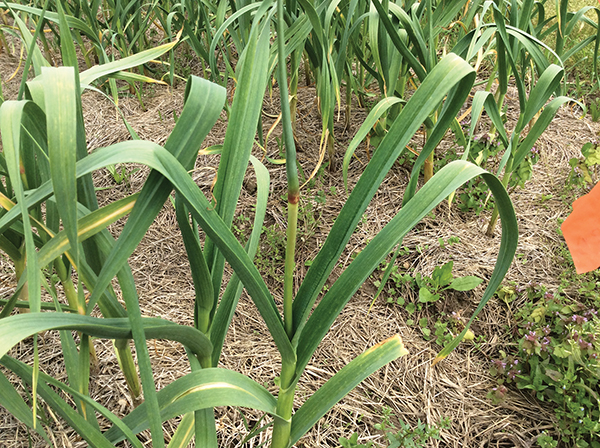
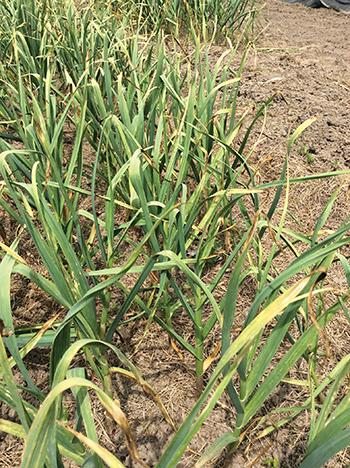 Softneck garlic ready to harvest. Though normally yellow leaves are an indication of a health problem, as garlic approaches harvest the number of yellow leaves show the degree of maturity. Photo by Pam Dawling.
The best varieties for your area will depend on your latitude. I wrote about this in my book Sustainable Market Farming and in GFM in October 2005, so, I’ll skip that complex issue here.
See the SESE “Onion Growing Guide,” which states: “When most of the tops have fallen over, pull onions, cure in partial shade for two to three weeks until necks have thoroughly dried. Clip tops to within 1 inch of the bulb.”
If the varieties you grow are not storing types, simply pull them up when you like, or when the tops fall over. Most kinds will keep for a few weeks, but some not much longer than that. Be realistic. If you have lots of non-storing ones, sell them fast.
Start harvesting a variety when about 50 percent of the tops have fallen, mid-to-late June for us. It’s best to harvest during drier weather, but sometimes you have to harvest wet just to get them out of the ground. Don’t let onions sit around in wet soil during very hot days.
Gently lift the onions out of the soil, harvest only the onions with floppy tops, leaving the upright onions in the ground to harvest on a second visit.
To cure, handle bulb onions gently; many rots are the result of poor handling post-harvest. Spread in a single layer in a warm dry place, and check every few days. The ideal conditions are 85ºF to 90ºF (27ºC to 32ºC) with constant air movement, and no direct strong sunlight. Some growers pull 80 to 90 percent shade cloth over a hoophouse and cure onions on racks. We use racks in a barn with fans. Storable varieties should be cured until the necks are dry, about two weeks.
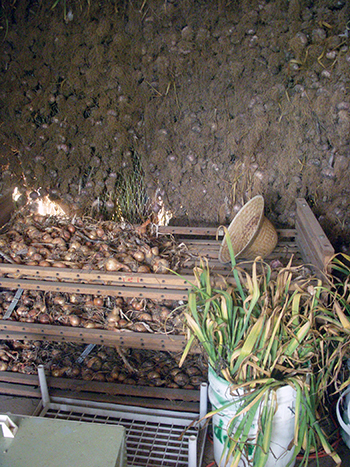 Potato onions drying on racks, with garlic hanging in vertical netting. Photo by Marilyn Rayne Squier.
Some growers recommend curing in the outdoor sun. This applies farther north or farther south and doesn’t work in our climate. We need to provide partial shade, moderate temperatures, good air flow and no rain. Farther north, temperatures are lower, and onions do not bake during outdoor curing. Farther south (in Georgia for instance) onions mature much earlier, they have been growing over the winter. The sun is not yet too intense or humidity too high, and they can cure onions in the field.
Trimming should begin about two weeks after hanging the onions to cure. Test a dozen necks by pinching gently just above the bulb and rubbing your thumb and forefinger back and forth. Determine if necks are dry and papery or still slippery or moist. Storage onions are ready for trimming when most of the necks feel dry and papery. If more than a few still feel damp, although not slippery, test again in a couple of days.
To trim, get good scissors or pruners, and a glove on your scissor hand to prevent blisters. Trim the necks off ½ inch (1 cm) from the bulb, and trim all the roots off. No matter what, in our climate, we cannot wait more than three weeks after harvest to trim the onions or we get more rot.
Sort the onions while trimming. Onions with damp necks are for immediate use. Bulbs that feel firm and have dry necks are storage bulbs and should be trimmed and put into mesh bags, which we store flat on shelves in our basement. Most onions store reasonably well if spread in a layer fewer than 4 inches (10 cm) deep or hung from the ceiling in small mesh bags. Avoid large bags where the weight of the onions will crush the ones at the bottom. Ensure good air circulation.
Onions can be stored at 60°F to 90°F (16°C to 32°C) if they have never been refrigerated. It is important to avoid the 45°F to 55°F (7°C to 13°C) range, because that’s when they sprout. We have limited refrigerated storage, so we keep alliums in the warmer storage range until room temperatures drop into the danger zone, by which time there is space in the cooler.
In our latitude and climate we cannot grow hard long-storage onions. Here’s information from the Roxbury Farm Harvest Manual (upstate New York), a quite different story from Virginia:
“Pull the onions out of the ground, cut off the tops immediately, 2-4” (5-10 cm) above the crown. If for long-term storage, bring the onions to the greenhouse for curing. Cover the greenhouse with 80 percent shade cloth to protect onions from sunscald. As soon as the necks are sufficiently dried up (you can no longer roll any stems between your fingers and the stem tissue feels like paper), and the leaves easily crumble off, give them a superficial cleaning, and move the onions into the barn (and not in the cooler due to high moisture levels). Store at 32°F-41°F (0-5°C) 65-70% humidity.”
The warm season is not a good time for planting most alliums. If you have perennial leeks or Egyptian onions, you could divide clumps and replant them. But I would postpone doing this and replant dry bulbs in August, or divide newly re-sprouting clumps in September. June is leek transplanting time in Virginia. See my article in the March 2022 issue of GFM, “Leeks: a guide to the versatile winter workhorse.”
Because alliums don’t have big spreading leaves, they are not good at shading out weeds. Particularly in warm humid climates like ours in central Virginia, bulb onions and garlic approaching harvest will benefit from removing weeds and mulch to let in fresh air to help the bulbs dry down. We don’t mulch bulb onions, but we do mulch garlic. Removing the mulch a few weeks before harvest reduces fungal disease and helps the bulbs to dry down. We also mulch overwintering multiplier onions, but those mature mostly on the surface, rather than in the soil, leaving the bulbs in what looks like a nest of mulch.
Pam Dawling works in the 3.5 acres of vegetable gardens at Twin Oaks Community in central Virginia. Her books, Sustainable Market Farming: Intensive Vegetable Production on a Few Acres, and The Year-Round Hoophouse, are available from Growing for Market. Her weekly blog is on her website and on facebook.com/SustainableMarketFarming.
Copyright Growing For Market Magazine.
All rights reserved. No portion of this article may be copied
in any manner for use other than by the subscriber without
permission from the publisher.