


Drip tape can last three or four seasons before it starts to clog or develops too many holes. So it pays to handle it gently and try to prolong its life. One of the best ways to take care of drip tape is to gather it at the end of the season and store it someplace where it won’t be exposed to the weather or rodents. A farm-made drip tape winder is the tool for the job.
Drip tape winders come in many versions, and some are more expensive or more dependent on access to discarded spools than this one. I’ve built several winders and the design that I’m most fond of I got from Mike Raymond when he was the manager of Holcomb Farm CSA in Connecticut. All of the parts for this one are available at a good hardware store and are relatively cheap.
Building the winder
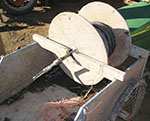
The winder is made from black pipe nipples (available at most hardware stores) and plywood. You can either make a stand for it or, if you have a garden cart, make an adapter for wheeling it around on the cart. To build the roller itself you’ll need two 24-inch circles of plywood. Half-inch is probably best but anything that’s not totally flimsy will work. Buy 1-inch black pipe nipples in the following lengths: two 5-inch, two 6-inch, and one 12-inch. Also buy two 1-inch elbows, four 1-inch flanges (usually only available in galvanized), and eight flat-head machine screws with nuts and star washers that are long enough to clamp together the flanges with whatever size plywood you use.
The winder is assembled by drilling four holes in the plywood rounds that will allow you to bolt the flanges together at the centers of the rounds. The flat-head screws should sit flush in the flanges that go to the inside of the roller. Now insert the nipples. Starting from one side, the assembly goes 5-inch nipple to flange (nut side), to 12-inch nipple, to flange, to 6-inch nipple, to elbow, to 6-inch nipple, to elbow, to 5-inch nipple. If you got that, you now have the two rounds with about 12 inches between them, a short axle sticking out of one side and a crude crank sticking out of the other.
Now, to make it work you need a center for your spool and a stand to hold it up while you crank. I make the spools out of scraps of 3-inch pvc. Any stiff plastic pipe will work but don’t use cardboard. I made that mistake my first year using the roller and the next spring when I went to recover the spools the centers had dissolved from the moisture left in the tape. The spools need to be cut very square and to the exact length that will be captured firmly in the center of the roller. To find this measurement tighten the rounds onto the 12-inch nipple and measure the distance between the rounds close to the flanges. Then loosen the rounds until there’s only about two or three threads holding them onto the nipple and measure again. You want a length between these numbers.
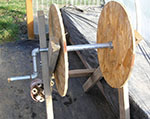
To make a simple stand that works with a garden cart, take two 2x4s that are 7 inches longer than the width of your garden cart and drill a 1 ¼-inch hole ¾ of an inch from the edge at the center of the 2×4. Notch this out so that the winder axles can sit down in the notches. Cut two 17-inch lengths of 2×4. These are screwed to the opposite side from the notches in the long 2x4s to make a rectangle. This frame sits on top of the garden cart. The roller sits on top of the frame in the notches. The winder can now be rolled from bed to bed using the garden cart.
Using the winder
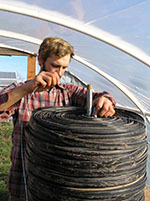
Drip tape comes in very compact rolls, and it’s impossible to get it that compact when you wind it back up. With thiswinder, and for the sake of saving space, it’s important to wind the tape tight and flat. To start, insert a new pvc spool in the center of the winder. Make sure that the tape in the bed is open at both ends to let water and air out. Also, make sure that it’s not held down by weeds. Make a full wrap around the spool and start winding with the crank while holding a little tension on the tape and pinching it flat to exclude as much air and water as possible. Work the tape back and forth as you wind so that it fills the spool evenly. This is important!
When you come to couplers, remove them. When you come to the end of the line, start a new piece of tape by leaving about 12 inches of the old tape pulled tight and capturing the new tape under it. As you start winding slowly again the old tape will capture the new and then as the old tape end is about to come out of your hand move it under the old tape to keep it from coming loose. (This is a fancy way of doing this which makes unrolling easier but isn’t necessary.)
The spool is full, and will be very heavy, when you get to within an inch of the edge of the plywood round. At this point, you need to tie up the spool and start a new one. Be very careful with this next part if you want to be able to reuse the tape without hours of tangled tape frustration. Lift the winder out of the notches and place the winder, crank side up, on the handle of the garden cart. The axle is down and the plywood round is sitting flat. Carefully unscrew the crank side plywood round from the winder exposing the roll of tape. Using poly twine (not natural twine which will rot like the cardboard I warned against earlier), carefully drop the twine end down the inside of the spool and lift the bottom edge of the roll enough to pull the twine around and tie it tightly. Do this in three or four spots around the spooled tape to make a tight bale. Handle these bales carefully and store them on their sides so that they do not come apart at the edges (which would signify disaster).
In the spring, you can just remount the bales on the winder, cut or untie the twine, and then roll the tape back out. For easiest use, if you have different lengths of tape, wind them on separate spools and label the spools clearly with something that won’t rot or fade. Similarly, if you use different flow rates, label them appropriately on separate spools. I have used this system on miles of drip for more than eight years and it works really well, but it is not at all idiot-proof, so pay attention to what you’re doing. The neater you are with the process, the better it works.
Josh Volk farms and writes at the edge of Portland, Oregon. He also helps farmers around the country improve their farming systems. He can be found at www.slowhandfarm.com.
Copyright Growing For Market Magazine.
All rights reserved. No portion of this article may be copied
in any manner for use other than by the subscriber without
permission from the publisher.