


I worked on a farm a couple of decades ago where we had two small greenhouses for propagation. One was heated with a typical greenhouse heater run on propane, the kind that hangs from the bows and blows hot air through the house to bring the temperature up. The other was unheated. We used the unheated house for overflow in the peak of the spring when we didn’t have enough space in the heated house and some of the hardier seedlings appreciated the slightly slower growth and chance to harden off a little before going out into the field. The propane for the heater was expensive so we didn’t keep the heat all that high, mostly around 60, and most crops were fine with that, but some definitely wanted more heat. It also wasn’t warm enough to quickly germinate most crops, so we did that in a basement and then schlepped all of the trays up to the greenhouse when they were big enough for the greenhouse, which was less than ideal. My solution at the time was to add a table with bottom heat into the greenhouse.
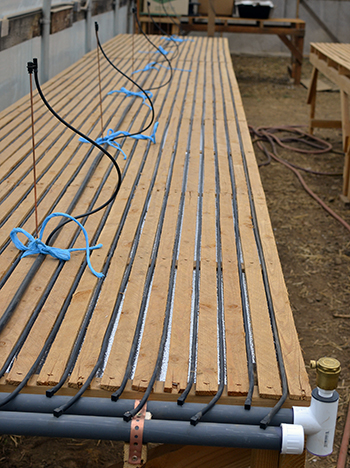 The spaces between lath strips make a perfect place to put the spaghetti tubing. You can just see the foil side of the foam insulation below the spaghetti tubing. The brass valve on top of the right end of the manifold is an air relief valve (this pipe isn’t actually hooked up at this point, a pipe will come up into the T on the right to feed it).
My thinking there was that it would be more efficient to just heat the area right around the plants that needed the heat the most, and any waste heat would warm the air which would cut down on the amount of work the forced air heater needed to do. This basically moved our warm zone out of the basement and into the greenhouse. It eliminated the schlepping, and it made that zone available not just to germinating plants, but also to bigger ones that wanted more heat – like peppers and eggplant. This wasn’t an original idea, it’s actually pretty common in the greenhouse world, so I was able to research the available bottom heat systems and buy one off the shelf.
In the September 2021 issue of Growing For Market a chapter on building simple seedling benches from my book, Build Your Own Farm Tools, was reprinted. In the chapter I mention that the bench design works really well with a bottom heat system that uses spaghetti tubing, but I don’t detail out how that works, or how to build your own. I’ve gotten some questions about that since and so I thought I’d address more of the details in an article here. This article also expands on a short one I wrote back in the January 2009 issue of Growing For Market. If you go back and read that article, you’ll notice that I’ve changed my tune slightly on a few points in that one, as both technology and my own farm has changed since then.
Electric heat mats
Before I talk about the spaghetti tubing option I’ll mention two other options. The simplest to buy and set up (assuming you can get electricity to your greenhouse) is an electric heat mat which is made for seedling trays. This is what I currently use because the area I’m heating is relatively small (I have enough mats for about 20 trays). Older style mats were sometimes electric shock prone, but with the commercial grade ones I’ve gotten (Jump Start and Redi-Heat) I haven’t had problems with that and they’ve lasted me for at least 5-6 years of heavy use before wearing out – at which point they just stop heating evenly.
Electric heat mats require a thermostat which typically has a probe on the end of a wire that you stick in the potting soil and an outlet for a plug that turns on and off depending on what temperature you set the thermostat to.
It’s critical that you size everything appropriately. The thermostat will have a maximum number of watts it can support and the mats will tell you how many watts they draw. Outlets also have a maximum number of Watts you can draw from them, typically less than 1800 watts (that would be a 15 amp circuit – I’m assuming a typical US circuit that is delivering 120 volts), but sometimes 2400 watts (if you have a 20 amp circuit with nothing else on it).
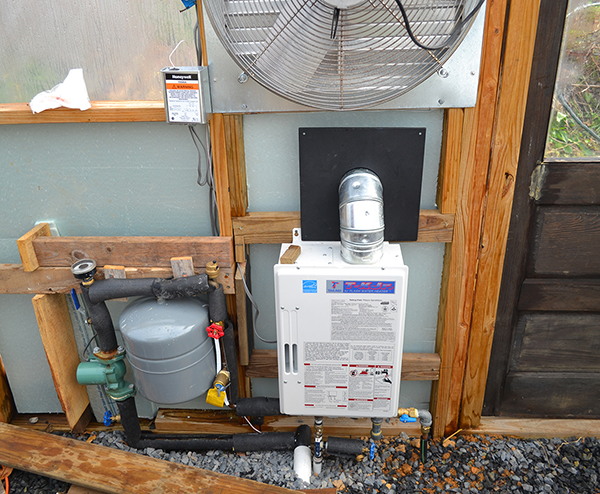 A bottom heat system using an on-demand water heater at Liberty Gardens in Coopersburg, PA. The heater is the white box. There is a grey expansion tank to the left and to the left of that you can see the green pony pump. They’ve insulated all of the pipes to conserve the heat. There is an air relief valve just above and to the right of the expansion tank and a thermometer above and to the left. This is the most compact system I’ve seen.
It’s important to pay attention to all of those numbers and that you keep your outlets and wires in good condition. If you’re using an extension cord make sure it’s also rated for the number of amps you’ll be putting through it for the length of run (longer runs require larger gauge wires, as do higher amps). Overloading a circuit, especially for the extended periods of time that a heat mat will run in cold conditions, can heat up the wires feeding the outlet in the greenhouse and if those wires are at all loose or undersized they can build up enough heat to start a fire. If the wires are in good shape, appropriately sized, and there are no loose connections, as long as you don’t try to run too many heat mats on one circuit you’ll be completely fine.
If your electric heat mats are giving you little shocks, something is wrong and the electrical insulation has failed somewhere. This may or may not be repairable; usually not. This is somewhat analogous to a leak in a pipe, although instead of leaking water you’re leaking electricity which can be more dangerous than water, but how dangerous depends on how much is leaking. Like most leaks, it’ll probably get worse with time, not better.
Sand tables
The first farm I worked on had a heated sand table. This is basically a shallow sandbox on table legs and electric heating cables were buried in the sand. The sand would spread out the heat from the cables and deliver it to the trays which sat directly on the sand. It also created some drainage for the trays. When wet the sand distributes the heat even better than when dry, although the plant roots do tend to find their way into the sand once the plants get bigger. Just like the heat mats the system had a thermostat that turned it on when the temperature of the potting soil dropped, and off when it came back up to temp.
Sand tables can also use buried water pipes that circulate hot water instead of electric heating cables. Typically these might be ½” pipes or larger, spaced a few inches apart, very much the same as a hydronic home heating system. To circulate the hot water the thermostat turns on a small pony pump, and the water is typically heated by a water heater or boiler, just like what you’d have in your house.
Spaghetti tubing systems
Spaghetti tubing systems are hot water systems that forgo the sand table. The idea is that the tubes are small and cheap enough that you can run a lot of them on a close spacing so that you don’t need the sand to spread out the heat from larger pipes. There are a few advantages here and a few disadvantages.
On the advantages side they don’t weigh nearly as much as a sand table so the tables themselves can be much lighter and cheaper, and the tubing itself is typically cheaper. There’s also no sand to make a mess of, or to have roots crawling in.
On the disadvantage side, there are more small parts which are more easily broken or clogged. The plumbing for a sand table could be made from non-plastic parts if you prefer, but a spaghetti tubing system typically relies on flexible plastic tubing and plastic barb fittings to make it work.
Spaghetti tube systems and lath tables
A spaghetti tube system meshes nicely with a lath table top because the thickness of the lath is just slightly less than the spaghetti tube, and the space between the lath strips is just slightly more. This means the spaces between the lath can act as guides to keep the tube evenly spaced, and they will still touch the bottoms of the trays for the best heat conduction. When using lath tables with spaghetti tube it’s important to put stiff foam insulation below the lath to help support the tube between the supports for the lath. The insulation, especially if it’s reflective, will help focus all of the heat into the trays and keep more from escaping below. The insulation needs to be angled very slightly to allow water to run off so that it doesn’t pool and make the insulation sag. Just an eighth to a quarter inch is enough to make a difference from one side of the table to the other.
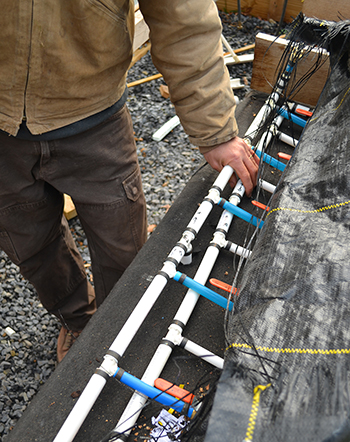 At Liberty Gardens they used pex tubing to build manifolds and circulate the hot water under their tables. These are the same materials used in hydronic heating systems for houses.
Plumbing a hot water system
The plumbing is pretty straight forward for the most part, but there are some non-obvious parts that are required to make it easy to fill, monitor, maintain and drain the system when needed.
The obvious parts are a water heater or boiler to heat the water. Pipes from the water heater go out to a pony pump which is used to circulate the water. The pipe from the pony pump runs to one or more manifolds which distribute the water to the spaghetti tubes, or the pipes in the sand table. If your table is small enough this could be just one pipe that snakes back and forth across the table, but the water will cool the farther it goes so it’s better to make runs that go down and back and sit next to each other so that the average temperature at any point on the table is the same.
 You can also run spaghetti tubing on the surface of any table, using plastic spacers every few feet. When I first started building tables with lath I hadn’t figured out that it was better to run the lath lengthwise.
The spaghetti tube or pipes on the sand table end in a return manifold which in turn goes back to the water heater to reheat the water. Again, it’s best to have the return manifold on the same side of the table as the feeder manifold in order to even out the heat on the table itself.
That’s it, pretty simple! Except for a few more details…
The controller
Your pump will need a controller to turn it on when the soil on the table gets too cold, and off before it gets too hot. These are commonly made for many heating and cooling applications and typically will have a long wire with a temperature probe on the end and a little screen where you set the temperature. The controller needs to be wired both to a power supply – usually directly to a circuit already coming into your greenhouse but you could outfit it with a power cord and plug it into an outlet – and also to the motor. Depending on how you wire it to the motor it will turn it on or off at the set points and there will be an instruction manual with the particular controller which specifies how it should be wired.
The fill valve or reservoir pipe
There are two options for making sure the system stays full of water – which is essential if you don’t want to burn up your pump, or your water heater: A pressure reducing fill valve, or a reservoir. I prefer the reservoir which is easier to install and trouble shoot, but requires a bit more continuous attention through the season.
A pressure reducing fill valve allows you to connect the system into your existing water supply line. Any time the pressure on the water heater side gets too low, typically from a minor leak or evaporation, the valve will let water through from the supply line into the water heater to refill the system. The pressure in your supply line is probably too high, so you need a fill valve that reduces the pressure. You also need a small expansion tank to deal with the fact that the water will expand and contract as it heats up and cools down and as the system is closed it needs somewhere for the expansion to go so nothing explodes.
If you use a reservoir pipe the system is open to the air and there’s no need for a pressure tank. Instead of your supply line automatically filling the system if it gets low, you need to actively monitor the reservoir and make sure it doesn’t run empty. The simplest way to make a reservoir is to take a couple foot section of 3 or 4” pipe and reduce it down on one end to a size that will T into your cold water side of your water heater. This needs to be the highest part of the system so it usually sits on top of the water heater. Because it’s up high it’s nice to add a section of clear tubing to the outside so you can tell how full it is without having to look down inside. You could also set up a float indicator. I like to cover the top with a loose cap and insect netting to keep most dust and bugs out, but still allow air in and out.
Air separator and air relief valves
In any water plumbing system you always need to have a way of getting air out of the system at the high points. If too much air gets trapped it will restrict the flow of water, and can even prevent it from flowing at all. Air is significantly lighter than water so it will naturally collect at high points. Most water introduced into a system has dissolved air in it, but as it sits the air will separate out and float to the top of the pipe. Any high point in your system that is not already open to the air needs an air relief valve – basically a basin with a hole in the top and a ball or piston that is too light for air to lift, but that will lift and seal the hole when it fills with water. The typical spots these are needed in a bottom heat system are on the ends of the manifolds as the water feeding the manifolds usually comes up from pipes that run along the ground, or underground.
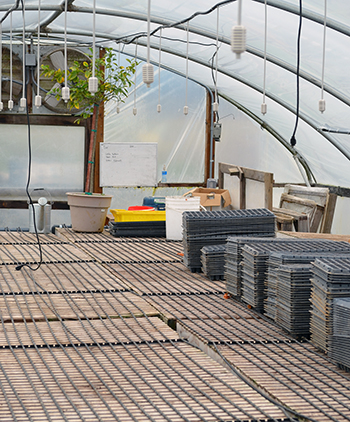
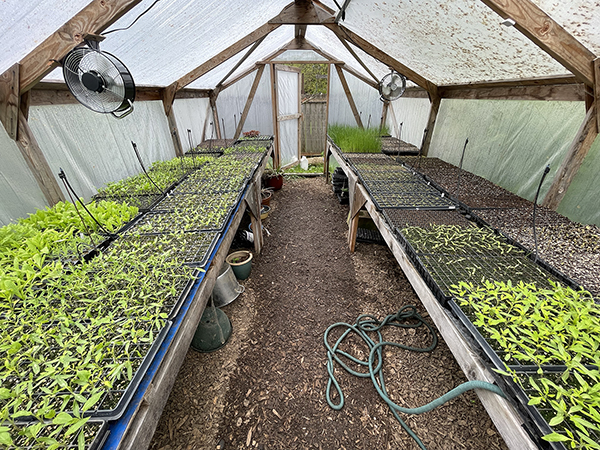 In my tiny greenhouse, I use electric heat mats on top of the lath tables. You can just see them peeking out from under the trays.
If you have a closed system it’s good to also add an air separator on the hot water side of the water heater – usually the highest point in the system. The separator helps keep air from being pulled through the system by the pony pump. An air relief valve sits on top of an air separator to allow the air to escape.
In-line thermometers
Slightly more optional, but a nice feature to add, are in-line thermometers on the pipes entering the cold side of the water heater and leaving the hot side. These thermometers give you a quick reference for how hot the water actually is. When the system isn’t circulating water they will start to equalize, but as soon as the pump turns on you’ll see the hot side get hotter – or at least you should, and if it doesn’t you’ll know something is wrong.
You can also used the thermometers to help gage how hot to set your water heater. Typically setting the temperature on the low side is better as it means the pump will cycle less, but if you set it too low it won’t ever get the soil up to your set point. You need to monitor the cold side while the system is running to make sure it’s above the set point while water is ciruculating.
Hard water
Most water not only has dissolved air, but also dissolved minerals. If you have very hard water you might have problems with mineral deposits in the system. These can reduce heat transfer and/or clog your pipes. There are chemicals you can use to treat the water to help. My water isn’t very hard and the chemicals are toxic so I’ve avoided them, but the system will work better with them in the water.
Filling and draining the system
The fewer times you introduce new water the less air and minerals you’ll introduce. With a reservoir system I usually hook up a hose to the drain of the water heater and fill the system from there. This means the water will run through the hot side and push most air out of the cold side up through the reservoir as it fills. Once the reservoir starts filling I know the system is more or less full and any future additions I can make through the reservoir.
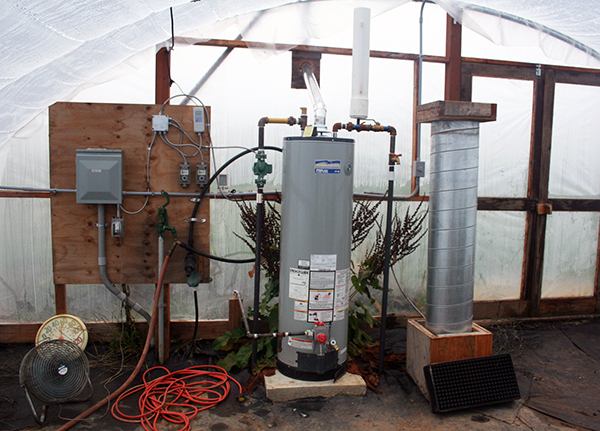 A typical set up with a home water heater. You can see the reservoir on top of the cold water side of the water heater, a big section of white PVC pipe. At the top of the hot water side there’s a small air relief valve. the green pony pump on the left side of the water heater is controlled by the small grey box at the top right of the plywood panel. The other controls in the photo are for the circulating fans in the greenhouse.
If the temperatures in your greenhouse are going to drop below freezing you need to drain the system as freezing can cause major damage – and even if the system is running, especially with small spaghetti tubing, it’s possible for sections to freeze and break. Make sure to install valves at low points in the system to assist in draining when needed.
Insulation and sizing your water heater
Adding insulation to the bottom of your table, the pipes feeding the system, your water heater, and to the top of the table in sections that don’t have plants will make the most efficient use of the heated water and allow you to use as small a water heater as possible and as little energy as possible. I’ve been heating bench spaces that were under 400 square feet and a residential 50 gallon water heater has been enough to keep that space warm.
A typical greenhouse electric heat mat is about 16 Watts per square foot which is equivalent to about 55 BTU/h. You can use that number to size your water heater (electric heaters are rated in Watts, and gas water heaters are sized in BTUs/h). If you had a typical 50 gallon water heater that put out 38,000 BTU/h, you could expect to heat up to 2375 square feet of table space. This depends a lot on how cold the air temperature is in your greenhouse, how warm you want the soil, and also the temperature of the sky (a clear night sky is much colder than a cloudy one and will pull more heat from your greenhouse through thermal radiation – likewise a sunny sky is much warmer than a cloudy one and will heat your greenhouse faster).
Josh Volk farms in Portland, Oregon, and does consulting and education under the name Slow Hand Farm. He is the author of the books Compact Farms: 15 Proven Plans for Market Farms on 5 Acres or Less, and Build Your Own Farm Tools, Equipment & Systems for the Small-Scale Farm & Market Garden, both available from Growing for Market. He can be found at SlowHandFarm.com.
Copyright Growing For Market Magazine.
All rights reserved. No portion of this article may be copied
in any manner for use other than by the subscriber without
permission from the publisher.