


As temperatures drop and day length shortens, it’s time to get our interior covering in place inside the hoophouse for the coldest months ahead. With an interior covering, or what we also call the “inside tent,” or the “hoops within the hoops,” it is possible for growers in the North to harvest year-round. Farmers farther south may not need the interior covering, but for us in Michigan and similarly cold climates, it would be challenging to harvest past December without it.
How it works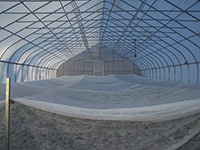
Just as you would add another blanket on your bed to stay warmer in winter, you can add a blanket on your crops to keep them warmer. Another way to think about it is to consider the way the hoophouse works. We know that it is warmer on a cloudy night than it is on a clear one. Why? Because the clouds act as an insulation layer to trap the Earth’s radiant energy from moving off into space. And what are clouds made of? Water vapor. When we hit the dew point, water condenses on the coldest surface. In the hoophouse this is the polyethylene layer. When this happens, the hoophouse more or less acts like a cloud trapping the radiant energy (heat) that is coming off the soil surface that has warmed up during the day. In the spring and fall, the hoophouse covering itself is enough to trap that radiant energy, or at least slow down the escape. But in the winter, there is an opportunity to reduce the space between the crops and the polyethylene layer. Even the tallest crops (kale, chard, collards) are only three feet tall. By adding an interior covering sometime in late October or early November we can keep the temperatures warmer closer to where the crops are planted.
Choosing a cover
The two most common materials for the interior covering are row cover and polyethylene. Both have benefits and challenges. We use row cover (Agribon-19) that weighs .55 oz. per cubic yard. There are a number of companies that make this weight and we choose this one based on balancing enough light coming through the covering and enough weight to trap the heat. That being said, let’s talk about the poly option before coming back to why we use row cover and how we install it.
What is nice about the poly covering is that it can be old poly from when you change the roof poly. On sunny days it is pulled back so even if the light infiltration is low (why it was taken off the roof in the first place), it is not going to inhibit light as long as it is managed well. It is also more durable than the row cover — you can be a bit rough with it and not have to worry about tearing it, which can more easily happen with row cover. It also tends to be a bit warmer than the row cover. The two downsides to the poly are that it is not breathable and it is heavy. This means that if you are not always on the farm to pull it back to vent on a sunny winter day then it gets very hot, very fast, underneath it. Mismanagement of the poly cover makes the temperatures way too hot to keep things like spinach, lettuce, salad greens and other winter crops happy for very long. Because it is not breathable, it is more humid than under row cover. Those of us who live in humid places know that high humidity and warm temperatures add up to high chances for fungal diseases. The weight of the poly also means that it needs more support to keep it above the ground. This translates into higher cost to install it.
We talked about the disadvantages of the row cover – mainly that it is not as durable and potentially not as warm as the poly. The benefits of the row cover is that it is breathable and lightweight. That means that if it gets sunny and we don’t open the cover, the crops do not overheat. It also means that it is not as humid, which reduces the opportunities for diseases. On our farm, we both have off-farm jobs related to agriculture. In the winter, this means we leave before the sun comes up and get home after it goes down most days. There is no way we are going to open the cover when it is dark and -15°F at 6 a.m. because it is going to be sunny later in the day and then try to close the cover when it’s dark and it has frozen to itself. We learned that one the hard way. Also, since it is lightweight, it takes less support to keep it above the crops which means lower investment costs.
Building the support
There are a number of options for supporting the row cover inside the hoophouse. There are wickets, hoops of eitherPVC or EMT conduit, #9 wire and a number of other ways. There is also the option to either cover beds individually or to cover large areas or the entire growing area depending on how the beds are arranged. Since our overall goal is to trap the radiant energy close to the crops, we decided to cover the entire growing area. Using the analogy of a mitten versus a glove helps us explain why covering the entire growing are is warmer than covering individual beds. Is a mitten or a glove warmer? Most of us in the North know that mittens are warmer than gloves because there is less surface area to lose heat from in relation to the area covered.
We wanted to come up with a different interior covering design that allowed us to cover the entire area but also had minimal support investment. Working with John Biernbaum from Michigan State University, we designed a system that used high-tensile wire to support the row cover.
We have metal endwall framing covered with polycarbonate on our 34’ x 96’ hoophouse and our beds run the short way across the house. They are 3’ wide with 1’ walkways between them. We also have two 4’ x 8’ sliding doors (mounted on the inside so we don’t have to shovel snow to open them) on one end so that the door, when fully opened, is 8’ x 8’ We have a number of vertical uprights as part of the endwall framing, but the important ones for this are the two that are on each endwall just at the outside edges of the beds. They are directly opposite each other end-to-end so that the high tensile wire can be run in a straight line the length of the house and attach to each of these uprights on the outside of the growing area. These are two of the four wires that we run. For the middle two wires we could not attach them to the endwall because the verticals there are part of the door frame. If we attached them there, they would block the doors from sliding open and we would have no way to get inside. For these two center runs of wire we cut two 7’ pieces of leftover endwall steel (2” square tubing) and buried them 3’ in the ground with 4’ above ground. On the near end we installed a wire strainer for high tensile wire (available at the feed store where we bought the wire) on each of the verticals. They are designed to bolt to a vertical and can be attached by drilling through the steel and using a 3” or 4” nut and bolt. If we had wooden endwalls we would not attach them directly to the endwalls because of the potential strain. Instead, we would bury posts and attach to them as you would for animal fencing. At the far end, we bolted tension measuring springs that tell us the pounds per foot of tension on the wire using the same idea of drilling through the endwall vertical. We don’t necessarily use the pounds of tension to set the wires as much as the springs make a good attachment point. We then attach the wire and tighten down the strainers so that there is no sag in the wires. That is the only support we use for the entire area. The wires are approximately 40 inches above the ground.
Covering
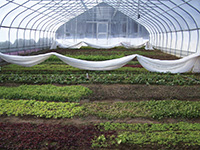
For the covering we use three pieces of 30’ x 40’ row cover. We bought two rolls of 30’ x 100’ and cut them to this size. We could have bought one large piece but we chose to use three smaller pieces that overlap because that way if we want to get to the middle bed we don’t have to pull from the far end all the way down to open it. It also makes opening the cover on a sunny day fairly easy by pushing the two outside pieces to the ends and bunching the middle piece over an aisle. The 40’ runs the short distance across the house. This way, the same piece runs from the ground on one side up and over the 30’ long beds and down to the ground on the other side. The 30’ length of the pieces runs the length of the house and the three of them, when just slightly overlapped, seal each other and total the length of the production area. These are all held in place with clothespins every 8-10’ on the two outside wires. We pull the row cover tight before putting the clothespins on so there is no sagging in the row cover. We especially want to make sure that the covering does not touch the plants because when the water that condenses on the covering freezes, it will damage the plants if it is in contact with them. At this point, the tops and the sides of the area are covered but the ends are still open. To close these we cut two 5’ x 30’ pieces of row cover (one for each end) and attach it to the wires using clothespins. We clothespin one corner to one of the outside wires and then pull it tightly as we go across the house, securing it to each of the wires with a clothespin. We don’t move the ends once they are in place.
Cost vs. revenue
Materials for a 30’ x 84’ x 40” cover:
400’ 12.5-gauge high tensile wire = $10
4 wire strainers @ $3 each = $12
4 tension measuring springs @ $7.49 each = $29.96
2 row cover pieces, Ag-19 or similar (cut to three 30’ x 40’ and two 5’ x 30’) = $140
1 pack clothespins = $5
TOTAL COST: $196.96
Note: We attached wires to the metal endwall verticals and two pieces of leftover pipe. If posts need to be purchased, there would be an additional cost.
This covers 20 beds in our hoophouse. With one 3’ x 30’ bed of salad mix cut three times we can generate around $450 (gross) when sold at $10/lb. Based on this, payback is not a concern with this covering.
Management and maintenance
It is important to make sure that there are no gaps in the covering. This means that it reaches the ground all around, and that where the top pieces overlap they are pulled tight and clothespinned together. To make sure there are no gaps at the ends, we drape the top pieces over the end pieces by a foot or so, depending on how much overlap there is. It works very well with two people to just slide the row cover along the wire to open it with one person on each side. It is faster with two people but with one it really isn’t a challenge, it just takes 10 minutes instead of five to open it up. Ideally, we would like to pull the cover back whenever it is sunny to be able to get additional heat into the soil, but in all honesty we do this relatively little in the winter since we are off-farm as mentioned above. When we are home we do pull it. Opening the cover will decrease the humidity in the microclimate surrounding the crops and therefore decrease the chance for disease such as Cercospora leaf spot on spinach and beets and white molds on tightly planted lettuce for baby leaf salad mix.
While it could be in one single piece we also like the three pieces for management. Since we can only harvest on days that the temperatures reach above 32°F (freezing), we like the option to move only a portion of the cover when we harvest. With the three separate, overlapping pieces we only have to move the cover a maximum of 3 beds in either direction to access the production area. The height at approximately 40 inches is not only meant to accommodate the taller plants but also allows us to crawl underneath, if need be, to harvest without opening the cover. We do this a few times a year when it is just above freezing, but cloudy, so we don’t want to open the cover and let out all that built-up heat.
We also like the high-tensile wire because it can be rolled up and coiled (with some patience and maybe some choice words!) and stored in place for the summer as a small coil. The cover can then be either rolled and hung from the rafters or folded and put in a sealable container to prevent mice from nesting in it. Our current row cover has been through two winter seasons and a portion, if not all of it, will be replaced this year. The current plan is to cut it into smaller pieces that could be used for temperature and insect protection in the field in the early spring.
Lastly, as we move into April and our tomatoes and other warm season crops start to be transplanted into the hoophouse, the cover protects them as well. This is where the only challenge with this covering has come up. Our roll-up sides are also thermostatically controlled. Often in Michigan, like other northern states, our early spring days are cold in the morning but can be sunny and warmer as we go through the day. There have been a few times we have come home, the sides have rolled up and the row cover is blown around a bit. It has been nothing major and not damaged any crops but does take a bit of time to unwind and get it back in place.
Adam and Dru Montri own and operate Ten Hens Farm in Bath, MI, where they farm with the help of family, friends, and their 2 year-old daughter, Lydia. Dru manages the Michigan Farmers Market Association and Adam works with farmers through his outreach position with the Michigan State University Student Organic Farm. They can be reached at tenhensfarm@gmail.com.
Copyright Growing For Market Magazine.
All rights reserved. No portion of this article may be copied
in any manner for use other than by the subscriber without
permission from the publisher.