


I get a lot of questions from newer growers about how to figure out good succession planting schedules and crop rotations. The tools I use for both are the same: a combination of very basic spreadsheets and concise field maps that capture both space and time. But like most things, it’s actually less about using the right tool and more about using a good process.
Head lettuce is a great example of a crop that I grow many successions of over the course of a year. My goal is an even supply of mature lettuce heads from the beginning of my CSA season in mid-May through mid-October, at which point I switch to harvesting hardier chicories instead of more tender lettuce.
Unfortunately, getting an even supply of head lettuce every week is not as simple as planting the same amount every week. As days warm up and day length gets longer in the spring, the lettuce starts to mature faster.
I farm in Portland, Oregon, a little north of 45 degrees latitude, so the difference in day length is pretty significant between late March when it’s about 12 hours, and late June when it’s almost 16 hours. That’s 25 percent more daylight, not to mention warmer air and soil.
When I plant head lettuce in late March it takes about eight to nine weeks to fully mature. When I plant the same variety in late June, it takes about five to six weeks. As the plantings get later, the lettuce slows down again. Not only does it take longer to mature with late summer plantings, it also eventually slows down so much that it essentially holds in the field for two to four weeks at full maturity without bolting.
Two different approaches
With a crop like lettuce I can get regular harvests of the same variety by staggering plantings. To get a consistent harvest through the warm months, my first plantings are about a week apart. But every so many weeks I skip a week, knowing that the lettuce will start maturing more quickly. Later in the season, I start to double up plantings as the lettuce growth slows.
With a crop like radicchio I take a different approach. I’m using just one or two planting dates around the end of July, but I’m getting regular harvests over an extended period of time (October through January) by planting varieties with a range of days to maturity.
With either technique my planning process is the same. I start with the harvest date I want and then work backwards to find the planting date that will work for me based on my records of plantings in the past. If I don’t have experience, I take my best guess based on similar crops and information from other growers or seed companies. Then, I keep records for the next year.
I use the first method with a lot of crops: lettuce, carrots, beets, bush beans, to name a few. I like this method because it spreads out the labor of preparing and planting beds, and cultivating weeds. On my small, hand-scale operation, that’s usually an advantage.
The second method works best for crops, like radicchio, that have a relatively narrow window of time for planting where they will mature properly (usually due to day length requirements). And, also for crops where longer maturing varieties have higher yields, but you need shorter maturing varieties for earlier harvests; for me these are crops like sweet corn and spring broccoli. There are a few advantages here, as it tends to make mechanized field preparation, planting, cultivation and irrigation easier since it’s all done in one big block.
In practice I often mix the two methods, like with the radicchio example, or late lettuce plantings where I might have a few different varieties, all planted at the same time, but that planting is repeated just in case the late summer weather speeds up or slows down one of the plantings. Sometimes I get lucky and find a mix of varieties that subtly give me a kind of harvest succession that works to even out our harvest workload over the course of many weeks.
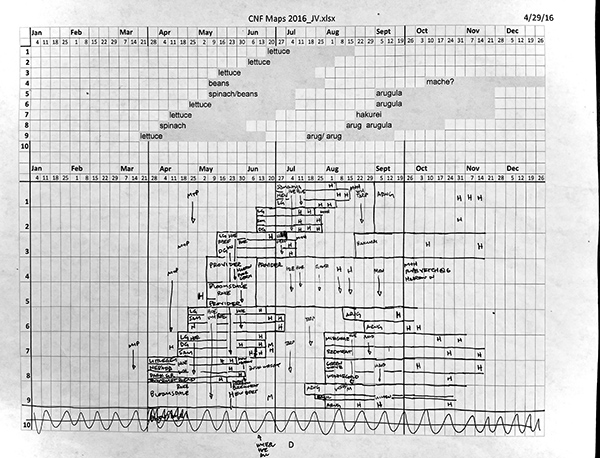 Here’s an example of one of my field maps from 2016. This field block has nine beds and the plan is represented in the top nine lines. The record of what actually happened is noted on the bottom nine lines. In 2016, I was making plantings of head lettuce with multiple varieties of different days to maturity. You can see that the weeks to harvest definitely get shorter on the later plantings of the same varieties, and even though I’m not planting every week, I have a pretty even harvest. Note that there’s also some spinach and beans mixed into the first plantings and the second crops are mostly brassicas. You can also see that the plan does not match what actually happened, which is not unusual as field conditions are never entirely predictable. The 4/29/16 date is when I printed out this version of the map, so some of the information on the bottom was transferred over from a prior version.
We grow six different sweet pepper types that are all planted together, but they peak at different times which means our CSA members get an even flow of peppers, yet there’s always some variety and the mix is always changing.
“Days to maturity” numbers
For new growers looking at the “days-to-maturity” numbers in many catalogs, this variation in the actual days to maturity can be very confusing. The catalog days-to-maturity numbers are useful, but not necessarily for figuring out how many days your planting will take to get to maturity; they’re useful for comparing two different varieties and understanding, relatively speaking, how much longer one will take than the other to mature when planted at the same time.
How I find weeks to maturity
The way I plan my plantings for successions of lettuce that will mature evenly through the season is by keeping records of when lettuce from each planting week mature each year. My very simple tool for doing this is a field map of “space and time” that I update every week during the year.
This isn’t a plan view map like your typical field map, it’s a grid. Each location in the field has a row, and each week of the year has a column. On the square that represents the place and time the lettuce was planted I write the variety name. Then, on the week I harvest that variety I write an H. To figure out the weeks to maturity I just count the number of squares between the planting and harvest. (For more on this type of map see my February 2010 GFM article “Mapping crops on a spreadsheet.”)
Why I use weeks, not days
For the crops I grow and my markets I use weeks to maturity, not the more granular days to maturity. One of the engineering principles I mention in my book, Build Your Own Farm Tools, is tolerances. When measuring units, like days to maturity, there’s always some slop, known as a tolerance. The implied tolerance is typically plus or minus half of a unit. If your “unit” of measure is days then 55 days to maturity would imply an actual days to maturity of somewhere between 54.5 and 55.5.
In reality, I find that weather and workflow on the farm dictates a plus or minus tolerance of at least a few days, roughly half a week. Keeping track of weeks to maturity is far easier than keeping track of the exact days to maturity and its natural implied tolerance of half a week lines up better with my realities. Using blocks to represent weeks on the map also makes reading the map much easier — 52 columns is a lot, but not nearly as many as 365 would be.
The place where I have found that weeks to maturity isn’t always precise enough is with crops that are fewer than four weeks to maturity, such as baby salad greens or even microgreens. For those, you might want to keep closer track of the actual days.
Double and triple cropping
The same “map” that I use for keeping track of weeks to maturity is also a great tool for planning out how to fit more plantings into limited spaces on the farm, including cover crops. As I’m making my planting plan for the year I map out where (and when) each crop will be.
In the row that signifies the bed where the crop will be planted, I write the crop name into the square that represents the week it will be planted and then give all of the squares following that while the crop will be in the ground a light gray background. Any blocks of squares that are white represent free space on those weeks. That’s where I can either plant more cash crops, or plan for a cover crop.
In my 2010 mapping article, I pointed out that the maps give “an easy way to see if all of the crops planned for will actually fit into the fields at the times they are scheduled for, without conflicting with preceding or successive crops. It also makes double cropping and cover cropping easier, as blocks with no gray fill are obviously available for plantings. Once these crop plan maps are made, they are also excellent for passing on the planting location to field crews. I’ve found this especially true for unusual plantings, such as ones where blank beds are to be left for future plantings, or where the sequence of varieties is important.”
Rotations
When thinking about double and triple cropping, or relay cropping where the crops actually share space for a period of the season, the next question I always ask myself is how this fits into my crop rotations. These maps can help with rotation planning, especially by tracking what has been planted where and when, but they’re just one small piece of the system I use for developing rotation plans. Look for more about my approach to the larger topic of planning for crop rotations with diverse plantings in a future article.
As always, questions on the topic help spur my writing. I’ve gotten a couple of great follow-up questions to the last article on pricing. If you have specific questions on rotations, I’d love to hear them.
Josh Volk farms in Portland, Oregon, and does consulting and education under the name Slow Hand Farm. He is the author of the book Build Your Own Farm Tools and Compact Farms: 15 Proven Plans for Market Farms on 5 Acres or Less, both available from Growing for Market. He can be found at slowhandfarm.com.
Copyright Growing For Market Magazine.
All rights reserved. No portion of this article may be copied
in any manner for use other than by the subscriber without
permission from the publisher.