


Exploring our love/hate relationship with caterpillar tunnels
It’s January 2022. We’ve just returned from our annual winter vacation. No one has set foot on Ferme des Quatre-Temps farm for three consecutive weeks. The first thing we see when we arrive at the site is the row of ten caterpillar tunnels.
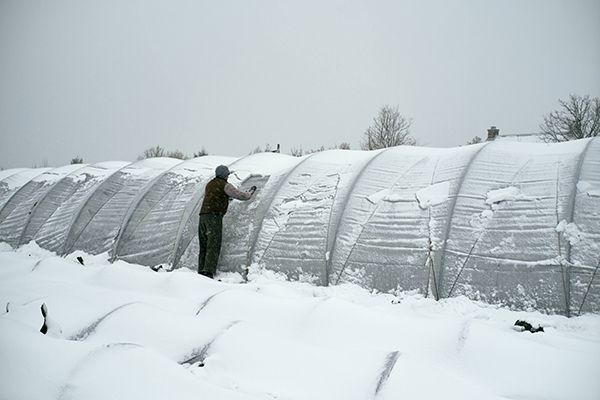
I’m expecting to see empty tunnels with their polyethylene neatly rolled up on top of the hoops. What I see instead: three tunnels collapsed under the weight of snow and the action of high winds during a winter storm. Several of the other tunnels have accumulated water in their plastic and are threatening to give way.
Caterpillar tunnels can help keep the worst of the winter weather off at a lower cost per square foot, though they are not as sturdy as greenhouses.
All rested and disconnected from farm worries, my team and I were expecting a slow morning, touring our winter crops and planning the week to slowly restart our activities on the farm. I was particularly excited to start our tomato seedlings in the nice warm nursery. But we now find ourselves more concerned than we’d like to be. We have to tackle the disastrous caterpillar situation and start repairing what we can.
Hands frozen from working outside in the middle of January in Québec, we question the use of the caterpillar tunnels as we look at our greenhouses, which are proudly standing upright and haven’t moved an inch in all the bad weather.
This is a bittersweet reflection, because when things are going well and the weather is kind, we really appreciate the simplicity and minimalism of our caterpillar tunnels.
This is all to say that we have a love-hate relationship with caterpillar tunnels at Ferme des Quatre-Temps. We like them for their low cost and their ability to increase the farm’s covered area without requiring the construction of additional greenhouses. However, our appreciation for them decreases due to their fragility, susceptibility to collapsing under the weight of snow, and the fact that they are not automated, requiring daily opening and closing on sunny days.
Over the years, we’ve tried different models and different techniques for using them, always trying to find the magic formula to gain all of their benefits and decrease their flaws. Here’s a summary of our adventure into the world of low-cost structures, and a perspective on where we are now.
Homemade caterpillar tunnels
The initial idea behind the caterpillar tunnels was to build them at the lowest possible cost in order to make growing under cover accessible to as many market gardeners as possible. To make them, we bought metal tubes which we bent using a hoop bender from Johnny’s Selected Seeds.
 Caterpillar tunnels can be vulnerable to getting crushed by a lot of snow or high winds.
The advantage of these early tunnel designs is their low cost. However, this model requires a joint between two pipes on each arch, thus weakening the whole structure. It is also less resistant to wind and snow.
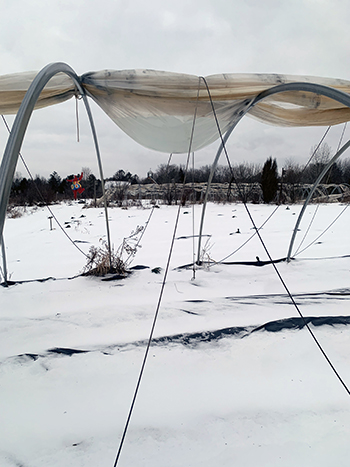
If plastic is rolled with the opening facing upwards, it can fill with snow and ice.
With this homemade structure, the anchors are moveable, consisting of metal rods into which the hoops are inserted. The idea behind these moveable anchors was to enable the structures to be moved easily. The production technique to use them is as follows:
#1 APRIL: Construction of the caterpillar tunnels in spring to cover the early crops (green onions, lettuce, fennel, kohlrabi, bok-choy, etc.) in the field.
#2 END OF MAY: Once the early crops have reached 75 percent maturity and temperatures are sufficiently warm, move caterpillar tunnels and plant warm crops in them (tomatoes, peppers, eggplants). Early crops finish growing without protection, but are already well ahead of schedule compared to uncovered field crops.
The advantage of this strategy is that few structures are needed and crop rotation is possible. However, the disadvantage is that it generates a lot of work to move the structures each year, and the fact that the anchors are not permanent diminishes their robustness.
After several years of using this low-cost solution, we experienced a number of disasters due to the fragility of these homemade structures. This uncertainty and lack of simplicity convinced us to try a new solution.
Fancy and robust caterpillar tunnels
To avoid yet another field full of collapsed, wind-blown structures, we turned to sturdier caterpillar tunnels. We opted for Multi Shelter Solutions caterpillar tunnels. What convinced us to try these tunnels were their sturdy hoops formed from a single piece of very thick metal.
Another notable benefit lies in the permanent anchoring of these tunnels, enhancing their resilience against strong winds. However, this has forced us to change our strategy for using caterpillar tunnels: it is no longer possible to move a caterpillar tunnel to heat-loving crops after covering spring crops.
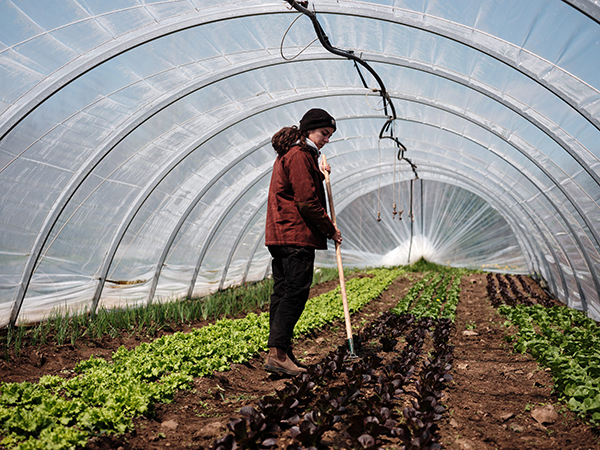
Cultivating in a caterpillar tunnel. It can be difficult to stand up on the edge beds. All images courtesy of the author.
To cope with this new reality, we had to adapt our crop calendars to ensure that early crops reach maturity in the caterpillar tunnels before the planting date of the heat loving crops. The process of achieving this crop planning goal is quite simple: we only plant early crops in the caterpillar tunnels whose days to maturity (DTM) are 50 days or fewer. We also start them in the nursery before planting to reduce their days in the field as much as possible.
This solution is quite satisfying, as it reduces the effort needed to move structures and minimizes unexpected weather disruptions, adding a sense of predictability to our work. It’s certainly a bigger investment, but after three years of using sturdier structures, we can confirm that it’s well worth the cost.
How to get the most out of caterpillar tunnels
To maximize the use of caterpillar tunnels on the farm, they should be filled with three crop successions per year:
#1 Early spring crops (April 1 to May 30): Radish, dill, coriander, Hakurei turnips, lettuce, kohlrabi, salanova, Bok-choy, and spinach.
#2 Heat loving crops (May 30 to September 15): Tomato, eggplant, peppers, and hot peppers.
#3 Cold-weather extension crop (September 15 to December 10): Spinach, Salanova or other lettuce, bok choy, dill, coriander, Hakurei turnips, Tokyo Bekana Chinese cabbage, kale and arugula.
By respecting this sequence of crops, caterpillar tunnels are used to their full potential and always have a growing crop inside.
Note that full winter growing — meaning growing vegetables from November to April — is not possible in northern regions with current caterpillar tunnel structures; the farther south you are, the more you will be able to grow through the winter, depending on your conditions. For this reason, the sides of the tunnels have to be raised during the winter and tied to the top with ropes. This strategy avoids having to completely remove the plastic from each tunnel during the winter, a task that requires a great deal of time and effort.
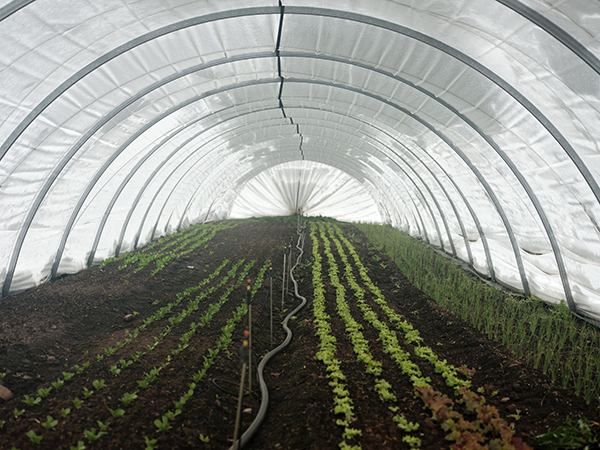
Even when there’s snow on the tunnel, crops are spared the worst of the weather.
When carrying out this task, the most important thing is to focus on not creating any gaps where water can seep through and collect in the plastic. To do this, make sure you place the ends of the plastic toward the bottom of your “roll” and not toward the top.
The future of caterpillar tunnels
While we’re happy with our current installation of caterpillar tunnels, we’re always looking at what’s new on the market. We have noticed that Tessier Greenhouses is offering a new tunnel that looks interesting for winter production.
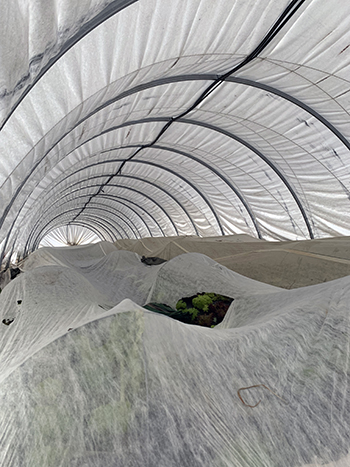
A layer of row cover inside can help crops survive very low temperatures and the drying effects of winter wind.
A new tunnel is Gothic in shape, which means that snow falls more quickly down the sides, making it harder for it to accumulate and cause the structure to collapse. For this reason, it seems that these tunnels have the potential to be used for year-round production in Nordic settings. They enable the cultivation of highly cold-resistant crops during the winter.
Alongside all these technical issues, a broader reflection is emerging on the usefulness of caterpillar tunnels. Although less expensive than a greenhouse, they require more work and are less reliable. What’s more, a major drawback to their use is that they are not automated. The opening sides must be operated manually, which generates makes work that has to be done on weekends and sunny days.
Given these facts, it’s no exaggeration to ask: Are these really the best structures for our farms? Wouldn’t a better investment be to build bigger greenhouses so we don’t have to deal with the complexity of adding small, fragile shelters to the farm?
If I were to start a farm today, I would favor building bigger greenhouses. Predictability, efficiency and having real time off are all worth the investment. With all that said, caterpillar tunnels still are an important part of the season extension toolkit. They can expand a farm’s protected growing footprint before time or money permit the construction of a larger structure that is sturdier and easier to ventilate. And, in areas with milder winter weather, they may be all growers need to make sure crops survive bouts of bad weather.
This encapsulates our current mindset. Meanwhile, as we navigate through this phase, we remain watchful for any potential high winds, meticulously reinforcing the caterpillar’s ropes and steadfastly preparing for the forthcoming delightful spring days.
Catherine Sylvestre is a professional agronomist and leader of the market garden team at la Ferme des Quatre-Temps in Hemmingford, Quebec. She develops, implements, and teaches best practices for cold season growing, specializing in crop protection and greenhouse production for northern climates. She is also the co-author of the book, The Winter Market Gardener, available from growingformarket.com/.
Copyright Growing For Market Magazine.
All rights reserved. No portion of this article may be copied
in any manner for use other than by the subscriber without
permission from the publisher.