


When we started our farm in 2018, we built a small, unheated greenhouse with plans for something larger the following season, but those plans were derailed by more pressing farm projects, building a website, and, well, farming.
We managed somewhat successfully with our cheaply built greenhouse using PVC and greenhouse plastic. Looking back, I can’t believe we managed to grow what we did with just this tiny structure.
After three years of saving, researching, planning, and designing, we were ready for a more appropriately sized greenhouse that did not rely on fossil fuels. We landed on passive solar technology.
What is passive solar?
In the simplest of terms, a passive solar greenhouse is designed to collect heat from the sun, store it in heat sinks, and send it back out as needed. When built properly, the building will perform like this:
• In colder months: gather the sun’s energy and store it in heat sinks. The release of this heat helps keep the building at a more even temperature.
• In warmer months: the building will not overheat. This is because the sunlight entering the glazing wall is indirect in summer months, fans kick on and there is proper ventilation.
Why passive solar?
Planning for long-term success, we were very deliberate when designing our new greenhouse. We start sowing seeds in February when here in New Hampshire, it is still very cold outside. There are approximately 80-90 days between when we start our first seeds indoors and our last average frost date, May 19th, which leaves lots of time for potentially dangerous weather. Oftentimes we even get a surprise snowstorm as late as mid-May.
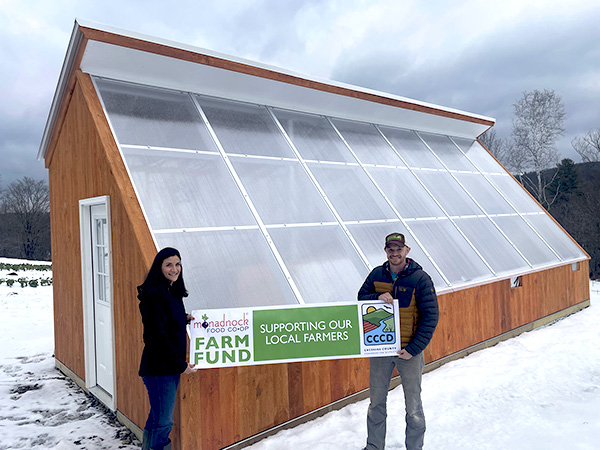 The author (left) received a grant to help pay for some of the cost of the propagation house.
Our previous greenhouse was unheated, which meant that for three years, from March-May, we moved seedling trays from the greenhouse to inside our home until temperatures allowed the next day. All of this moving about through different temperatures, wind, etc is not good for young plants, and I don’t doubt some stunting occurred due to all this trauma.
Storing the sun’s heat to use later also lowers or diminishes heating bills and keeps plants safe from freezing temperatures. Spending less money on heat means more money is going into farmers’ pockets.
Financial sustainability
When we priced out this building, the components added up quickly. It is hands down more expensive to build than a traditional high tunnel with a propane heater. However, the way we looked at it is, if we spend the money upfront on a well-built, insulated building that holds heat, it will be in use for many years to come. Subsequent years will have a higher profit margin than if we were not using passive solar.
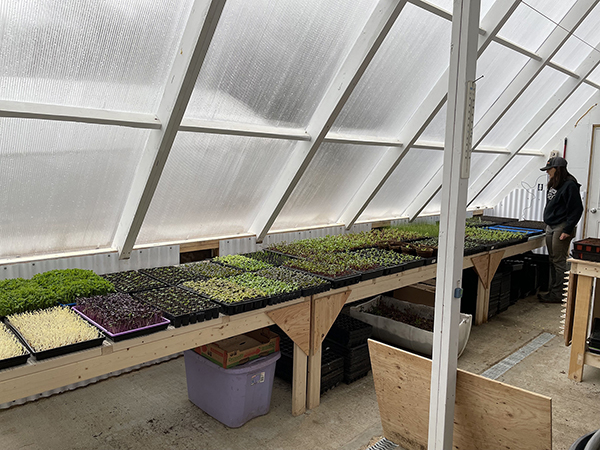 The author inside the propagation house with trays of early spring plant starts.
The main goal of this building is to hold on to the precious heat in heat sinks as opposed to, and this is important here, simply heating the air. This allows us to eliminate the use of fossil fuels and decreases our dependence on energy which just continues to rise in cost.
Environmentally friendly
As you’ll learn shortly, we are able to heat our propagation house at night using heat collected and stored throughout the day. The small electric heater we use only needs to kick on a few times an hour in quick spurts because our building can maintain its desired temperature very well.
The electricity we consume is run through a community solar array, which allows us to have zero dependency on propane.
Also, farming can create a lot of plastic waste, and some of it is hard to avoid. Greenhouse plastic typically needs to be replaced every 4-5 years as opposed to the polycarbonate panels we installed which should not need replacing for 15+ years.
Traditional greenhouses
Traditional greenhouses are typically fully covered in greenhouse plastic, although some may have solid end walls. None of the materials used have much of an R-value so when the outside temperatures drop, so does the inside temperature.
R-value is the capacity of an insulating material to hold in heat. The higher the R-value is, the more the material insulates.
A traditional greenhouse heats up easily on a sunny day but has no way to hold in the heat because of the plastic’s low R-value (roughly .75-1.5 depending on how many layers). If you are running a heater all night, your plants will survive, and the heater will have done its job. However, all that heat (and your money) is simply seeping out through the plastic, and there will be nothing left to show for it as soon as the heater is turned off.
If you are not running a heater and simply depending on the sun’s heat during the day, you will notice the temperature inside your greenhouse in the morning will be about the same as it is outside.
Passive solar greenhouses
A passive solar greenhouse in the northern hemisphere has only the south-facing wall covered in clear glazing, in our case, polycarbonate panels. This wall, the glazing wall, lets sunlight in. All other walls and ceilings are insulated to help retain the heat. It may seem like only one wall of glazing would not let in enough light, but when that one wall is properly positioned based on your farm’s location, it brings in more than enough. All interior walls are white, so the light reflects off the walls’ surfaces and bounces around, hitting virtually every surface. And remember, it’s the collection and storage of the heat that’s important here.
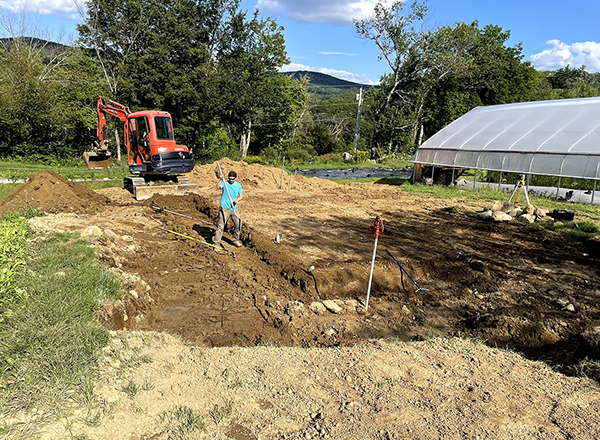 Prepping footings for the Alaskan slab.
A passive solar greenhouse is insulated to hold heat in by way of the R-value of the walls, the heat sinks, and (in our case) the concrete slab. Stored heat comes from the sun, any heaters used, as well as natural heat given off by plants.
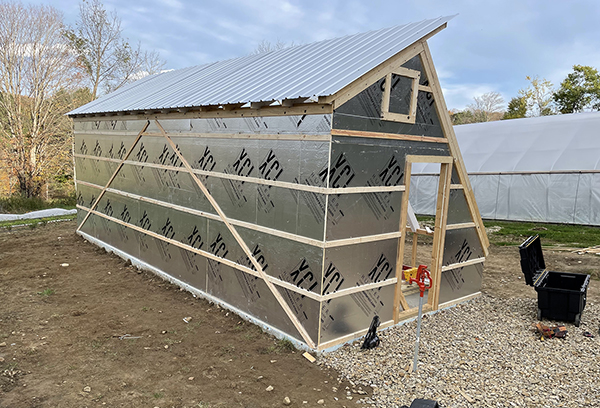 The exterior of the propagation house before the polycarbonate panels and wooden siding was installed. Notice foil-faced insulation and space for an exhaust vent.
Without any supplemental heat, our greenhouse remains about 15 to 20° warmer than outside, even on the coldest of nights. That’s because stored heat is being slowly released into the interior space of the building as temperatures drop.
Greenhouse components- heat sinks
Think about leaving a rock out in the sun all day. When you touch the rock, it will be hot to the touch, right? After the sun has gone down and the air temperature cools, when you touch the rock again, you will notice that it’s still much warmer than the air around it. That’s because it’s acting as a heat sink, holding onto the heat it gathered all day and releasing it as it cools. This is why turtles love to sit on rocks protruding from the water, collecting the heat from the sun!
A heat sink is anything that warms up when temperatures are hot and retains the heat, and then as the air temperature cools, it slowly releases that heat. A few options for a greenhouse include barrels filled with water, brick or concrete pavers, stone, concrete floors, and phase change material (PCM).
PCM basically looks like little fluid-filled pillows that you secure to ceilings and walls. It comes in rolls of 4’x8’ sheets that you can easily nail up where needed. PCM has the same effect as the water barrels do, but they take up much less space, ‘freeze’ at a much lower temperature, and have 5x the radiant heat capacity, according to my research. In the future, we’ll consider replacing some of the barrels with PCM to give us some more space for trays.
When using passive solar to heat a building, you want as many elements inside the building to somehow hold or give off heat. We ultimately purchased ten, 50-gallon, BPA-free barrels that we found on the Facebook Marketplace and washed them out as best we could. We painted them black so they would absorb a lot of heat and then lined the back wall with them, five on each side of our workstation.
Alaskan slab/insulation
There were several floor options to choose from, including brick, concrete, loose stone, and simply grass, but ultimately we decided on a concrete Alaskan slab because we could form and pour this ourselves, saving us a little bit of money. A concrete slab is also the best choice for our region because the floor serves as massive heat storage.
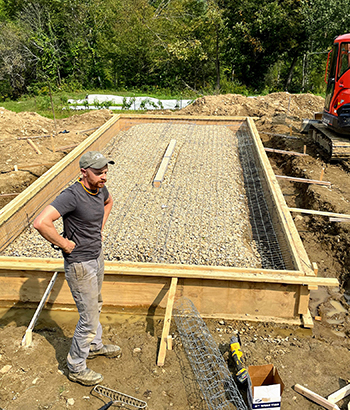 Working on bracing the slab form.
After leveling out the ground where the building would live, we built the frame and heavily braced it. We laid down stone and pieces of rebar that would offer additional strength. Our footing section ended up being about two feet deep, and the actual slab is four inches.
Once the slab was fully cured, we insulated the exterior of the foundation with rigid foam insulation. We also laid insulation on the ground against the walls before fully burying all of it with topsoil.
The reason for all of the insulation is to keep the frost out. If we hadn’t insulated the ground around the slab, the frost would seep in and fight with the heat in the slab, defeating the purpose of this type of slab in the first place. Also, just like in the barrels holding warm water, the larger the mass under the propagation house being kept warm, the more heat can be held, keeping our propagation house warmer for longer and keeping the heater off as much as possible.
R-value of walls
The non-glazing walls, the ones that face north, west, and east, as well as the three-foot knee wall beneath the glazing wall, and ceiling, are insulated to about R15. For comparison, most modern homes today average about R25-R40.
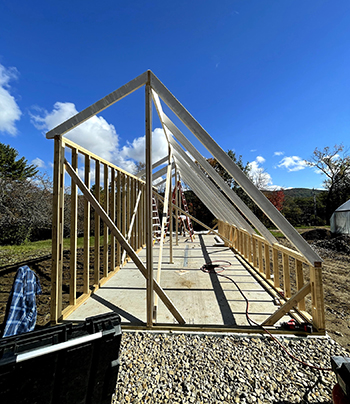 The propagation house frame in the beginning stages. Notice the 50° angle of the south-facing wall.
While we could have installed wood panels over the insulation and painted it white, so it reflected sunlight, they would have rotted quickly from watering and the humid environment. Instead, after installing the painted white plywood, we added a layer of white polywall panels typically used for roofing. Now, we can spray water without concern. Any water that gets on the wall rolls down onto the pitched floor, into our drainage system, and out of the building.
Glazing wall
Our glazing wall is made of polycarbonate panels. We chose this type of panel because of its ability to diffuse light evenly and how long it lasts. Even though they are thicker than regular glass or plastic and not as much direct light can make it through, they more evenly disperse the sunlight. This gives all the plants an equal opportunity to receive sunlight. This was important to us as we were going to be utilizing every surface available for seedlings and needed to ensure they were all going to get the light they needed to thrive.
Polycarbonate holds up well to the elements, and it has high light transmission. However, the thing to keep in mind with this material is that although the quality of insulation increases the thicker panel you select, it also decreases the light transmission. We opted for 8mm twin-wall polycarbonate panels.
The angle of the building’s glazing wall is based on our exact latitude in order to receive the most direct sunlight in the cold months. This sunlight warms our heat sinks and the heat is stored to be released at the most important time of the year; when seeds are sown. Our glazing wall is set to 50°.
Siting the building
1. The angled glazing wall needs to be as south-facing as possible. Again, this is when you are growing in the northern hemisphere. Full sun is required.
2. Select a spot that is a safe distance away from trees and other buildings, so there are no shadows cast inside your building.
3. Level ground is very important. Most of the land we grow on is sloped, including the plot we chose for the original greenhouse that we built back in 2018. Once we decided to build a permanent structure and have a concrete slab poured, this land needed quite a bit of site work. If you do not ensure the ground is completely level, you’ll be chasing your tail for the life of the building.
Proper position of the sun
The proper position of the building is crucial when using passive solar technology. We tried to locate someone with a similar building in a northern climate that we could speak to with no success. We did lots of research with our favorite book being The Year-Round Solar Greenhouse: How to Design and Build a Net-Zero Energy Greenhouse by Lindsey Schiller. Highly recommended. Then, we took what knowledge we gained and applied it to our situation.
Tyler spent many early mornings, mid-afternoons, and evenings at all times of the year, tracking the sun and marking the ground with a stick so he could see where the sun would be in regard to the building. He did this for three main reasons:
1. To ensure that no shadow would be cast on plants that are in the propagation house.
2. We needed to make sure that in February and March, the sun would be directly hitting the barrels in order to warm up the water inside them to, in turn, warm up the building. During these early months, harnessing direct sunlight is key.
3. Then in the summer (if angled properly), when the sun is higher and hits the glazing wall indirectly, it would not overheat the building but still provide the amount of sunlight needed.
Automation/sensors
Automation and having the ability to track the temperature in our propagation house were important to us, so we selected a wireless SensorPush device. We set up the app to send notifications if temperatures go above 90° or below 50°.
In February 2022, before we were using the house for plants and no fans were installed quite yet, we started using the sensor to monitor temperatures. On some of the coldest (but sunniest) days of the year when it was between 17-20°, it reached over 100° inside when the doors were closed.
Shortly after that, we installed one exhaust fan and one vent on opposite sides in the peaks of the building. The fan was set to turn on if temperatures reached above 90°F. The fan sensor was adjusted throughout the season. 2022 was a very hot and dry summer in New Hampshire, so they ran regularly. The threshold temperature was lowered when high temperatures lasted longer throughout the day.
We purchased a small electric greenhouse heater that we set to kick on when temperatures dipped below 55°. We lowered the threshold temperature as plants became more established. Most of what we start at this point in the year is cold-hardy anyway. Heat mats were connected to an adjustable thermostat.
Drainage
We installed an eight-foot-long channel drain in the center of the house for drainage. We didn’t want to skimp in this area as there will never be a shortage of water that needs to be drained out. Since we made the decision to pour a permanent slab, we figured it made sense to do the same with the drainage.
In this regard, our sloped land really works in our favor because all the water from inside the prop house drains out through a large pipe, into the main, underground drainage system that runs along our lower fields and then out into the road.
Soil sink/workstation
We used another barrel we had laying around as our soil sink. We cut it in half lengthwise, washed it out, and connected it to a custom-built table. Tyler built a cover for the soil that lines up with the rest of the surrounding tables, so it doubles as a workspace. Underneath the soil sink is a shelf that holds strip trays, regular and grease pencils, tags for trays, vermiculite, etc.
There is also room enough for four buckets of potting soil that needs to be brought in from where we store our 2-yard sling. Since I complete the majority of sowings on our farm, I had a lot to do with this part of the building design. I spend a lot of time in this nook of the greenhouse, and I have to say, it’s my favorite. With the exception of very early seeds which are started inside our home, this is where all the life on our farm begins and what’s more exciting than that?
Costs
Our electric bill averaged between $17-25 per month over the winter of 2022. Since we do not farm during this time, this cost was solely to run the high tunnel air blower and was under 7 kWhs/month.
We started running our small greenhouse electric heater in February to test out the sensors and start collecting data through the app. There were no plants living in the house at this point, but we wanted to start monitoring the nighttime temps and ensure the heater kicked on at the right times. We could be sitting at home on a blustery night and watch the graph on our temperature sensors go up and down, up and down as the heater kicked off and on. Our usage increased to 251 kWhs, making the bill just under $60. Less than half of this bill was the cost of actual power, the rest was delivery fees from the power company.
We brought seedlings into the propagation house the second week of March, which coincided with our March 7 billing cycle start date. From March 7-April 5, our usage was 573 kWhs, making our bill $114.
Our highest bill was for 745 kWhs which we used from April-May, costing us $140, making that our highest electric bill ever. $140 is extremely inexpensive when it comes to heating a greenhouse, which is typically heated with propane, gas or even wood. Also remember the $140 was the total power bill for the farm, not all heat. We also had several outlets powering HAF (horizontal air flow) fans and heat mats.
We’ve heard of farmers essentially paying for the fuel used in the early part of the season with the money brought in by the sale of the crops grown in the heated tunnels in order to break even. As small-scale farmers, we wanted to come up with a solution to this vicious cycle and cut into profit as little as possible. The point of extending the season is not to get to market earlier just to break even. We, farmers, should be making money for our hard work, especially during those early-season months when folks are anxious for locally grown vegetables to become available.
At the time of this writing, the average of other heating means in our state is as follows:
Cordwood: $422.50 / cord
Propane: $3.80 / gallon
Fuel oil: $5.30 / gallon
Electricity: $0.2898 / kWh
An important point to remember here is that in a traditional greenhouse, the air alone is being heated and there is little heat retention (R-value) of greenhouse plastic. This equates to a lot of heat being pumped into a big, cold area and seeping out through the plastic, costing and wasting a lot.
Due to our heavily insulated slab, insulated exterior walls, and the heat sink barrels, heat is held in our propagation house for quite some time, requiring the heater to kick on just a few times per hour during nights even in the low 20s. This is how we keep our heat costs down while production and profits are up.
What we have learned thus far
In the past, we have started seeds inside our home using heat mats and a grow rack with lights to get them established. We decided to continue that with our most vulnerable flower seeds and tomatoes in 2022, just to be safe. We over-sowed some crops in preparation for some losses.
Once our seedlings were ready to move into the propagation house, we rolled out our large heat mats and laid them out atop our tables. The most vulnerable crops went on heat mats like spring onions, lettuce, and flowers. We sowed other, more cold-hardy crops like kale and beets directly in the propagation house.
As seedlings became ready to be stepped up into the propagation house, we shifted trays around, putting the youngest trays on heat mats. If particularly cold weather was predicted, we covered trays just to be safe, but that was probably not necessary.
We were definitely overly cautious with it being the first time using the new greenhouse. Using the experience we gained in 2022 along with additional heat mats that we purchased we feel confident in the greenhouse’s capabilities to safely house all of our 2023 seeds this coming spring.
Losses to temperature and drops
This year we had no losses due to dropped trays, crushed stems, plants killed by frozen row cover touching it all night, etc. as opposed to past years when we were moving trays around a lot more to keep them safe. We had no stressed plants or poor germination due to low temperatures because the building stayed at an agreeable temperature for all plants living inside. Plants thrive in consistency, so the more even the temperature and conditions are, the better.
We did however have some microgreens dry out on super hot and sunny days as we were getting used to the building. Baby greens are already vulnerable, so in addition to the shallow soil trays used for microgreens, they just didn’t have enough moisture to survive. We learned quickly that we needed to move microgreens to the back wall, so they were never in direct sunlight. They seemed to do just fine there with some occasional rotating of trays to balance out the sunlight.
Downfalls
1. Lack of space for additional ventilation: We have added ventilation where we can, but because of the high value of the insulation when outside temperatures are cold, you want to cut into that insulation as little as possible. Having used our building during a severe drought summer, we saw just how hot it could get inside there when daytime temperatures ranged from 75-90° for several months.
2. Less flexibility in the interior layout to gain additional storage surfaces than in a traditional greenhouse: The walls are white to reflect light so we cannot block them all with shelves or black trays. The barrels serve as a huge heat sink so we cannot remove any of them. The angled wall will always be an angled wall.
The space constraint is something we were aware of when we were designing this building, but it’s something to keep in mind if you are looking into building one yourself. It’s another reason to consider adding PCM and removing some of the water barrels. For now, we just need to be creative.
3. High cost to build: When comparing a passive solar propagation house to a standard greenhouse, the cost per square footage is much higher. Figure in your long-term savings before deciding if this type of building is for you.
We were lucky enough to have been selected to receive a grant in 2020 from our community co-op which is given in partnership with our local conservation district and helped substantially with the cost of the building. We highly suggest you look into grants offered in your area to help offset the costs of big projects such as this.
Also, it is worth noting that Tyler is a professional carpenter, so he was able to complete most of the work with the help of a few other local carpenters and contractors. It may be complicated for someone without building experience to build one of these, albeit possible. Hiring someone to build it for you would just be an additional cost to consider.
What we plan to add
We intentionally left parts of the interior of the propagation house partially incomplete to leave room for adjustments as needed, taking into account our 2022 season experience. We knew pretty immediately that we wanted to add shelving above the workstation and additional racks that can hold more plant trays.
We also plan to drill a hole in the wall and install the Hi-Hose above the walk space to make watering easier. Currently, the hose lives outside next to the water spigot and is dragged inside when needed.
Eventually, we may install a sprinkler system that will allow us to automate the watering of plant starts. However, since we would only use this during times away from the farm or in a pinch, it’s not a top priority. We believe the best way to care for our plants is to be there in person, feel the soil’s moisture level, know when and how much to water based on weather and temperature, etc.
There are four incomplete vents along the south-facing side of the building, which will be utilized in 2023. We would like to add a feature that forces them open and closed, to get more airflow at the plant level.
Final thoughts
All in all, we love our passive solar propagation house. Our farming experience, work-life balance, and plant quality have greatly improved. This building has given us so much peace of mind when tucking our plant babies in at night, as well as during the hottest days of summer.
During the design process, our goals were to produce more high-quality plants, create a healthy work-life balance and sustainable farming future, and have zero dependence on fossil fuels. I think we reached all of those goals!
There was a lot that went into this building, and we will definitely be working on it for many years to come, making tweaks and updates as needed. It is a work in progress, as are most things on a farm. I encourage you to consider a passive solar propagation house if you are looking for a long-term, budget, and climate-friendly alternative to a greenhouse heated with fossil fuels.
Jenna Rich, alongside her partner Tyler, owns and operates Partners’ Gardens LLC, a small-scale and no-till market-style farm in Nelson, NH. In her spare time, Jenna is a freelance writer, dog and cat mom, and part-time bartender. Follow the adventures of Partners’ Gardens on Instagram @partnersgardens or reach out at partnersgardensnh@gmail.com.
Copyright Growing For Market Magazine.
All rights reserved. No portion of this article may be copied
in any manner for use other than by the subscriber without
permission from the publisher.