


#ToolsForGrowingForMarket
Post your favorite farm-made tool on social media using #toolsforgrowingformarket or email it to us at admin@growingformarket.com. If Josh picks your tool, you win a $50 tool gift certificate and a Full Access sub to GFM!
I was first introduced to flame weeding as an apprentice farmer. We had a single wand torch with a squeeze valve and we’d carry the “20 pound” propane tank (which actually weighs over 30 pounds when full) in our other hand while flaming beds seeded to carrots. 24 years later, despite having tried a few other options, I’m back to that same set up, and basically I’m still using it for the same thing – pre-emergence weeding of carrots and parsnips, which for me means just a bed or two every two weeks or so.
Before I get into more on the tool itself, first a few notes on the use of flame weeders (and you’ll find other good articles in the GFM archives). Flame weeding doesn’t take as much time as many people think. I often see people walking extremely slowly with flame weeders, waiting to visibly see weeds wilting or imagining they have to heat the surface of the soil.
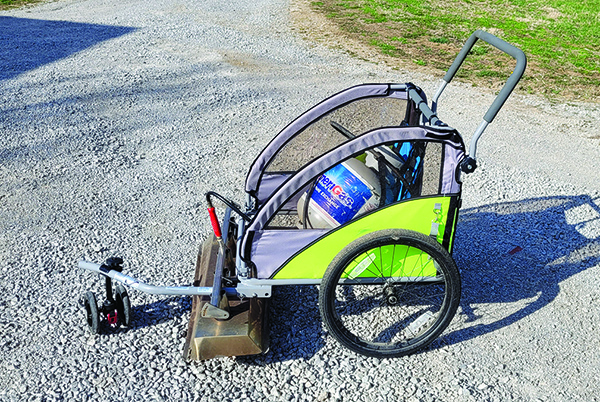 The burners and shield of the old flame weeder are mounted to the frame of the stroller and the tank sits in the seat. The valve is easily adjusted by bending over.
All that is required to kill the weeds is to damage the cells on the surface of the leaves so that they can’t perform their function and the plant will then die over the course of the next few hours. This typically works best when it’s hot and dry, just like other cultivation methods, but for safety it’s often a balance of doing it when there’s some moisture, at least in the surrounding beds, to reduce the potential of lighting a larger grass fire. Flaming around mulch – plastic, straw or wood chips – is a fire hazard and bare soil is really where the method is effective.
I always walk at a brisk pace up and down my beds and I don’t even look at the weeds. I often do a quick double pass, one from one side of the bed going one direction and then coming back on the other side of the bed because the most common way to miss a weed is if it’s hiding behind a small clump of dirt where there’s a heat shadow effect. Also, I’m always flaming when weeds have just emerged and haven’t developed true leaves. It’s also important to understand that you can knock grasses and other monocots back but you won’t kill most of them because their growing tips are below ground and are insulated by the soil.
Holding the tank in your hand and a wand in the other is ok if you’re only doing a small area, and it’s certainly a relatively cheap way to do it – but you have to be able to awkwardly haul a 30-pound tank in one hand for a couple of minute walk down a narrow furrow. That doesn’t work well for everyone. One upgrade many farms use, including ones I’ve worked on, is to attach the tank to an external frame backpack, or something similar.
Flameweeders.com has been selling shielded torches with a wheel for decades now. They’re kind of like a wheel hoe, but one that uses heat instead of blades, and they’re a bit more efficient than an unshielded single burner torch. Over the past few decades I’ve seen a lot of variations on this theme, some built by companies that mainly supply larger tractor scale farms and using liquid propane, some more focused on small scale market farmers.
Maggie Dungan of Salad Days Farm in Kentucky started out with a two-wheel, fiver burner model (30” wide shield) from flameweeders.com and was carrying her tank using a frame pack, but she found it awkward. She was inspired to modify hers by a version Ford Waterstrat of Sustainable Harvest Farm built from an old three wheel running stroller. She found a different combination stroller/bike trailer used for $50, attached the burners and flame shield from her flameweeder.com model, and stuck the tank in the child’s seat instead of wearing it on her back.
Conveniently the version of the flamer she started with has two tabs that she was able to bolt pieces of square tube to and those she simply held to the bottom of the stroller frame with zip ties until she figures out the best placement. (This is the kind of temporary solution that’s a great prototyping hack and often becomes more permanent than initially intended.) She also had to remove the handle from the flamer and attach the hose directly to the burner manifold with a bushing.
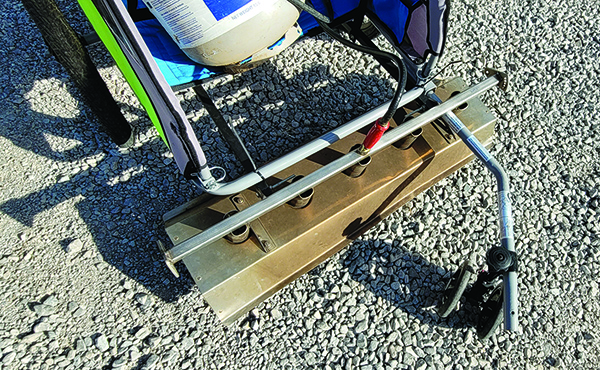 Here you can see the two black pieces of square tube that are bolted to the burner assembly and are zip tied to the frame of the stroller.
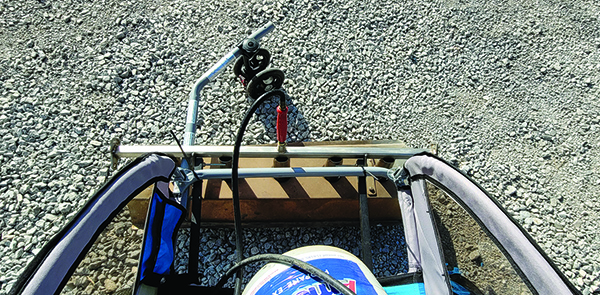
The only modification she made to the stroller was to cut away some of the fabric closest to the burner to reduce the chance of lighting it on fire. When I first saw her Instagram photo of the stroller with the flamer attached my initial reaction was, “I hope that fabric doesn’t catch on fire,” and scrolling through the comments I quickly came across Ford’s comment, “Maggie… I caught one of those on fire doing that same thing… Good memories.”
I reached out to Ford about that and his response was, “I think it would work as long as you didn’t have any fabric or plastic. It melted the webbing/straps quickly.” You can find photos of Ford’s version by scrolling back through his Instagram. Both he and Maggie pointed out that his didn’t have any flame shielding.
Maggie tells me she’s been using the flamer for making stale seedbeds and hasn’t had any trouble with the frame of the stroller heating up or the fabric melting. To me this is a testament of the added efficiency of having a shielded flamer which keeps the heat focused down on the ground and doesn’t waste as much heat going other places. According to Maggie the stroller makes the flamer much easier to use and she runs it for about 20 minutes at a time with no problems.
There are a few things I want to point out in conjunction with this tool. Modifying tools like this one isn’t super complicated, but it does have some really severe consequences if things go wrong. Even if the probability is relatively low, potential consequences of failures with propane gas warrant extreme care and a little extra thought and research into safety measures.
This applies even if you’re not modifying the tool and you’re just using a regular torch like the one I use. For example, I always take extra care and have established systems and habits to make certain the torch is kept well away from the supply hose, tank and my feet when I’m using it, and that it’s stored in a safe place where it won’t be damaged between uses.
With propane burners like this one the tanks are made to deliver propane vapor, not liquid propane. To do this the tank has to remain vertical. Because the tank is delivering propane vapor it will sometime freeze after extended use (and the metal wands can get really cold). If you’re interested in more on this topic look up the physics equation; it is PV=nRT (the ideal gas law which relates pressure [P] and volume [V] to the amount of gas [n] and temperature [T] with R being a constant).
This process of expanding pressurized gas to create a temperature drop is also how modern refrigeration works. Using a pressure regulator between your torch and the tank helps moderate the release of gas which can extend the amount of time before the tank freezes. There are torches that are designed to run on liquid propane but those are almost always for larger operations and they basically have a preheat that vaporizes the propane as it runs through the burner as opposed to coming out of the tank in vapor form.
Part of Ford’s comment when I asked him about the version of this flamer he built was, “It seems that the longer I farm the more I realize that a lot of thought and experimentation goes into a good product and that it might be better to just figure out what you really need and purchase it. We rigged stuff for quite a few years until we were able to start buying newer-real stuff and that’s blessed our business.”
Of course there’s a limit to what you can buy ready-made, but it is true that there are more and more well designed, pre-made tools available these days.
Josh Volk farms in Portland, Oregon, and does consulting and education under the name Slow Hand Farm. He is the author of the book Build Your Own Farm Tools and Compact Farms: 15 Proven Plans for Market Farms on 5 Acres or Less, both available from Growing for Market. He can be found at slowhandfarm.com.
Copyright Growing For Market Magazine.
All rights reserved. No portion of this article may be copied
in any manner for use other than by the subscriber without
permission from the publisher.