


This is the second in a series looking more closely at the five areas of potential produce contamination identified by the FDA.
The first principle of microbiological food safety is to keep the poop – and the potentially nasty microbes it carries – off of the food in the first place. That means keeping tools, equipment, and facilities from being contaminated by feces from people and animals right from the start. And because poop inevitably does make it onto our produce and into our packing environment, we need to take reasonable steps to ensure that our tools and equipment don’t spread that poop from one item or one place to another.

When exploring ways to produce microbiologically safe food, we’re always looking for ways to reduce risk, not eliminate it. Where organic farming is about following certain methodologies of agriculture, food safety is about accumulating risk reduction to produce a decreased likelihood of contamination by food-borne human pathogens. Because the kinds of buildings, equipment, and tools used on vegetable farms vary widely from operation to operation, changing significantly with the scale, diversity, and product mix of a given operation, the specific tools and tactics used will also change.
Equipment and tools
Whatever we’re using should be easy to inspect, maintain, clean, and sanitize. Cracks and crannies are bacteria’s best friend, because they hold water and provide snuggly little hiding places. Tables should be smooth with good welds, and knife blades shouldn’t be loose in their handles.
Equipment that’s permanently placed should be accessible and easy to clean. Even shelving and pallets need to be considered as “equipment” if they come into contact with food or food-contact surfaces.
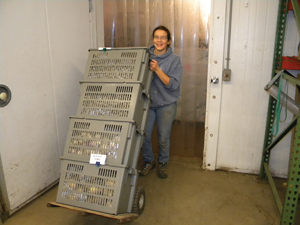
Equipment and tools should be stored in a way that avoids contamination by contact with rodents, birds, and insects. Ideally, knives and harvest totes would be stored in an enclosed facility. If you don’t have an enclosed facility, knives and other harvest tools could be stored in a lidded, solid-sided tote. If totes aren’t stored indoors, at least turn them upside down, elevate them off the ground, and put some sort of cover over them.
Even the smoothest surfaces, such as stainless steel, can still carry E Coli O157:H7 from one piece of produce to another, so cleaning and sanitizing are a first line of defense against introducing and spreading disease. First, rinse the surface to remove any free dirt and debris. Clay particles and organic matter bind up sanitizers and keep them from being active against microbes, so you’ve got to get those off of the surface you’re sanitizing. If dirt and debris of any sort remain – even a thin film – after you’ve rinsed with water, use elbow grease or a detergent to free up the remainder, and rinse again.
You have to rinse before applying a sanitizer, because detergents can inactivate sanitizers, just like clay and organic matter. Once you’ve sanitized, don’t rinse again – that just increases the opportunity for recontamination.
It’s the best practice to clean and sanitize all of your harvest and packing equipment at the end of every day, and to sanitize again before you use it again in the morning. Sanitizing clean tools can be as easy as dunking them in a bucket of sanitizer solution before you take them out to the field; the water that remains on them when you carry them to the field will be enough to provide an adequate contact time for the sanitizer to be effective.
You can use a variety of sanitizers, but make certain of two things: first, be certain that you are using a food grade sanitizer – no lemon Clorox here. Second, use the right concentration, which you will find on the label. Weak solutions aren’t effective, and solutions that are too strong can cause damage to the surface you’re sanitizing.
For a hard-surface sanitizers, I use Ecolab’s Oxonia Active, because the hydrogen peroxide and peroxyacetic acid blend breaks down into water, oxygen, and acetic acid, and it’s OMRI-approved for organic production. Peroxyacetic acid (also known as peracetic acid or PAA) gets dismissed in some circles as being relatively ineffective, but in combination with hydrogen peroxide it is very effective.
Keep in mind that harvest equipment isn’t just knives and totes – it also includes harvest vehicles and carts, which also need to be cleaned and maintained in such a way as to avoid contamination. That means that vehicles used to haul produce shouldn’t be used to haul trash or livestock, unless they are readily cleaned and sanitized – a caveat that would exclude many panel vans and garden carts. Pallets can reduce contact with potentially contaminated vehicle floors.
In the field, equipment should be operated in such a way as to avoid moving contaminated soil into fields where vegetables are grown. If you are doing both livestock chores and harvesting tasks with the same vehicle, do the harvesting work first, then move into the livestock field – and consider how you can reduce any contamination before you drive out to harvest the next morning.
Buildings
When we start talking about buildings, remember that food safety is about reducing risk, not about eliminating it. In the ideal food-safe world, everybody would be packing produce in state-of-the-art enclosed packing sheds, but not every farm operates at a scale that makes that feasible. So, we need to do what we can to create an environment that prevents contamination with food-borne illness organisms.
You should be able to clean all of the surfaces in your packing area: floors, ceilings, fixtures, and pipes. At Rock Spring Farm, we use a combination of fiberglass reinforced plastic (FRP, or dairy board) and painted tin on our walls and ceilings to make cleaning easy. Full-fixture shields can make lights easy to clean, as well as preventing physical contamination from broken glass.
Condensation and dripping should be avoided. Condensing water concentrates dust and provides a means for contaminating food, food-contact surfaces, and packing materials. Ceiling insulation can reduce or eliminate condensation and dripping in rooms at large; in walk-in coolers, functioning catch pans and drain piping can remove water from the cooling units without condensation.
Concrete makes cleaning floors easy, and facilitates adequate drainage. Packing on gravel, grass, or bare soil makes it almost impossible to remove all of the food waste from an area. Puddles serve as watering holes for pests like rodents and birds, and provide a breeding ground for organisms like Listeria monocytogenes, the organism implicated in last summer’s cantaloupe outbreak, so you’ll want to make certain that water flows away from your packing area. Concrete crews don’t always do the greatest job of pouring a flat and even slab, and a squeegee can help move water towards a floor drain if you’ve got uneven spots in the floor.
Packing areas can be enclosed in a variety of ways. I’ve seen successful farms with heavy-duty screening hanging from a lean-to shed, plastic sheeting nailed to poles, and hoop houses for packing facilities; you don’t have to build a sophisticated structure to keep dust, rain, and animals out.
Regardless of whether you have an enclosed packing area or a lean-to shed, you should make an effort to exclude as many animals as possible. Domestic animals provide a fertile vector for microbes – I’ve seen what my dog rolls in, and I don’t want that anywhere near my food. Rodents, insects, lizards, and birds can all carry pathogenic microbes, so you should make every effort to keep them away from packing operations and packaging materials.
Most efforts to keep animals out of the packing area focus on physical exclusion – screens and doors to keep animals out of the packing facility. Some farms use discouragement as well, such as “scare eye” balloons of the sort used in orchards to discourage birds, and owl decoys to frighten rodents.
Exclusion means not only keeping pests out in the first place, but also not providing a welcome environment for them to stay. In a lean-to with open rafters, the addition of bird netting stapled to the underside of the rafters won’t keep birds from flying in, but it will deny them a place to build their nests and take up residence.
Pests that get in should be captured and either killed or removed. On my farm, we used the Mr. Sticky Fly Tape System in our old hoophouse packing shed to significantly reduce fly populations in the packing area; this skinny sticky tape ran across the top of our packing area, and could be wound up when it was full of dead, crunchy fly carcasses to expose fresh new sticky tape.
We monitor for rodent pests weekly using “tin cat” mouse traps with a window in the lid. We place one in each room of the packing house, including each cooler , with the open passage side butted up to the wall. Traps are checked weekly for signs of rodent activity. If we find evidence of rodents, we label the location as a “hot spot,” and check the location daily until we have ten days with no sign of activity. Shortly after we instituted this monitoring program, we expanded it to include our cover crop seed storage and our greenhouses, and greatly reduce rodent damage as a result.
Plumbing, litter, and waste
Anywhere you’re picking and packing vegetables, you’ve got waste. Trimmings and lunch scraps provide food for rodents and flies, and paper towels and sewage provide potential sources of produce contamination.
Toilet facilities should be located in locations such that they don’t contaminate packing areas, and should be designed so that they are easy to clean, with washable walls and floors and plenty of space around the stool. In my packing house, the bathroom opens onto the employee kitchen, rather than directly into the packing area.
Hand-wash facilities should be located appropriately. Some people recommend that hand-wash facilities be located outside of the bathroom, so that managers can monitor compliance with good hand-washing practices. In any case, they need to be accessible to workers during the transition from field to packing house, and before they do anything that involves handling food.
Waste water from hand-washing is considered contaminated, by definition; after all, you wash your hands because they might be contaminated, so it only makes sense that the water you use to wash them becomes contaminated as well – so it needs to be directed into a sewage system or into a container for later disposal, rather than being allowed to run into the field.
Litter and vegetable waste should be handled in such a way as to not harbor pests, and not to contaminate produce or food-contact surfaces. Lidded garbage cans for trash provide a clear place for litter, and prevent access by rodents or birds.
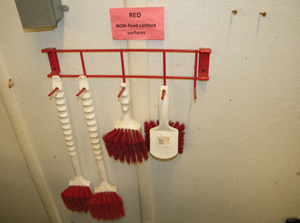
Designated containers should be used for vegetable waste. We spray-painted a red stripe on several of our plastic harvest totes to designate them as “compost” containers, and purchased several red buckets, as well; on my farm, red is the color for non-food-contact equipment, such as brushes used to clean the walls and brooms for cleaning floors.
Chris Blanchard owns and operates Rock Spring Farm in Northeast Iowa, which is food-safety certified. He offers education and consulting as Flying Rutabaga Works (www.flyingrutabagaworks.com) and is the co-author of Fearless Farm Finances, available from www.mosesorganic.org.
Copyright Growing For Market Magazine.
All rights reserved. No portion of this article may be copied
in any manner for use other than by the subscriber without
permission from the publisher.