


If you have high tunnels, chances are you already have them planted and are looking forward to a long season of delicious winter crops. But if you’re like me, you’ll start worrying every time snow is forecast. We lost one last winter to a heavy, wet snow — that’s our tunnel in the photo below. 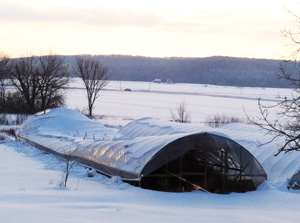
The amount of snow that equals an inch of rain varies from 12 inches for light, fluffy snow to 3 inches for heavy, wet snow. An inch of water amounts to 6.5 tons on a 24×96 foot greenhouse. That’s like parking two Ford Escalades on your tunnel. Well, not exactly because the snowload is spread across a greater surface area, but the point is that even 3 inches of snow can be very heavy.
In the interest of keeping your tunnels standing and producing, whatever winter throws at them, I contacted experts in snowy places for suggestions about how to prepare for winter. Here are their suggestions:
Adam Montri, Michigan State University
Build strong from the start. That doesn’t always mean things won’t collapse or get damaged but it is really helpful. It costs extra to do things like truss supports on at least every other bow, but an additional $500-1000 spent up front on a $7,000-10,000 tunnel is worth it. We have 3 houses with trusses on every bow and 3 houses with trusses on every other (which we got used so they are what they are—they went through last winter without a problem).
Think about opting for extra wind bracing. Sometimes when a house gets rocking it can start to loosen a lot of parts over time and the extra wind bracing helps to keep this rocking down.
Endwalls aren’t just for sealing up the ends! Building them strong also helps keep the house from collapsing in under heavy loads. Steel (stronger) or wood (less expensive) are both fine, but make sure they are anchored well. We put our steel ends in the ground about 2 ft. For the wood we put 4x4s on each side of the doors in the ground but don’t put other 2×4 verticals in the ground. Instead we are screwing them to a baseboard across the end and then putting a 4’ U-post driven into the ground behind them and screwing the U-post into the 2×4 with 3-4 2.5 inch exterior wood/deck screws.
I have seen a few people use “dead-men” — 2x4s or 4x4s notched and placed under every other bow running down to the ground to provide more support. This would be on houses that didn’t have trusses that would get in the way.
Fix loose doors, channel, or other things that will come loose or tear off in wind storms. The same goes for patching poly before the winter if there are any tears. A lot of times in the summer we might just do a quick fix (like using a screwdriver stuck in the ground to keep a door closed). This works for the summer but before the winter we fix these kinds of things. A small tear or loose screws can become a major problem pretty quickly.
Buy insurance for tunnels. All of ours are insured through our farm policy. They are not covered against collapse from snow or ice loads because we do not heat them but they are covered for everything else. We have a $500 deductible for each house but if something happens they are covered.
Lewis Jett, West Virginia University
Apply a second layer of polyethylene film to the high tunnel for greater insulation and wind/snow resistance.
In high snow load areas, bow spacing should be 3-4 feet.
Increasing height of the ground posts will result in a greater air volume for better heat retention during the winter.
Trench around the high tunnel and bury a sheet of polyethylene plastic or woven ground cover from the base board to the bottom of the trench. This will reduce soil heat loss and control tunneling from animals such as moles throughout the winter.
Supplemental cross bracing and corner braces can be added if the existing structure has no cross braces. This will increase the wind and snow load capacity of the high tunnel.
Additional purlins can be added to the high tunnel structure.
All air gaps should be sealed. A sheet of polyethylene plastic from the end bow to the next inward bow will be effective in sealing or reducing heat loss from the corners of the tunnel.
The interior baseboards can be lined with insulating material (e.g.,bubble insulation) to retain heat during the winter.
An interior row cover or energy curtain can be placed within the tunnel to retain infrared insulation.
Adam Lemieux, Johnny’s Selected Seeds, Maine
I think most considerations around snow load happen during the planning and constructions stages. Shape (Gothic vs. Quonset), orientation (such that snow tends to blow off the structure, rather than drift on it), bow spacing (generally 4 ft. minimum), additional bracing, end wall design, etc.
In the smaller Quonsets (like those made with our Quick Hoops High Tunnel Bender and maybe a little bigger), growers sometimes add wooden vertical supports. These are usually 2x4s, notched at the top, with a 1’ x 1’ piece of plywood nailed to the bottom, so that the 2×4 won’t sink into the soil. The notch is placed up under the ridge pole. This may be repeated every other or every third hoop.
Sometimes side purlins can create a pocket and trap snow, which can be catastrophic. In the case of our 12’ tunnels, we recommend removing purlins if the tunnel will be left covered over winter. We also have come up with a different design for trellising purlins that does not catch rain or snow. See it at http://www.flickr.com/photos/johnnystooldude/8023549097/in/set-72157631621184319
I believe one of the most important things is diligent snow removal. Simply making a pass around the perimeter of the tunnel after every storm will greatly reduce the snow load on any tunnel, regardless of shape. It will give the snow above it somewhere to go, allowing it to somewhat self-shed and will remove the force of the base snow, pressing in on the sides.
Copyright Growing For Market Magazine.
All rights reserved. No portion of this article may be copied
in any manner for use other than by the subscriber without
permission from the publisher.