


Brassicas (cole crops) can be reliable and profitable workhorses for organic growers, providing large harvests over long periods. Broccoli is especially popular. Growers scaling up can do so by introducing different varieties, cutting heads and side shoots, extending the season, or introducing new mini sizes of broccoli by reducing the spacing, as well as the obvious: planting more land.
Crop requirements
In most of the U.S., broccoli is planted in spring and fall. In cooler climates, people plant in the spring and harvest all summer, until cold weather brings the plants to an end. In warmer climates, broccoli grows through the winter, and summer is the impossible time for it. And in parts of California, broccoli grows year round. Optimal growing temperatures for most brassicas are 60-65°F.
Broccoli does best on fertile soil, well drained, with adequate moisture. Potassium requirements are high, so a sprinkling of wood ash, kelp meal or granite dust could be helpful. Calcium, boron, iron, manganese and molybdenum are important for good brassica crops. Healthy, biologically active soils can usually supply enough of all these.
In early spring, transplants have the advantage over direct seeded crops, of growing faster under protected conditions, and bringing earlier harvests. At other times of year, you may prefer to direct seed.
Varieties
Have a clear mind about your goals. Do you want crown cut broccoli (big heads) or bunches? Are side shoots valuable or a hassle? How long of a harvest season do you want? How much do you want at once? Our goal for broccoli is enough for 100 people to eat it fresh every other day, and some to freeze for the winter. To extend the season as long as possible, we grow several varieties with different numbers of days to maturity. We like to have some good side shoot production.
Johnny’s Selected Seeds catalog has a useful comparison chart of their varieties. Days-to-maturity listed are often days from transplanting, so add the time to grow the transplants, or 21 days if direct sowing, to figure when to sow. For broccoli, we like Blue Wind (49 days from transplanting) as an early variety, replacing Packman. Windsor (56 days), Gypsy (58 days), and Premium Crop (61 days) fill out our mid-season. Diplomat (68 days) and Arcadia (63 days) are our slow-maturing varieties to finish out the season. If the days-to-maturity listed are days from direct sowing, subtract 21 and add the time to grow the transplants.
Johnny’s rates Windsor, Gypsy, Bay Meadow and Green Magic as their best at tolerating hot weather (for spring sowing), and Arcadia, Diplomat, Marathon and Belstar as having the best cold tolerance, (for fall crops). Our climate is different from Maine. Our broccoli gets either a cold start and a hot finish in spring sown, or a hot start and a cold finish in fall. We do plant Arcadia in spring and harvest successfully in quite hot weather, although it’s not rated as having good heat tolerance. Fedco finds Windsor good on both cold and heat tolerance, as they do Fiesta (86 days from direct sowing), which we haven’t tried yet.
We have not had success with open pollinated broccoli or with broccoli raab, which are waving yellow flowers at us before we’ve realized they are ready. Also, we’re not good at dealing with small vegetables.
Amount to grow
We like large broccoli heads. For a 25% higher total yield, but smaller heads, you can produce 3-packs of 1½ pound broccoli heads: Plant double or triple rows with only 6-8” between plants, and a 24” aisle between outer rows of one set and the next.
For 100 enthusiastic vegetable eaters, in spring we grow we grow up to 2000’ of broccoli. Broccoli is planted at 18”. Yield can be 1 pound/plant for broccoli. On a larger scale, you can expect 5 tons per acre of broccoli.
Rotations and cover crops
We arrange our rotation so that early food crops are preceded by easy-to-incorporate winter cover crops. Our main broccoli and cabbage patch follows an early sweet corn crop the previous year. We disk in the corn and sow a cover crop of oats and soy in August. Oats winter-kill below about 5°F, i.e. zone 6 and most of 7, and break down easily when disked in February.
When our spring broccoli becomes bitter in early July, we bush hog to destroy harlequin bug habitat. We may simply mow until early September, then put in the winter cover crops. If possible, though, we disk and sow a round of buckwheat and soy. We need six weeks or more for good growth of soy, but only 4 weeks for buckwheat. Our goal is to sow winter rye, hairy vetch and Austrian winter peas 9/7 – 9/14, to make good growth for no-till tomatoes the following year.
A rotation of one year in four is ideal for brassicas to avoid disease and pest buildup. When possible, plant one year’s brassicas at some distance from the previous year’s, rather than in adjacent plots. The spread of disease can be reduced by avoiding walking through wet crops, and by keeping cruciferous (brassica related) weeds under control.
Sowing
Work back from the desired harvest date to figure the sowing date. Naturally you’ll need to allow for your climate and choose a realistic transplanting date. We start our first broccoli in early February, make a second sowing 14 days after the first (to extend the harvest season) and a third (to fill gaps) 10 days after the second.
Our formula is to produce 20% more starts than we intend to grow, so we can pick the best, and sail through 20% of a disaster. Despite being a cool weather crop, broccoli actually germinates very well at high temperatures: the ideal for brassicas is 77-85°F, and 95°F is still OK. Given enough water, the seedlings will emerge in 4.5 days at the low end of this range, and at the top in only 3 days. The minimum temperature for good germination is 40°F, but you’ll need to wait over two weeks for emergence if it’s that chilly.
There are several systems for growing transplants: open flats, cell-packs or plug-flats, and outdoor seedbeds. People who use cell packs for broccoli often use the 608s (48 cell inserts), or the 72 cell size with 1.5” cells.
We start our spring broccoli in open flats, sowing 3-4 seeds per inch. We press a plastic ruler 0.25” into the seed compost to make a small furrow, spacing the rows 2-3” apart. As soon as the seed leaves are fully open, we spot (prick) them out (bump them up) to 4” deep flats, with 40 plants per 12” x 24” flat. We have a dibble board with pegs in a staggered pattern, which we press into the compost to make holes where the seedlings are to go. The plants grow to transplanting size in these flats.
Once they have emerged, the seedlings need good light, nutrients, good air flow, and protection from bugs. 60-70°F is a good temperature range for growing the seedlings. For the last two weeks before transplanting, harden off the plants by moving them into cooler, breezier, brighter conditions.
Stressed plants are liable to bolt, or in the case of broccoli, “button” (produce tiny heads). Buttoning is worse if the stems are more than 0.25” diameter at transplanting, so it is better to make several sowings and only set out plants of a moderate size.
Transplanting
We grow our spring broccoli in raised beds on 4.5-5’ centers, at two rows per bed, with plants 18” apart. After spreading compost and incorporating it, we mulch the beds with rolled out spoiled hay bales, then make “nests” in the hay by hand, using a stick of the right length to measure spacing along one row. The person working the opposite side of the bed does not measure, but eyeballs the spacing, to stagger the two rows.
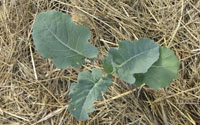
We aim to transplant at 4 or 5 true leaves (6-8 weeks after sowing), early April for the first broccoli (and our main crop cabbage), a week later for the second sowing of broccoli (it is sown two weeks later, but catches up one week). For calculating your planting dates, compare your climate with ours: our last frost date is April 30, on average. Soil temperatures of 65-75°F are ideal. We transplant every afternoon until done. We water the seedlings well before transplanting, and plant up to the base of the first true leaves, to give the stem good support, and press the soil very firmly around the plants, so the roots have good soil contact, and don’t die in an air pocket. Then we water within half an hour of planting, and again on the third day, the seventh, and then once a week.
When broccoli plants have 5-8 true leaves, they are susceptible to cold stress if subjected to continuous temperatures below 40°F for a few days, or a longer spell at 50°F. So if the weather deteriorates at the critical time, give your plants extra protection. High daytime temperatures can to some extent compensate for low night-time temperatures – it is cold days and cold nights together that do the damage.
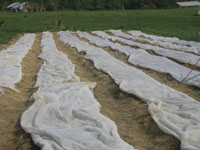
Our spring broccoli planting is traditionally marked by cracking open a brand new roll of row cover, as this crop uses lots, and we often need every piece we’ve got. We also take row cover directly from the early turnips, leek seedlings, oriental greens, kale and collards to the broccoli. It feels more efficient and purposeful to take row cover and sticks directly from one crop to another, rather than packing them away in the shed, just to haul them out again a few days later.
Two weeks later, we check the plants and fill the gaps. Leftover plants from the first sowing are usually too big to transplant by then. We fill gaps in the first sowing with second sowing plants, gaps in the second sowing with plants from the “filler” third sowing. At this gap-filling stage, around 4/25, we also plant out alyssum in the center of the beds, one plug every 5-6’, to attract beneficial insects. We sow it 3/3, in a Plantel 192 cell tray, the only one we own, bought as a sample and found too odd a shape to fit with our general production but just right for this job!
Caring for the crop
About a month after transplanting (mid-May), we remove the row covers and the sticks we use to hold it down, taking them directly to cover newly planted lettuce, eggplant, watermelons, muskmelons and okra.
The first weeks after transplanting of broccoli are used for vegetative growth, adding leaves until there are about 20, when “cupping” starts. The cupping stage is usually 10-14 days before harvest, depending on temperature. If the weather gets too hot — more than 80°F — too soon, broccoli may grow only leaves, and not head up.
Richard McDonald has this information in his Introduction to Organic Brassica Production, www.drmcbug.com/organic.htm. “Research has shown that, once broccoli plants have at least six leaves and up to 15-16 leaves (just prior to cupping), they can withstand up to 50 percent defoliation without a decrease in yield. In fact, moderate defoliation of the plants–around 20 to 30 percent–actually increases yield. Defoliation causes certain plant chemicals to be emitted; these chemicals beckon parasitic wasps and predatory insects to the plants. By allowing for a certain amount of defoliation, you encourage beneficial insects to establish a foothold in the cropping system. They then begin foraging in the area. As the plants cup, you want the fewest numbers of pests around and the most beneficials. Cupping is the time to get particular about pest levels, and not before.”
Our big brassica patch is next to our garlic patch, which works well. In the middle of May, we weed the broccoli, where the mulch is giving way to weeds. Then we weed the garlic and gather the weeds and mulch, using it to top up the mulch around the broccoli. This helps the garlic dry down for the last three weeks before harvest.
We use overhead sprinkler irrigation, which helps cool the broccoli, and can wash off aphids. Organic mulches help keep the soil cool, as well as adding lots of organic matter to the soil. Brassica roots are relatively shallow, so long droughty spells without irrigation can cause a problem. One inch of water per week is about right. If you are using plastic mulch, you’ll need to use drip irrigation under it. The black plastic can get too hot later in the spring, but luckily the plant canopy will cover some of it.
Pest control
Using row covers keeps many pests off the plants while they are small. We have not had much trouble with aphids, perhaps partly because of the overhead sprinklers. Insecticidal soap sprayed three times, every five days, can usually deal with aphids. Our worst pest is the harlequin bug. We hand-pick them, for lack of a better organic solution. Ladybugs are reputed to eat harlequin bug eggs.
Sometimes we have had enough cabbage worms to make Bt necessary, but usually paper wasps eat the caterpillars. The action threshold is an average of 1 cabbage looper, 1.5 imported cabbageworms, 3.3 armyworms or 5 diamondback moth larvae per 10 plants. Below this level you can do watchful waiting rather than spraying with Bt or spinosad. We are lucky enough to have the naturally occurring wasp parasite of cabbage worms, the Braconid wasp Cotesia species, which are found as small cottony white or yellowish oval cocoons in groups on brassica leaves. The Cotesia wasps like umbelliferous flowers, and overwinter on yarrow as well as brassicas. If you find Cotesia cocoons and your brassicas aren’t diseased, you can leave plants in the field over winter. Or you could collect up leaves with cocoons in late fall and store them at 32-34°F until spring. Hopefully no one will clean out your fridge without asking. To float out worms and aphids after harvest, use warm water with a little vinegar and soak for up to 15 minutes, then rinse.
Farmscaping
Putting 5% of the crop area in plants which attract beneficial insects can seriously reduce pest numbers. Sweet alyssum, yarrow, dill, coriander (cilantro), buckwheat, mung beans, black oil-seed sunflower, calendula and cleome all work well to attract a range of insects which eat or parasitize aphids. Pans of water and gravel will help attract aphid midges and lacewings. The gravel provides surfaces for the insects to land on while drinking. Mix flowers to have something blooming all the time. Beneficial insects will generally move up to 250’ into adjacent crops.
For more information, see ATTRA’s Farmscaping to Enhance Biological Control: http://attra.ncat.org/attra-pub/PDF/farmscaping.pdf,
Debbie Roos, Growing Small Farms: www.ces.ncsu.edu/chatham/ag/SustAg/index.html and
Richard McDonald’s: www.drmcbug.com
As well as sweet alyssum within the brassica beds, we plant “Insectaries” around the garden, usually at the ends of beds. These flowers are planted inside rings sawn from a plastic bucket. The rings act to alert inexperienced crew that something special is there, not just a clump of weeds.
Trap crops
A row of mustard greens can be used to lure flea beetles. They like the pungent compounds in brassicas. Once you have lured the flea beetles you need to deal with them before you create a flea beetle breeding ground. Flaming the mustard plants is one possibility. If you have poultry that likes eating fleabeetles, you could cut off some of the leaves and carry them to the chicken run. Bug vacuums are also a possibility. Another approach is to hold an inverted bucket lined with sticky trap compound over the plants and rap the stems with a stick. If you’re lucky, the pests will stick in the bucket.
Harvest
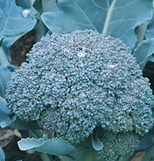
Our broccoli harvest is about 35 days long, 5/20 – 6/30, possibly a week longer. We like our broccoli heads to get as large as possible (without opening up) before we harvest. We test by pressing down on the head with our fingertips and spreading our fingers. We harvest as soon as the beads start to “spring” apart. This may be a little late for other growers. We also look at the individual beads and aim to harvest before the beads even think about opening. We cut a fairly long stem, which does reduce the number of side shoots, letting the remaining ones develop more strongly. We cut diagonally to reduce the chance of dew and rain puddling, followed by rotting of the stem.
We harvest three times each week, and take the buckets of produce directly to our walk-in cooler. Other growers place ice on top of the broccoli or hydrocool it, (submerge it in cold water or shower it from above with cold water) if they are dealing with a large volume compared to the cooling power of their refrigeration. Suitably chilled, broccoli can store for 10-14 days.
ATTRA has a good publication Cole Crops and Other Brassicas: Organic Production: http://attra.ncat.org/attra-pub/PDF/cole.pdf.
Oklahoma State University has a publication for commercial growers: http://pods.dasnr.okstate.edu/docushare/dsweb/Get/Document-1388/F-6027web.pdf.
Pam Dawling is the head gardener at Twin Oaks Community in Virginia. pam@twinoaks.org.
Copyright Growing For Market Magazine.
All rights reserved. No portion of this article may be copied
in any manner for use other than by the subscriber without
permission from the publisher.