


As I grow older, and gain in wisdom, I am more skeptical of black and white ways of seeing things. Although “either or” is an easier way to understand the world, I don’t find it’s the most accurate or allows me as much room to learn or to understand others. When I was coming up in farming, complete and utter tillage was the paradigm. So, I have appreciated the alternative perspective offered by the no-till movement.
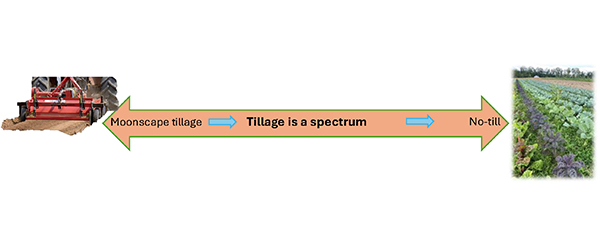
Figure 1 – Tillage is a spectrum. Growers don’t have to be perfect, and can continually be working to target their tillage, reduce its harm on the soil, and move towards less tillage.
Books by Daniel Mays, Jesse Frost, Andrew Mefferd, and Bryan O’Hara have taught me a lot. I enjoy the froth of new farming techniques that magazines like this one and social media have enabled. But I have also observed a sort of purity and puritanism in the no-till orthodoxy. I think sometimes farmers feel — or are made to feel — if they are tilling at all, they are “bad.”
When we have absolute morality we can sometimes let the perfect be the enemy of the good. And it’s from that perspective — the “good” in soil management — that I’ll share ideas about the benefits conferred by judicious use of tillage.
As a rule of thumb (meaning that it’s mostly true but not always), the consensus is that tillage is a soil-destructive practice. I agree with that. Turning the soil mechanically is grossly unnatural. But a practice that causes harm can also sometimes be beneficial to a system.

Figure 2. Three ways to think about the effects of tillage on the soil, and how to reduce them.
Just as chemotherapy can make a person miserable for months but ultimately better, so tillage can wound a soil while also contributing to longer-term improvements. Even when tillage may not lead to long-term soil improvements, sometimes it’s just really effective or time-saving.
I talk with some beginning farmers who see no-till as the only option and start with that system right away. In foregoing tillage from the jump, I think they may sometimes be missing out on the various benefits of tillage that could improve their future no-till conditions. A dose of tillage can address some specific underlying agronomic problems in a way that will make a no-till system function better once it’s up and running.
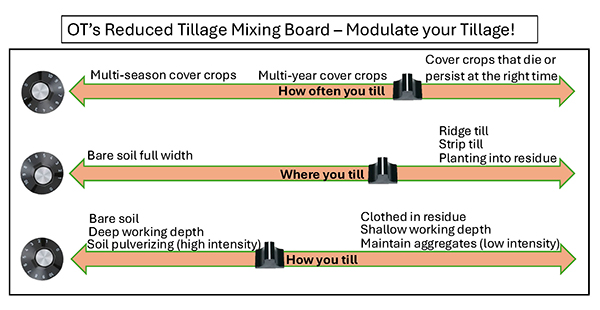
Figure 9. Sam’s reduced tillage mixing board.
For example, poor soil drainage or compaction are terrible for plant health and are hard to improve quickly in a no-till system. Deep subsoiling can be used at the beginning to set a no-till system up for success by alleviating compaction or improving drainage. Or for a grower starting with a weed problem, a longer period of bare soil with tillage every two weeks (called a bare fallow) can help get perennial weeds under control and reduce the annual weed seed bank. Also, using tillage to work-in mineral amendments, organic matter, or pH adjusters will hasten their action in the soil.
Tillage on a spectrum
As is the fashion for other things these days, it aids my understanding to think of tillage on a spectrum. On the one end is that perfect shining no-till system where roots and worms replace the plow, and on the other is a brown lunar landscape of mechanically pulverized soil lacking the protection of a shred of crop residue. But in between those two extremes is a beautiful place where many of us farm and seek to steward a more articulate soil within the constraints of physical and market realities.
In this article, we’ll inhabit the liminal space between no-till and tillage to explore some ways that farmers who are in a tillage system can keep the benefits of tillage while reducing the harms.
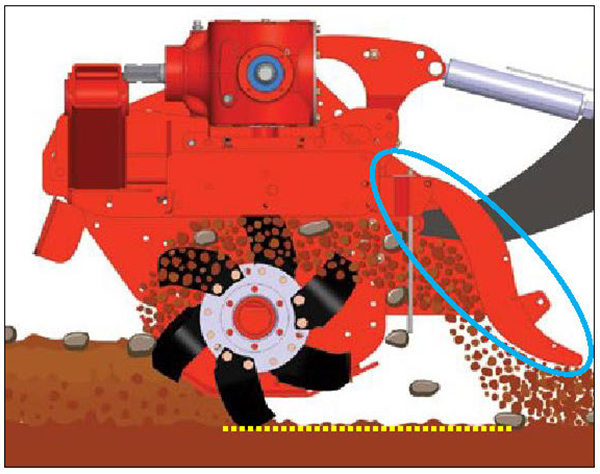
Figure 3. The yellow dotted line marks the layer of compaction that rototillers can make when the blade scrapes along the bottom of the working depth. The rear shield is down (circled in blue), which means that tilled soil is directed back into the blades and pulverized multiple times. Photo courtesy of Masano Co.
Let’s think about tillage in three dimensions. As we look at each one I’ll share practices and farmer examples. If you’re putting your soil under the knife, I suggest you ask yourself, “What is the goal(s) of this tillage operation?” Because when you know your goal you can choose the frequency, location, implement, and its setting to hit that sweet spot on the tillage spectrum, so that you achieve your goal while causing as little soil damage as possible.
Since we all like shiny pieces of metal, let’s start by looking at how we till, or the tool and its setting. To understanding the effect of a tillage tool and how you set it, think about things like: its intensity, how much it destroys soil aggregates and pulverizes the soil; how it moves through the soil — rotary tillers tend to smear and compact the layer at the bottom of their working depth whereas some other tools do not; depth, the deeper the machine is set the larger a volume of your soil it is tearing up; and residue, how much soil-protecting plant residue does it leave on the surface.
Let’s think through an example. Sometimes we do want that perfect pulverized seedbed for small-seeded crops like turnips. As farmer Paul Huber says, “Tarping has been a practice that has been good for us, but still, if I am planting turnips and I remove a tarp after three weeks with some rain, that soil can be hard. I would likely use tillage before planting because with tillage, you get it just the way you want it.”
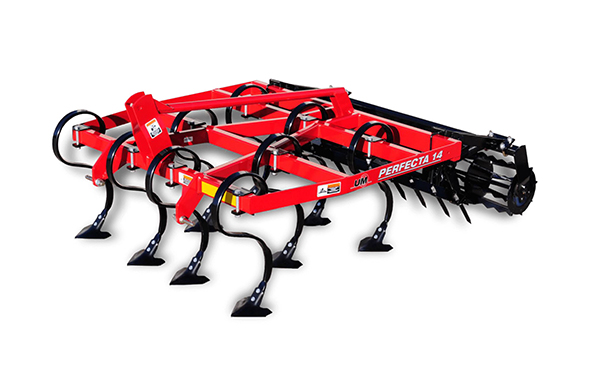
Figure 4. A Perfecta field cultivator, with S-tines, spike-toothed harrow, and rolling basket. Implements like this can be a good choice to preserve soil health when more intensive tillage is not required. Photo courtesy of Unverferth Co.
What is our goal in tillage for turnips? We want a fine tilth in the top 2 inches of soil, with less surface residue, and an even bed-top. This is so that the seeder can pass through the soil, the tiny turnip seeds have good seed-soil contact, and they’re placed at a consistent depth for even growth and even irrigation. It’s a bummer that we need to pulverize the soil, but at least we don’t have to do it very deeply and can adjust our implement accordingly.
In contrast, if we are planting transplants or potatoes, we don’t need that fine seedbed, but we do need the soil loosened a little deeper to set our plants or tubers, say 6 inches to 8 inches deep. For this tillage I might select a tool that is gentler on the soil and doesn’t break up aggregates so much, such as an S-tine cultivator or a Perfecta (Figure 4). I could also set the rototiller to be less aggressive by slowing down the blade speed (reducing tractor RPM), increasing tractor speed (to maybe 2.5 MPH instead of 1), and lifting the rear shield of the tiller so that soil is ejected and not re-blended by the blades (Figure 3).
There are a wide range of implements that do different things to the soil from power harrows, which are easier on soil aggregates and cause less compaction than tillers, to speed disks that terminate a cover crop or cash crop in a single pass running only a few inches deep, leaving the soil suffused with crop residue.
These tillage tools can also be adjusted in their depth and intensity to leave more or less residue on the soil surface. Plant residue does all sorts of great things for soil health, from shading it to lower its temperature, to holding-in moisture, reducing the erosive impacts of rain, to feeding soil life, and more.
You can encourage and manage residue by growing it (cover crops and crop residue), mowing it, and by how you till it. The USDA defines conservation tillage as leaving at least 30 percent of the soil surface covered with residue. You can do a lot better than 30 percent depending on the goals of your tillage operation, but it’s a good place to start (Figure 5).
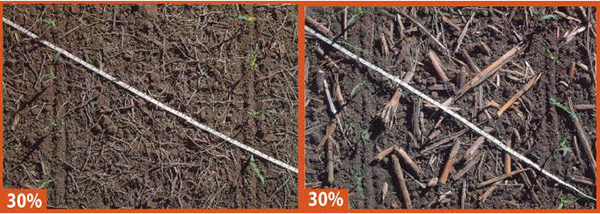
Figure 5. Conservation tillage leaves at least 30 percent residue on the soil surface. Showing post-harvest tillage in soy on the left and corn on the right. Photos from USDA-NRCS.
The choice of your implement and its adjustment is just one way we can reduce the harm of tillage. Eric and Anne Nordell talk about rotating tillage tools and their adjustments like they rotate crops so that they can capture the benefits of each tool without the accumulated harms of repeated use. Sometimes it might be helpful to run an S-tine cultivator 8-inches deep to kill quack grass roots that grow at that depth, but other times moldboard plowing just 4-inches deep can be enough to kill an established cover crop without the multiple passes required by another tool (what the Nordells call skim plowing).
You want to match the machine to the task. You can think of rotating tillage tools and settings like the blending of how you till with how often you till. By thinking deeply about their tillage, cover crops, and how they fit with their cash crops, farmers have found ways to reduce the frequency.
For example, Eliot Coleman told me proudly of his longer-term use of the classic rye-hairy vetch cover crop combination. Commonly this combo is planted in the fall and tilled-in early to mid-summer at flowering to terminate it. In order to increase the fertility that it adds to the soil and reduce tillage, Eliot manages this cover crop for a longer period. Instead of killing it in June, he’ll let the rye-vetch keep growing and set viable seed and then flail mow it around the middle of August.
All of the seeds fall to the ground and the residue falls on top as a mulch. Then rain or irrigation germinates all those seeds (which are now planted at about 20 times the normal density). This mix grows through the winter and is finally terminated the following April with his rototiller. The two winters and one summer of growth for this rye-vetch makes a lot of biomass that boosts soil fertility when turned under for the proceeding crop.
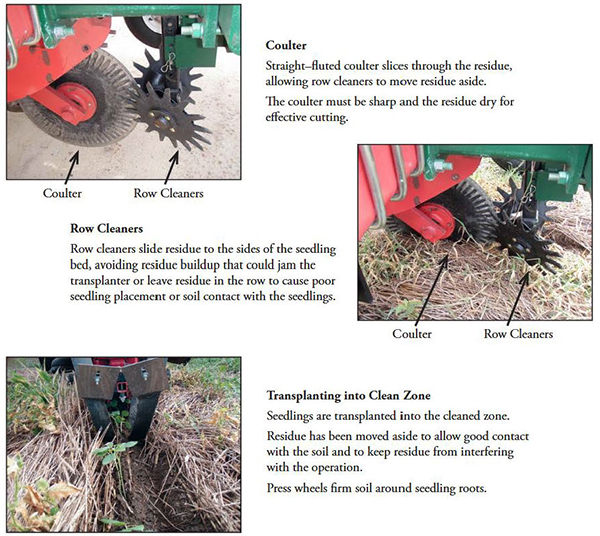
Figure 6. Parts of a “no-till” planter, which can also be used in strip-till. Photo from USDA’s Agricultural Research Service.
And you can see how in this process Eliot is tilling this plot only twice in two years — talk about reducing tillage. This method is reminiscent of ley farming, where farmers build up fertility by growing a multi-species cover crop or grazing mix for several years and then “cashing out” that fertility by tilling the field and planting cash crops for several years.
Your choice of cover crop species will also influence how much you have to till. You always want to think a few moves ahead with a cover crop. Let’s say it’s late summer and you have a plot where you plan to grow spring cabbage next season. If you plant a rye-vetch mix, come spring it will be growing like gang-busters and you will have to till the heck out of your soil to terminate it and prep the soil to transplant cabbage.
But if you think a step ahead, you might instead plant oats and peas or any other cover crop that will winter-kill. In that case, come spring you’ll have a mat of residue that protected the soil over the winter and is already dead, requiring a lot less intense tillage to prepare the soil for planting.
Farmer Ricky Baruch has another neat trick based on understanding and working with plant personalities to reduce tillage. In fall, garlic is planted in every-other bed, and the following June, winter squash is planted into the beds between garlic. When the garlic is harvested in mid-July the squash vines are just starting to run, and they can grow into the beds newly liberated by garlic harvest. In this way garlic harvest can act as “tillage” that is preparing land just as it’s needed for squash vines.
The tillage tool, its setting, and the frequency can all be used to reduce tillage. Another neat way is thinking about where you till, or the location of tillage. By tilling in strips or ridges, farmers concentrate their tillage only to the location where a seedbed is needed, reducing tillage on the rest of the field.
Lincoln Fishman in Massachusetts has been doing neat work with strip-till, and you can find great resources about it. There’s also an article in GFM I wrote years ago about farmer Jacob Bach and his strip till (Growing at Nature’s Pace Organics, from the April 2018 GFM). Generally, for organic vegetable strip-till, farmers establish a dense stand of white dutch clover. This species is preferred because it can grow densely enough to discourage weeds and also has a low-growing habit so that it doesn’t crowd the crop as much.
Because transplants don’t require a fine seedbed, tillage can often be done without PTO powered implements (which are often harder on the soil). Instead, a coulter can be used to cut through the clover sod and a single deep sweep to remove the clover and loosen the soil in a ~12-inch strip (Figures 6 and 7). This strip-till system works well for larger transplanted crops, but is less practical for those needing a fine seedbed.
At some point the clover does need to be managed either by tillage or tarping. There are also many creative ways to try to heal the damage done in the process of tillage. For example, Jacob would often inject compost tea into the soil as he was doing the strip-tillage (Figure 8).
A little further down the tillage spectrum from Lincoln’s and Jacob’s strip-till is the Nordell’s no-till garlic. Although “no-till” planting still involves a tool doing some soil disturbance, because the tillage is way less intense in the implement’s impact on the soil and is precisely targeted in its location, this practice still moves us in a beneficial direction on our tillage spectrum. The Nordells prefer forming ridges to plant the oats into, as the raised planting areas of ridge-till often provide many benefits from flat land growing (like higher early-season soil temperature and better drainage).
For their no-till garlic, they establish a field of oats on ridges, then roll them flat at garlic-planting time with a cultipacker. This rolling just presses the oat stalks flat on the ground but doesn’t kill them. Next, they run a coulter and small shank in a single row on top of each ridge with rows about 36-inches apart. To be sure the soil will be loose enough for easy garlic planting, they’ll make a pass in one direction down the row and then back in the other.
They found that a good stand of winter-killed oats alone was not enough to suppress weeds in the crop (a common problem in organic no-till). So, they grow a patch of oats on either side of the garlic patch. These oats get mowed around garlic planting and once the straw is dry they apply it to the oat-garlic patch. In the winter all the oats die and in the spring they have garlic growing on ridges, mulched with farm-grown straw, established with a minimum of tillage. You can learn more about the Nordells’ awesome reduced-tillage and soil-health practices in the articles they have written for GFM over the years, such as “Whoa-till: minimum-depth tillage for the dryland market garden,” from the November 2017 GFM.
Maybe it’s the musician in me, but I think of the three ways of reducing tillage like they’re on a sound mixing board, where each can be dialed up or down. I always want to be reducing the harm of my tillage. Even though I will never arrive at the perfection of no-till, I can be doing good by conscientiously moving in that direction in my planning and tillage operations. I can’t always choose the best tool, or the right location, or the best frequency/timing, but I can be aware of these factors and adjust as best I can.
Tillage done carelessly is one of the worst of human sins (in my opinion). When you put your soil under the knife with tillage, have a clear goal in mind and choose the implement, its setting, the timing, and the location to hit that sweet spot on the tillage spectrum so that you achieve your goal while causing as little soil damage as possible. With great power comes great responsibility. May you wield thine plow as the doctor wields her scalpel.
Sam Oschwald Tilton is an organic agronomist, and helps farmers improve their weed management, soil, and machinery systems. He also delivers hands-on trainings and works with organizations to develop resources, through his business Glacial Drift Enterprises. He organizes the Midwest Mechanical Weed Control Field Day (August 20th this year in Ames, IA). Sam lives in Minneapolis and enjoys gardening with the neighborhood. You can contact him at glacialdrift@protonmail.com.
Copyright Growing For Market Magazine.
All rights reserved. No portion of this article may be copied
in any manner for use other than by the subscriber without
permission from the publisher.