


Beyond the wheelbarrow and loader
Perkins’ Good Earth Farm is a permanent bed, deep compost, no-till, and certified organic vegetable farm. I want to share our journey from a low-till to no-till system to encourage others to consider how this production system might apply to your farms.
Going into 2025, my wife, Julie, and I were entering our 15th year of farming in rural northwest Indiana, and our 6th year of full-time farming. Our gross sales in 2024 from farm produce (1.25 acres) and value added kitchen items is over $239,000. For more farm background see the GFM article we wrote, “Developing youth farm team members,” from the April 2024 GFM.
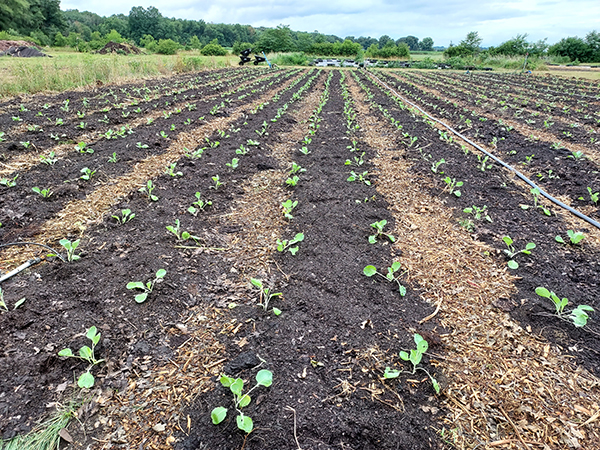
Fully planted beds in the compost/wood chip system.
When we purchased the land in 2009, our soil was very sandy and there were no rocks. We had about 8 inches of “black sand” with organic matter (O.M.) about 1.9% and C.E.C. of 4. It was low fertility, very fragile, and prone to wind erosion. It was not prime farmland. With no-till and deep compost, we have raised that O.M. to an average of 6% and C.E.C. of 14 across the farm. Here is how and why we did this.
Transitioning to deep compost beds
Initially, we farmed with a rototiller, made raised beds, and used extensive rotations, with a year of cover cropping since we had the land base. We utilized some light compost applications since that is what organic vegetable farmers do. This worked okay, but it took a lot of time to prep beds with the BCS and resulted in high weed pressure. The raised beds led to drought conditions on outside rows, and the rototilling led to blowing of our soil. It decreased plant health and yields, especially as we expanded and had to use every square inch of land.
Inspired by biointensive production from Eliot Coleman and permanent bed systems from Jean-Martin Fortier’s The Market Gardener and Richard Perkins from Ridgedale Farm, starting in the 2015 season we committed to 30-inch beds and 18-inch pathways with tighter row spacings and multiple bed flips per season.
I knew raised beds were not the answer for our sandy soils. I didn’t need drainage. However, the concept of permanent deep compost seemed to offer a solution to my challenges. Plus, I had a ready supply of leaves and manure-based compost of good quality. I thought perhaps we can make a whole plot “one big bed.”
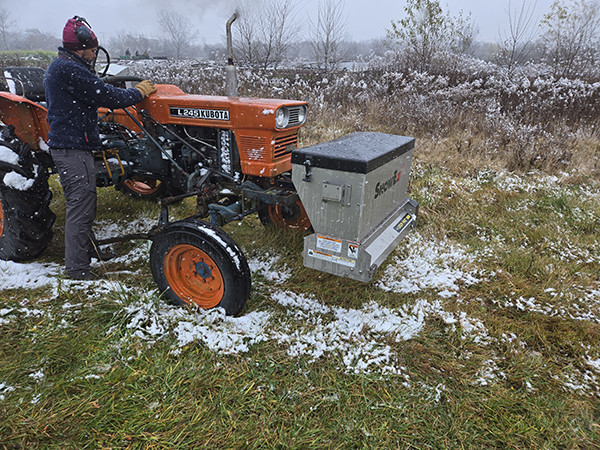
A front-mounted drop spreader gets two jobs done in one pass.
We applied a 4-inch layer of three-year-old cold composted leaves on six of our 60×100 plots and in all high tunnels. Our town dumps leaves at our farm, so we have a large source of carbon for free. The town leaf source was critical to doing this economically. We built the plots with a backhoe one load at a time during the off season on ground that had been tarped or rototilled from the year before.
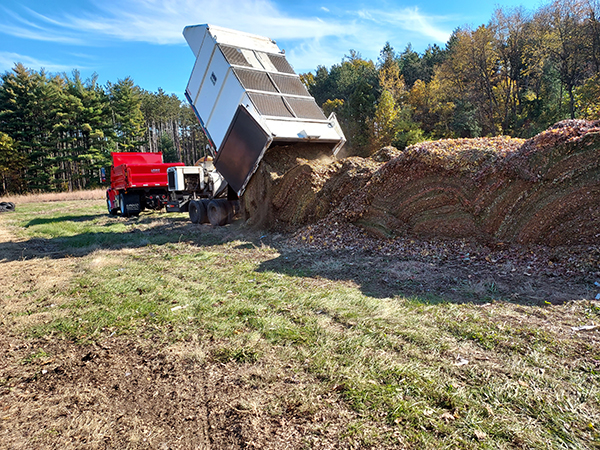
Leaves delivered to the farm by the town.
I would grow potatoes or garlic in the first year which allowed the chunkier material to break down further before fine seeded crops As we added more plots in 2016 and 2019, I hired a larger local spreader to do this in one shot across multiple plots.
Initially, we did rototill this 4-inch layer in because I thought I needed to get the compost into the native soil and incorporate kelp and crab meal, azomite, and a 4-3-2 pelletized chicken manure. In hindsight, this proved to be a mistake, because I ended up bringing weed seed into my 4-inch layer of “weed free soil.”
After that initial tillage, we used minimum till with a BCS power harrow for incorporating amendments for two years and a annual USCC certified manure based compost application of ½ to 1 inch on all beds. This significantly improved our yields and lowered weed pressure.
As we grew over one acre in production in 2020, we added a Farmall cultivating tractor (only to cultivate paths with 14-inch sweeps) and a Planet Jr. walk-behind tractor for one and two row per bed crops and our garlic, which we grew in 15-inch rows. Our yields doubled per bed foot due to better soil health (high organic matter and CEC) and our intensive row space on most crops during 2020-2022.
Challenges and solutions
However, there were still some challenges. In the winter of 2020-21 I read Daniel May’s No-Till Organic Vegetable Farm. I was deeply inspired by the fact that his farm had been doing deep compost, no-till for 10 years successfully. I realized several key challenges I had in my deep compost system, so I set about to fix these challenges by adapting Daniel May’s principles to my context and adding some innovations.
First challenge, the need for a good watering system. It took awhile to learn this the hard way. Our native soil is Morocco loamy sand as described above. Our water holding capacity is very low. Combine that with the fact that our leaf and manure based compost never had clay added and therefore doesn’t have much water holding capacity, especially during the first two years after building a bed. On more mature beds (2+ years into the system) that have had a cover crop at least two times, we have reduced our need for watering overall after plant establishment.
Plant and seed establishment must be managed carefully. The lack of aggregate stability from the compost and good drainage means we have to water a lot (daily) during plant establishment (first two weeks) and direct seed and transplant deeper than standard practices. My Jang seeder is set to 1.25 inches deep and I never change it, even for small seeds. Our peas and beans are seeded with an Earthway, at 3 inches deep.
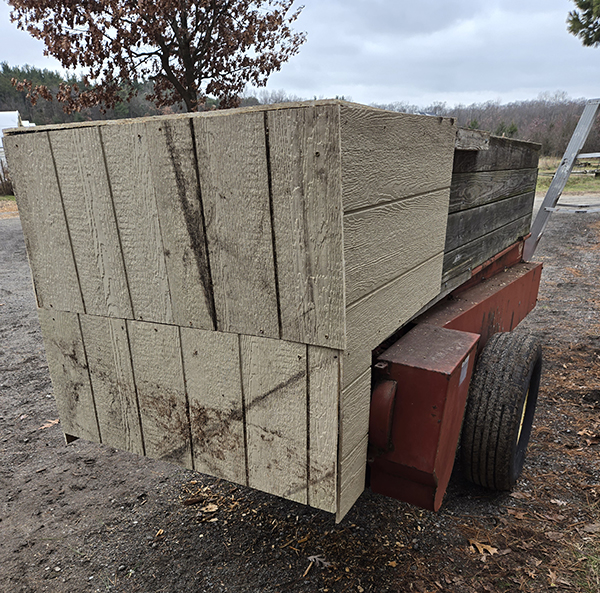
The end cap turned this manure spreader into a drop spreader.
We have a high water table, good water, and a well-developed watering infrastructure, and I improve it every year. We added pulse watering for all drip irrigation this year. We do all we can to minimize moving hoses, etc. We learned to water often — every day during the heat of summer to maintain soil biology and high yields.
For example, when germinating direct seeded crops or establishing transplants, I water every day, or 2x for carrots until germination or roots have established. Once crops are germinated and established my goal is to keep the top 2 to 8 inches of the soil profile very moist. The top 2 inches typically dry out very fast, 8 hours or fewer on hot, windy summer days. It gives the impression that one should water more so we always check with a soil probe, deeper than 2 inches rather than judge by the top.
Second challenge, continued weed pressure. I had rototilled in my first 4 inches of leaf compost. This was a mistake. This brought the existing weed seed bank up to the surface. To remedy this, I applied a 2-inch layer (this is the minimum depth for weed suppression) of leaf and manure compost mix across all my beds over the course of the 2022 season and didn’t rototill or power harrow.
I added my amendments and fertilizer before the 2-inch layer so I wouldn’t need to incorporate. I sold the power harrow since I didn’t use it that entire year — best thing I ever did. I continued to amend heavily with Kelp and Crab Meal, Azomite, and a 4-3-2 pelletized chicken manure during the 2022 season as I was essentially building soil and didn’t yet know if I could remove the additional amendments and still maintain high yields. For the 2023 and 2024 growing season I have only used chicken pellets ahead of heavy feeders like brassicas and large head lettuce.
I am watching plant health and annual soil tests to see what happens to fertility levels over time. I am also using a Advancing Eco Ag program of seed and transplant biological soaks and foliar feeding to maintain plant health and yields. But, my thinking is that I may not even need the chicken pellets moving forward.
Third challenge. How was I going to address weed pressure long term? Weed pressure was much lower, but we still had to manage some weeds. I practiced the following strategies: No-tillage. Tarping early and often. Transplanting crops into leaf mulch, cover crops biomass, and season long crops into weed fabric. Letting no weeds go to seed. Tighter row spacing. Interplanting to all but eliminated weeding in the beds.
Fourth challenge. The pathways still had to be managed. Nature abhors bare soil and will always find a way to armor itself. I wanted to remove the cultivating tractor from my system since working around irrigation, tighter row spacing, and intercropping made it nearly impossible to mechanically cultivate. Also, not having exact straight beds meant we often had to come back and wheel hoe edges anyway. Also, the edges of the plots along grass lanes were forever creeping in.
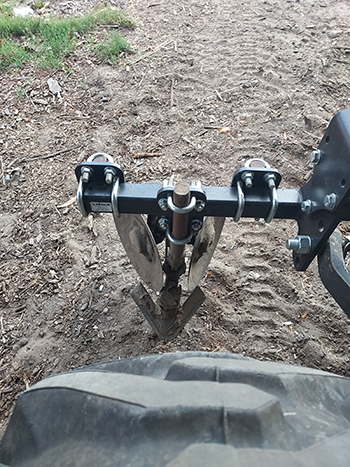
The tool for keeping bed edges clean.
How could we eliminate pathway and edge management? (Picture 8b is my tool for edging all plots along grass lanes. I had considered living pathways, but in droughty soils I didn’t think it was a good idea. I had tried landscape fabric on edges, but didn’t like the look or use of plastic, and often the mower would tear the edges. And who needs more microplastics on the farm.
Daniel Mays had been using straw on an annual basis to mulch pathways, so that could work for your farm. But we don’t have local straw, the wind would blow the straw into crop beds in our area if we did use it, and I had seen weed seed brought in with use of straw in the past on the farm. What resources did we already have available? We live in a wooded area so wood chips are readily available for free.
Trained as an ecologist and intrigued with the notion of bringing the “forest” and all its associated soil life into the vegetable field, I put wood chips in the pathways. We tried a 1-inch application and quickly realized that wasn’t thick enough (remember the 2-inch mulching rule). I figured 4 inches or more would be necessary. I didn’t have a Berta rotary plow for our BCS, nor was I going to do it by shovel, so we developed the following method.
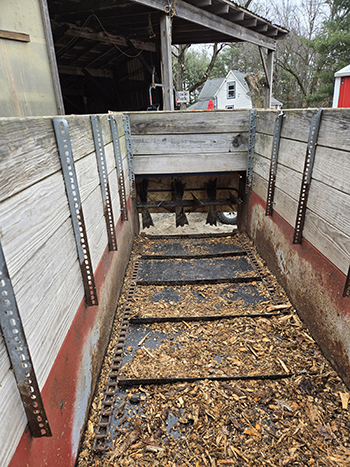
Inside view of the manure spreader with an end cap. The end cap turns the spreader into a drop spreader by preventing the material from being flung out the back; it hits the cap and drops on the bed being driven over instead of flying all over the place.
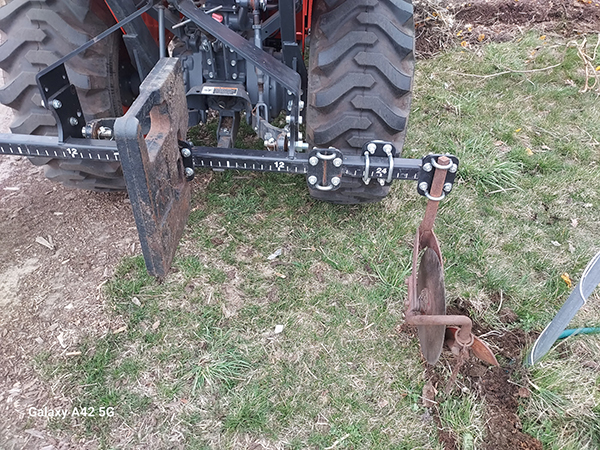
First, we dug trenches in the paths and around plots with our tractor-pulled pathway trencher, resulting in a 18-inch-wide by 10-inch-deep trench. (If you have a bed shaper that would work, too.) We could do this without measuring since I could follow the wheel marks of the tractor to achieve a 36-inch bed top and 18-inch pathways. Plus, it didn’t have to be perfect, just close enough since we weren’t mechanically cultivating or laying plastic, etc.
We filled the paths and edges with wood chips, 3 cubic yards per 100 foot path, which equaled nine wheelbarrow loads. We then raked the ridge of soil along the edges of the bed into the middle of the bed. This was key since when we didn’t do this raking, native soil was on top, which led to weeds on the edges of the beds. We then applied a 2-inch layer of compost to form our bed top, overlapping slightly with wood chip pathways.
We used steel barrows for this since plastic wheelbarrows were too flimsy. One bed and two paths took three people using equipment one hour to make each bed. We tried 12 beds this way and loved it. During the winter of 2022 and during our 2023 season, we slowly converted all our beds and paths to this system. I plan on a 1-inch every-other-year top dressing of the paths with wood chips to maintain pathways. Over time as the wood chip paths have broken down, the edge between path and bed becomes less and less defined so you don’t have to worry about planting into the path a bit.

Wheelbarrows modified to dump material in a narrow band in the old system.
Mechanizing the system
In 2023 we had expanded to 1.5 acres with the potential to expand to 4-plus acres, so we needed a way to scale this system of production and mechanize compost and wood chip applications. Having to apply all that compost on our beds was labor intensive. As we expanded beyond 1 acre, it became difficult to keep up with annual applications on all beds.
I tried the BCS compost spreader that goes behind the walk behind, but it wasn’t wide enough for our 36-inch bed top. More importantly, my compost was generally too chunky to flow through effectively, and it couldn’t spread chunky leaf compost at all. Screened compost worked great. Plus, we use wood chips in our lanes, so I wanted a machine that could apply wood chips too. Inspired by the Green Things Farm Collective’s podcast interviews (GFM pod episode #65), Instagram posts, and after visiting them in Ann Arbor, Michigan, we did the following upgrades in Fall of 2024.
We bought a used Mill Creek 75 Manure spreader that had extended sides for light material and built an end cap, making it a drop spreader. The Green Things Farm Collective uses a Mill Creek 75 spreader that already has an end cap built in, but the effect is the same. The key is to match your bed top and path width with your tractor and equipment wheel base so you can straddle the bed top.
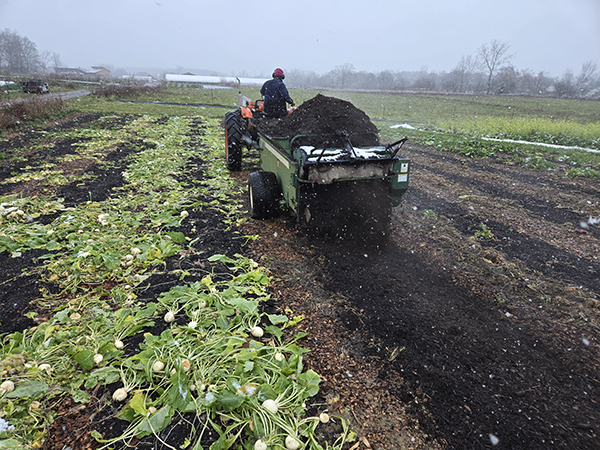
Turf drop spreader in action.
They do their crop planning as if they had 30-inch beds, but really end up with 36-inch-wide beds and 24-inch pathways. We plan on 36-inch beds so we can interplant more and slightly narrow paths at 18 inches. As your beds mature, the line between path and bed is very fluid so it is more about not driving over crop in season if you’re mulching with equipment.
You also need enough turning radius with a tractor plus spreader; I need 25 feet minimum radius. Green Things uses the Mill Creek 406 Bedding Spreader and need about 30-plus feet. It enables them to spread wood chips into pathways and edges very quickly. I am currently shopping for a used machine like this for our farm, but they are rare.
Green Things likes to have two separate machines so they can just go and not have to detach equipment and adjust things. They also have a fertilizer drop spreader mounted on the front of the compost spreading tractor that lays fertilizer so they can do two operations in one pass. These types of upgrades are in our future, but weren’t in the budget for this year.
We have a hand pull drop spreader for fertilizing, and the tractor loader and modified wheelbarrows work fairly quickly for wood chips in paths. We tried buckets, but that involved a lot of lifting, but for tight spaces and cat tunnels the buckets work well.
In my research, one machine does exist that can do it all. It spreads compost in one pass for the bed and a second pass for wood chips for the paths: The Millcreek Row Mulcher. To spread wood chips involves a 20-minute equipment change over to add a side discharge conveyor. Earth and Turf Vineyard Mulch Spreaders are similar to Mill Creek, but at a lower price point and sizing. Each machine has its merits and disadvantages depending on your context.
I’m writing this at the end of February 2025, and we have spread leaf mulch and/or compost on 80 percent of our beds, in depths ranging from ½ inch to 4 inches depending on what will be planted in 2025. That is 150, 36-inch wide 100-foot beds. This is 2.75 miles worth, and we did this on frozen ground (to minimize compaction) in 10 hours with one person and a tractor and spreader.
This is how the pathways were trenched for wood chip application.
Comparatively, three wheelbarrows and a tractor, with three people, would have taken about 100 labor hours to complete this same task. I can now take those 90 labor hours and utilize that time for our staff to plant, harvest, and wash/pack, which are the only three things on the farm that actually make money. I am confident with this mechanization, and assuming access to enough compost and wood chips, that I could farm 5 plus acres this way no problem. Now I just need to upgrade my wash/pack and coolers to handle that volume of production!
To learn more about Perkins’ Good Earth Farm visit us at www.perkinsgoodearthfarm.com or on Facebook or Instagram.
Copyright Growing For Market Magazine.
All rights reserved. No portion of this article may be copied
in any manner for use other than by the subscriber without
permission from the publisher.