


Most farms have a basic set of carpentry tools and use basic dimensional lumber to build all kinds of useful farm furniture. Wood is an accessible building material and it’s versatile so a lot of small farmers rely on it heavily for customizing work spaces, building structures and even for building custom tools. Metal is a little more intimidating to newcomers and it is literally harder to work with but it’s not too much harder. There are some basic tools and skills that can make it much more accessible. With a handful of special tools and a bit of practice, there are many equipment repairs that become simple, and the possibility for building more custom implements, especially for the tractor, becomes relatively easy.
Most everything I build from metal on the farm is made of scrap steel, which I either salvage myself or get from the salvage section of our local steel yard. Steel is relatively inexpensive, tough, easy to weld, and can be bent if needed. Other metals like aluminum, copper and stainless steel are more expensive, more delicate to work with, and have fewer uses around the farm. Here’s a short list of the tools that I’ve used for many years to repair equipment and build custom tools for the farm.
Welding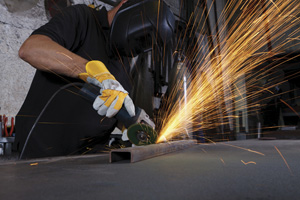 I’m going to get the big one out of the way immediately. Welding takes some skill, but not nearly as much as it used to. There are two basic heat sources for welding: gas or electricity. Gas (usually oxyacetylene) is very limited and while having a gas torch is useful for other things, most welding is done with electricity. There are three basic types of arc welder: stick (SMAW), MIG and TIG. Stick has been around the longest and for the money it has more power than the other two. That means you can weld thicker pieces of steel faster with a less expensive machine. I learned basic stick welding at my local community college in a semester, which was primarily just hours and hours of laying down practice welds on scrap metal with an instructor coming by to check on me every once in a while and give me tips. The community college also goes through basic safety procedures, as welding does have high potential for injury or starting fires if done inappropriately. This is a great way to learn to weld.
For all welding you’ll need some basic safety equipment: gauntlet welding gloves, a welding mask and safety glasses, and you want to wear heavy natural fiber clothing (leather is great, but heavy cotton or wool works too), leather boots, safety glasses and a welding cap, all to keep sparks from contacting your skin, which I know from experience cause painful burns instantly. With a stick welder you’ll also want a flux hammer and a wire brush for knocking off the flux residue. Flux is material that helps clean the metal being welded and also helps the molten metal to flow more evenly.
MIG (Metal Inert Gas) welding is much easier to learn than stick welding, almost easy enough to not even need to take a class, although a class will still be very helpful. MIG will also weld aluminum and stainless steel, which are harder to properly weld with stick welding set ups. MIG welders are more complicated and require inert gas cylinders which do add to their price. They are made in very small sizes though, which brings the cost down even below stick welders in some cases, and allows them to be used with 120 volt circuits, not just 220 volts.
TIG (Tungsten Inert Gas) welding is the most expensive type of welding rig, but it’s also the most controllable, with the ability to weld steel, iron, aluminum and stainless steel as well as a few other metals you’ll probably never use around the farm. TIG takes a bit more skill than either of the other two welding techniques.
I’ve used both a stick welder and MIG around the farm, and it may just be habit, but I prefer the simplicity of the stick welder which is all I had access to for years. The MIG welder is much cleaner, and since it can be plugged into a 120 volt outlet it’s easier to move around. You can still weld thick pieces with the smaller MIG unit, you just need to lay down more passes, which takes longer. Both the MIG and stick units that I’ve used are bottom of the line Miller units in the $400 range, new.
Grinding
Before you weld you need to prepare your surface, and generally that means a bit of grinding. There are two grinders I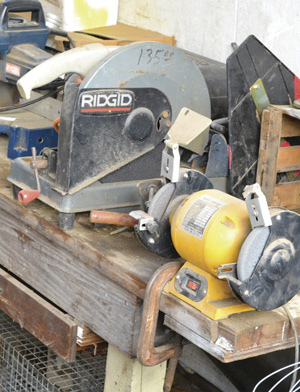 find very useful on the farm. The most useful is a 4 1/2” angle grinder and the other which many folks have already is a bench grinder. The angle grinder is a hand-held tool allowing you to grind anything that’s held down solidly. You can also get cut-off wheels for the grinder, which allow you to cut through thin steel, and even cut gradual curves. A bench grinder is fixed to a bench top and is useful for grinding small pieces or things like the ends of pipe where it’s easier to rotate the piece being ground rather than the grinder. Safety glasses and/or a full-faced mask, hearing protection and heavy leather gloves are all necessary for grinding, as sparks and small bits of metal and grit will fly. It’s best to grind steel down to a shiny surface and to get rid of any paint, rust or slag before welding an area. It’s also best to soften any sharp edges as they will cause uneven heating of the weld zone and an inconsistent weld.
I’ve used Makita and Bosch units for the 4 1/2” angle grinder, which are in the $80 range new, but can be found used occasionally. The Makita fits my hands better, but it’s not a big difference. I don’t use a bench grinder a lot, probably because I have a really cheap Chinese unit that’s completely underpowered. I definitely prefer to work with quality tools which are tough and last a long time.
Cutting
My main cutting tool for most projects is a 14” abrasive chop saw. This allows straight cuts on steel pipe and bars, as well as relatively precise angle cuts. It’s dirty and it throws a lot of sparks so make sure to use it somewhere the grit and sparks won’t be a problem. Metal band saws and metal cutting chop saws are more expensive and a little slower, but they work on aluminum and they are much cleaner. For small pieces you can just use a regular hack saw. It’s also possible to get metal cutting blades for regular circular saws and table saws, but the speeds these blades run at aren’t optimal, and the metal chips are hard on the rest of the saw which isn’t really designed for metal cutting. Use the same safety equipment as with grinding.
An oxyacetylene torch with a cutting head can also be used to cut through steel. This can make a fairly clean cut and it cuts very quickly, but unless you’re practiced it will leave a very rough, uneven edge. Plasma cutters, which use electric arcs to cut, are expensive but they cut in a similar way, only much more cleanly. The advantage of cutting with a torch is that you can cut any shape you want, not just straight lines.
I’ve used a Rigid abrasive chop saw I got used and it’s been great. New saws run about $150 for a decent one. I’ve gotten away without a gas torch for years, but they’re only about $400 depending on the size tanks you get and they’re also handy for loosening big rusty bolts.
Making holes
Usually this is done with a drill. The bit on the drill needs to be hard enough for cutting steel. Generally this is a cobalt bit, or one labeled HSS or HS (high speed steel). You can use a hand-held drill or a drill press. With both you want to slow down the speed of rotations slightly and you also want to only press hard enough that the bit is cutting. If you’re having to press really hard, the bit is dull and you’re just building up a lot of heat. Adding a bit of oil, cutting oil is best, to the hole or the bit as you’re cutting helps keep the bit cooler which will prevent it from dulling as quickly. One other thing that helps in making consistent holes is using a center punch to keep the drill bit from wandering when you’re first starting to drill.
Cordless drills will work, but it’s hard on the batteries as drilling holes in steel can take a while. A corded drill is better and I’ve bought used ones for pretty cheap that lasted a while. Drill presses are pretty commonly available used as well, but new ones can be had for anything from about $150 and up.
Clamps and other aids
When you’re drilling, cutting, grinding or welding, it’s helpful to have whatever you’re working on immobilized. A basic bench vice is probably one of the most useful tools. Metal C clamps and different sizes of vice grips are very handy for clamping pieces together and they don’t melt like plastic quick clamps (although it is possible to accidentally weld them to your project). Plastic quick clamps are great if they’re not too close to the actual welding. My favorite low-cost flat surface for laying out pieces to weld is a metal 55 gallon drum. It’s very sturdy and the rim is completely flat and it’s relatively easy to move. The shape allows pieces to be welded to hang over the edge and as long as you use one that never contained something flammable you don’t have to worry about it catching on fire or melting. If I’m welding something long I just use two or three drums to support the ends.
Common-sense safety
Working with metal, sparks and extreme heat has dangers so use some common sense when you’re on the farm. Pay attention to where you’re working and what might catch on fire if a big spark hits it. Even if you think there’s nothing that’s going to catch on fire, make sure you have a good fire extinguisher handy. Pay attention to ventilation and what it is that you’re heating. Some of these materials are not good to breathe if they vaporize with the heat of welding or cutting. You may want to wear a respirator and you definitely want to stand so any breeze is moving fumes away from you, not up into your mask.
A lot of the welding and metal work I’ve done on the farm has been simple repairs when metal parts on the tractor or implements break. Not having to wait for a welder or bring the part to town has saved me a lot of time and money. Being able to weld and cut metal has also allowed me to customize a number of implements and to build things like simple cultivating frames inexpensively. If you’re not at all interested I don’t consider it an essential skill on the farm; there are plenty of good welders and machinists you can pay to do the job better. But if you’re interested and just intimidated, it’s really not that hard or expensive to learn the skills and set up the basic tools. Winter is coming up, so there’s plenty of time to practice laying down welding beads.
Josh Volk farms on the edge of Portland, Oregon, and consults with farmers around the country. Contact him at www.slowhandfarm.com.
Copyright Growing For Market Magazine.
All rights reserved. No portion of this article may be copied
in any manner for use other than by the subscriber without
permission from the publisher.