


The first time I saw a video of the Paperpot Transplanter in action, it seemed completely magical. It looked like the solutions to all my problems. But, I knew that with my heavy clay soil and low tillage practice most small farm tools like this don’t really work for me “as seen on TV.”
I continued my hand transplanting until 2023 when I did a lot of research, talked extensively to folks at Paperpot Co. and finally bit the bullet. I purchased the HP-16 Paperpot Transplanter and a power harrow for my BCS tractor to accompany it.
This last season I have been learning the transplant tool, finding its advantages and limitations. For this article I interviewed several other farmers as well as folks at Paperpot Co. and Small Farm Works. I hope it will help distill some of the lessons I learned from my own first year and what I learned from my fellow farmers. Hopefully this information can help folks decide whether to give this system a try or perhaps work around some challenges.
.png)
What is the paper pot system?
Paper pot chains are single-use, foldable seedling trays made of paper. The paper chain shapes the walls of the seedling cell just like plastic separates plants in a typical 72 or 128 flat. To seed, the honeycomb of cells is spread open on top of a plastic flat and filled with potting medium, which holds the honeycomb open and in place. Seeds are added with a drop seeder or by hand. After as little as one and a half weeks, depending on the crop, seedlings are ready to transplant.
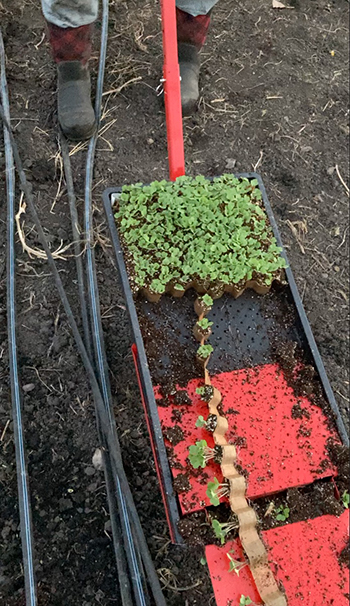 Example of chains on the transplanter. All photos courtesy of the author except where noted otherwise.
A paper pot chain differs from typical seedling flats. The cells are shallower (just over one inch) and the plants are transplanted without being removed from the cell. The transplanter is pulled through the bed at a slow walking pace. It creates a furrow, unfurls the paper pots into one long chain, deposits them in the furrow, and then covers the furrow behind. The paper chains are designed with cells (or pots) spaced at 2-, 4- or 6-inch spacing to accommodate various crops.
History
The Nippon Beet Sugar Manufacturing Company (a.k.a. Nitten) developed the first paper pots about 60 years ago for sugar beet transplanting in Hokkaido, Japan. Unlike the sugar beet growers in my region of eastern Oregon, on Hokkaido sugar beets are transplanted due to the short growing season on this northern most island of Japan. The original paper pots were deeper individual cylindrical tubes of paper, not the shallow chains increasingly used on market farms.
About 30 years ago, the paper pot branch of Nitten started developing paper pot products and chains for other crops. It started with 2-inch chains designed for growing the long, blanched Naga Negi onion, a staple in Japanese cooking.
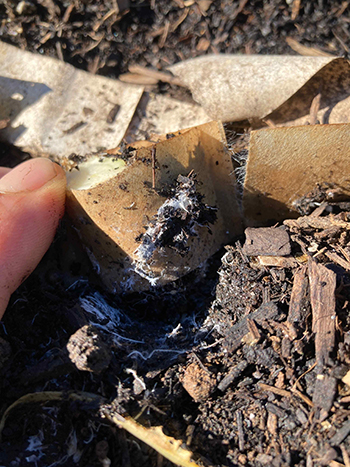 Paper pot chain colonized by fungus, by Cody Condery, Rocky Comfort Natural Farm.
John Hendrickson of Stone Circle Farm in Reeseville, Wisconsin, first encountered the Paperpot Transplanter while he was spending a year with his family in Japan. He was impressed with small scale agriculture in Japan and sensed there was a lot to learn. He found a grainy photo of a Paperpot Transplanter on the internet, and with the help of his wife’s translation, he was able to find the company that made the machine. As luck would have it, the company’s research farm was just around the corner from his house.
.png)
John recognized the applicability of the Paperpot system to market farms immediately. His company, Small Farm Works, became the first importer of the chains and transplanter to the United States in 2006. Today it is the official North American representative for Nitten and manufactures the Paperpot Transplanter and drop seeder in Wisconsin. Paperpot Co. also imports the transplanters from Nitten. Johnny’s Selected Seeds and Neversink Farm also have their own versions of the Paperpot transplanters. The paper chains are still manufactured exclusively by Nitten in Japan.
One of the most interesting things I learned about the history of the Paperpot system is that U.S. agriculture was headed in the same human-powered, small farm direction in the early 1900s. Ben Hartman of Clay Bottom Farm in Goshen, Indiana (author of The Lean Farm and The Lean Micro Farm) found patents and schematics for similar machines, which you can read about in the article on page 31.
Why farmers use the Paperpot system
In the first few years of my farm, I primarily direct seeded crops, but I have increasingly transitioned to transplanting. Transplanting allows me to plant out sooner and tightens crop succession. It also allows me season extension in the early and late season because I can control the germination climate in the greenhouse. Furthermore, transplanting plants allows me to get a jump on the weeds.
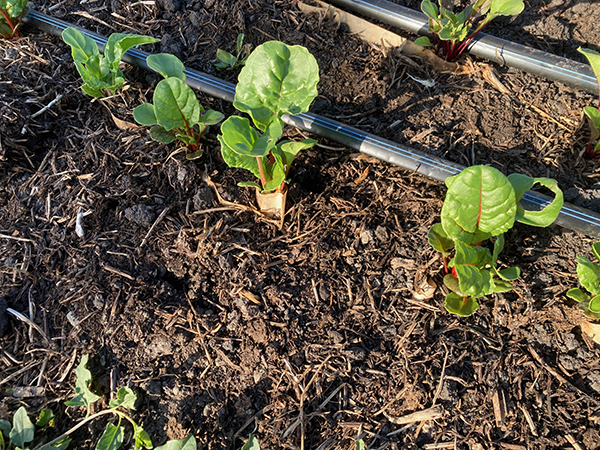
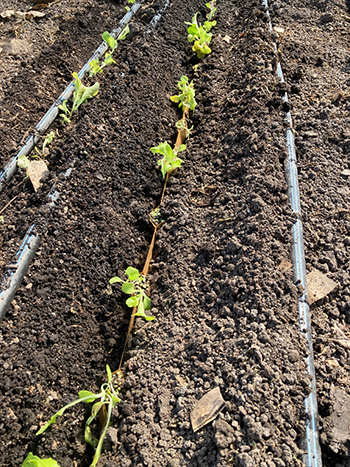 Paper pot chain in the furrow on the author’s farm.
However, hand transplanting most of my crops from 72 cell flats is slow and hard on the body and can be demoralizing for a crew. In my extreme summer climate, the window for transplanting is limited each day. My move to the Paperpot system was an attempt to grow more, save time, save labor, and save backs.
Many readers and farmers are familiar with Ben, who is a regular contributor to GFM. From the Lean perspective, the Paperpot system saves muda, a Japanese concept of waste. “The paper potter directly targets six kinds of muda,” Ben told me. “Excess motion, defective products, muri (overburden), overproduction, waiting, and mura (uneven production).”
“In other words,” Ben said, “it saves time, effort, improves crop quality, and makes for faster crop rotations.”
Eliminating overburden and excess motion
The Paperpot Transplanter allows farmers to transplant (mostly) in a standing position, which is ergonomically easier and eliminates the excess motion of standing up and squatting down. When I was ruminating over purchasing the transplanter, my 71-year old mentor Sandy told me: “If it will it keep you off your knees, buy it already! You’ll be able to farm for more years.”
John McCafferty of Pleasant River Produce in Dunedin, New Zealand, said the Paperpot Transplanter made it possible to farm alone while parenting. “I could transplant a bed in 10 minutes and do it all standing up with a baby on my back or front.”
While the transplanter is long and a bit awkward, it is still fairly light and easy to move around, especially compared with the struggle I put into maneuvering a BCS walking tractor.
Faster transplanting
Each person I interviewed reported different time savings, but even when conditions are difficult, the Paperpot Transplanter is generally a time saver. Paperpot vendors report it can take 30 seconds to transplant a row or 10 minutes to transplant a bed. John Dindia of Lakeview Hill Farm in Traverse City, Michigan, said: “One person can do a 150-foot bed with four rows in 10 to 15 minutes or less.” Others reported 10 to 30 minutes for shorter beds depending on how well the soil “flows.”
As Cody Condery of Rocky Comfort Natural Farm in Crosses, Arkansas, put it: “When beds are clean, it can turn transplanting from an all-day thing into a 10 minute per bed job.”
Transplanting faster means savings on labor costs as well. Diego Footer of Paperpot Co., told me “once the labor rate gets above about $20 per hour it is cheaper to paper pot than it is to hand transplant at 20 plants per minute.” Similarly, Ben reported: “We pay workers $20 per hour. Takes at least 30 minutes to transplant 250 plugs by hand. I can transplant a paper pot chain with that number of cells in a few minutes. So the way I think of it is that each time we use a paper pot chain, we save about $10 in labor.”
“We use around 150 chains per year, so the labor savings is about $1,500 per year,” he added. “We aren’t laying off workers, but staff are freed up to do other value-adding tasks.”
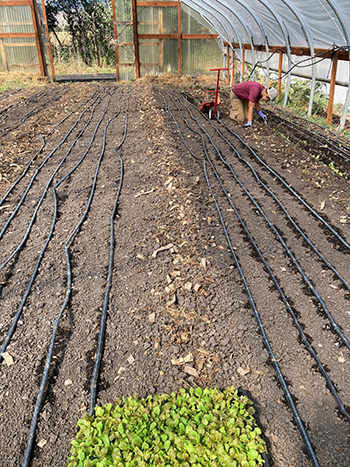
Given the clay clods, roots, and lumpy compost I make, I do not have a soil that “flows.” I use the buddy system to transplant with one person pulling the transplanter and one person making sure the transplants are “tucked in” completely. Some prefer to do this by hand, but many folks use the back of a rake, or a furrow closing tool like the Row Pro from Johnny’s or the Zipper available from Neversink Tools. Transplanting with two people, it takes us about 30 minutes per five-row bed on average, which allows us to transplant many more beds per day. I expect to get faster with more practice.
Production improvements
The Paperpot system has improved production for me because I can transplant more crops. I have few wasted seeds because I am starting them in the greenhouse. The spacing is perfect so thinning is not required, and I am able to decrease the crop succession time.
One of the biggest advantages with the Paperpot system is that transplants can be planted much earlier because you don’t have to pluck them from their cells to transplant. Most of the growers I interviewed wait to transplant until there are one or two true leaves or between one and a half and three weeks after germination. You can transplant earlier or later if conditions change or crops require it.
 Planting paper pots with a buddy and chain trash raked into walkway.
Ben estimates that the Paperpot system plus a hoop house adds about two months to the season and allows him to plant later into the fall and get an earlier winter harvest. “When I direct seed baby greens in the ground in the greenhouse in November, I wait 16 weeks for a harvest,” he said. “When I seed in a paper pot chain in the same day in November, I wait three weeks or so to transplant and wait three or four more weeks to harvest.” In other words, transplanting cuts days to harvest down 50 percent and transplanting with a paperpotter makes transplanting faster.
Transplanting helps with early spring plantings as well as germinating fickle crops such as summer spinach. “I would struggle April first to get direct-seeded green beans to germinate,” he said. “But if I can start them inside on grow mats in chains, I can start my beans April 1 in the unheated tunnel and harvest beans in mid- to late-May.”
John, of Small Farm Works, also pointed out that paper chains can be transplanted even before seeds germinate. This has the advantage of jump starting germination in greenhouse conditions and perfect spacing. John even has a guide on his website for paperpotting carrots and transplanting a few days before the seeds pop.
Paperpot limitations
I think the most important consideration with the paper pot system and transplanter is it takes time to transition and learn. As Diego emphasized: “I want to stress that it isn’t an out-of-the-box solution, instantly usable in every condition for every person. There is a learning curve.”
The Paperpot system is really good at what it was designed for — transplanting upright crops (onions) into tilled beds. If you’re planting other crops into untilled, lumpy beds, you are more likely to experience issues.
 Problems when paper pot chain is not buried enough—chard on Nella Mae’s Farm.
Some of the biggest problems I had this season were common among the growers I talked to. When soil is variable, it is hard to get the paper chain deep enough and the furrow and chain covered. At my farm, the first half of the row could go in perfectly, but if the soil texture or moisture changed halfway down, the transplanting became less consistent or more problematic. That’s why many of us use the buddy system to make sure each plant is zipped in.
For folks with sandy soil, often the problem is transplants are buried too deeply. Ben suggests running the transplanter through your prepared bed without transplants before you plant to see how the soil is flowing and make adjustments.
The transplanter can be adjusted for your soil type but it takes time to find the sweet spot. The furrow planting depth can be adjusted at the handle. The press wheels at the back can be flipped up if plants are being buried too deep. The fins or the “furrow coverer” can be adjusted to be more narrow, which pushes soil closer to the plant, or widened if the plant is getting buried. The fins can also be bent down to grab more soil or up to grab less. The press wheels can be flipped up if they aren’t useful in your conditions.
My friend Sarah Ketchum at Seasons Micro Farm in Kent, Ohio, doesn’t even use the transplanter. She starts her plants in paper pot chains but creates a furrow with one side of the “zipper” tool and lays the chain in the furrow by hand. She uses the opposite side of the tool to zip up the furrow and tuck the plants in.
Chain breaks and breakdown
Many growers complain that paper pot chains break during transplanting or conversely don’t break down in the soil. Chain breaks happen when shoots or roots are too big and get entangled. When plants don’t neatly pull apart they can hold tight and break the chain.
Ideally, we would like the paper chains to breakdown quickly once in the soil before the next crop goes in or at least within the season. In my bone-dry climate, I found bits of paper chain everywhere this season, which is more of an aesthetic problem than a practical one.
As John McCafferty in New Zealand told me: “The chains don’t break down at all. My soil is left with a huge amount of waste. I’ve found chains in birds’ nests and blown hundreds of meters away from our farm.” His farm receives about 24 inches of rain a year, which is similar to my farm in Oregon. On the other hand, Cody said they don’t have much trouble with chain breakdown at their much wetter farm in Arkansas. The microbial activity and moisture in the soil probably makes the difference among our farms.
To get around the chain trash, some growers put the chains between bed flips or purchase hemp-based chains. Folks also told me the hemp chains breakdown faster, which is good after you’ve planted. But if transplanting was delayed, it could happen before hand.
Due to the perceived lack of breakdown, some are concerned about what chains are made from. John says the chains are 75 to 77 percent cellulose fiber, 11 percent synthetic fiber and the remainder is glue. The hemp chains replace the synthetic fibers with hemp fibers. These lose their strength more readily so can only be use for crops that will be transplanted within three to four weeks of seeding.
John Hendrickson has been working to get approval for paper pots to be used on certified organic farms. Many people assume the key issue with organic compliance is the glue. John explained that paper itself is considered a synthetic material under the National Organic Program standards. Currently, the paper, synthetics, and glue are all under review to make sure they comply with a new NOP rule governing allowable paper-based planting aids.
Most certifiers are allowing Nitten paper pot chains in certified organic systems while a third-party reviews whether they meet the NOP standard. John has spent a lot of time working with the National Organic Standards Board and the third-party review process and expects paper pot chains ultimately to be allowed.
Cost
Initially, I was worried I would be locked into the Paperpot system, which has the additional cost of chains over my 72-cell plastic flats. The transplanter kit also was not cheap, but it is well made and has been a good investment in efficiency, ergonomics, and enjoyment.
“The transplanter can pay for your time in a season,” John Dindia told me. “It is one of the first tools I would invest in as a beginning farmer.”
Ben also praised the machine for labor cost savings, but suggested it is best to invest in it after you have your germination system dialed in.
If you’re having a lot of trouble, I recommend reaching out to the company you bought the transplanter from. I received a lot of advice this past season from the folks at Paperpot Co., and I know Small Farm Works and Johnny’s are similarly helpful and responsive.
Other drawbacks
John McCafferty reported that occasionally a bird would rip an entire chain out of the ground when going after a seedling. Cody found the transplanter difficult to use on the edges of raised beds or slopes. Diego said the transplanter is a challenge in places with heavy weed pressure, “very pure” no till practices, lots of rocks or clay, or if you have unique crop spacing requirements.
I found in my dry climate the paper can wick water away from the seedling. If paper pot cells were not completely buried, seedlings in the cell would croak in the hottest, windiest part of the summer.
Paperpot tips
Seeding: Invest in a drop seeder and use pelleted seed. Paper pot chains have much smaller cells which are a pain to seed by hand if you’re trying to get one seed per cell. I found my most attentive crew members were the best at hand seeding paper pot cells with raw seed but anyone could get the hang of the drop seeder. Don’t worry about putting multiple seeds per cell. Many growers intentionally put multiple seeds per cell because it creates ready-made bunches such as for scallions, radishes, and turnips.
Ben and Cody both recommend a germination chamber (old fridge) with a crockpot for starting plants. I use a heat mat with 1/8 inch silver insulation rolled over the top. Ben likes starting paper pots in the basement under a grow light and bottom watering because they are very low maintenance that way.
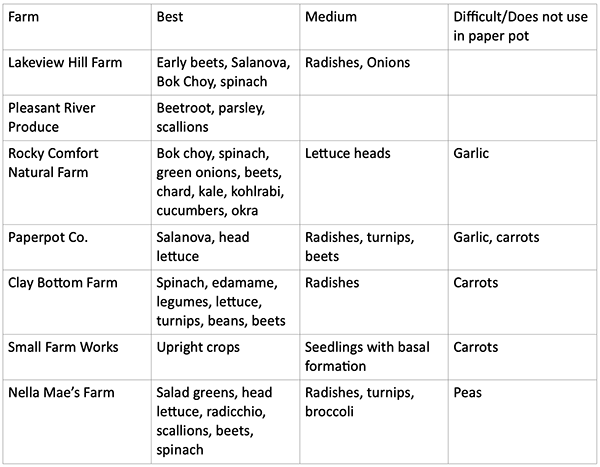
Crops for Paperpot: There are great resources on the Paperpot Co., Johnny’s, and Small Farm Works websites with crop specifics for Paperpot. Below, the folks I interviewed rated crop success in the Paperpot system. The Paperpot system isn’t practical for tomatoes, eggplant, peppers, winter squash, or crops grown in landscape fabric.
Transplanting
Soak paper pot flats well before transplanting. It is best to transplant earlier (even before germination) than later. As John Hendrickson told me, the Paperpot system requires a mind shift. “People think since the paper cells are small you have a shorter planting window,” he said. “The planting window is just as long, just shifted earlier. You can plant before the plant germinates. You can transplant almost immediately after seeding.”
If transplanting is delayed, check if the roots or shoots are entangled. You can score the bottom of the flat with the transplanter ramp or a knife to help the chains pull apart. If the shoots are entangled, consider cutting them back before transplanting.
Soil moisture can change the transplanter performance. The best guidance I heard was to run the transplanter at the same soil moisture you would a seeder. The transplanter does not yet have a kickstand, although we all want one. It can easily tip over and dump your plants upside down.
If you’re having trouble getting the paper chains buried at the right depth, try experimenting with your downward pressure on the machine. Pushing down makes the furrower come out of the ground (shallower furrow) and less pressure makes a deeper furrow. Fuss with the adjustable parts and call the company for advice. You can also buy deeper furrowers than what the machine comes with, which is what I plan to do.
Cody also suggests pulling the transplanter slowly through the soil to make fewer mistakes. I agree, living soil is not monolithic, so every few feet could be different. I go slowly enough that I can pay attention to both ends of the chain and how the fins are covering the furrow.
If you choose to add a Paperpot Transplanter to your farm, remember it doesn’t have to do everything. Several of the farmers I talked to use the paper potter for only a few crops. I found I can use the paper potter for most crops because I don’t use landscape fabric. Your context may be different.
The most important thing to remember with this tool is that it isn’t magic. It takes time to learn and experiment. Its growing popularity among market farmers is encouraging the company to innovate and address some of the limitations of the tool. So, we can expect this tool to meet more of our needs in the future.
Nella Mae Parks farms on her family place in Cove, Oregon, growing vegetables for her on-farm farmstand, the farmers market, and wholesale outlets in the region.
Copyright Growing For Market Magazine.
All rights reserved. No portion of this article may be copied
in any manner for use other than by the subscriber without
permission from the publisher.