


#toolsforgrowingformarket
There are a lot of little, very low-tech tools that I almost take for granted because I’ve been using them for so long and so regularly. This time of year, I’m seeding a lot of trays for the greenhouse and there are two very simple and effective ones that I thought I’d highlight here: a 12” drywall knife and my custom chopstick.
Drywall knives
A drywall knife (also known as a drywall taping knife) is basically a big, squat spatula, typically used for spreading joint compound in the joints between sheets of drywall and smoothing it, or as a shield when painting trim. They come in lots of sizes and the 12” one is the perfect size for me to quickly scoop potting mix from my mixing tub onto my seed trays, work it evenly into the cells, and then cleanly screed the top level. It also quickly cleans excess potting mix off my bench and back into the mixing tub.
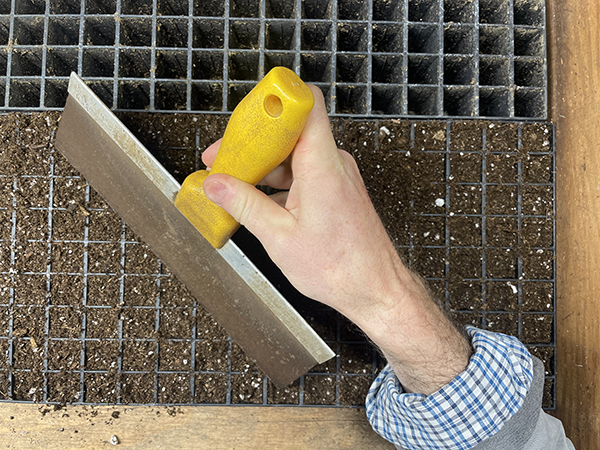
A 12” drywall knife is a great tool for scooping potting mix onto trays and then screeding off the excess. All images courtesy of the author.
There are lots of other ways to do all of this and I’ve seen a lot of people just do it with their hands. I find the drywall knife faster, cleaner, and easier on my hands and, because I have a dedicated bench top with a mixing tub for the potting mix built in, the knife just lives there and I never have to look for it.
I’ve tried larger versions and they’re less convenient at my scale but might work well if you have a larger bench and are filling a lot of trays all at once. I’ve also tried smaller versions, but they don’t span the full width of a 1020 tray so the 12” is what I’ve been using for at least the last decade – relatively cheap, easy to find at a hardware store and they’ll last forever.
The chopstick
My custom chopstick is just one of the disposable bamboo ones that come with take out food and break apart. Any stick about that size could work. I customized mine by whittling the tip a little sharper, more like a blunt pencil tip, and whittling the square end a bit more like a chisel. I use it with a folded index card or seed packet. First, I pour a small pile of seed into the fold and then I gently slide one seed at a time off the end and into the cell tray using the sharpened end of chopstick. With practice this is a fairly fast and reliable way to individuate seeds of pretty much any size or shape.
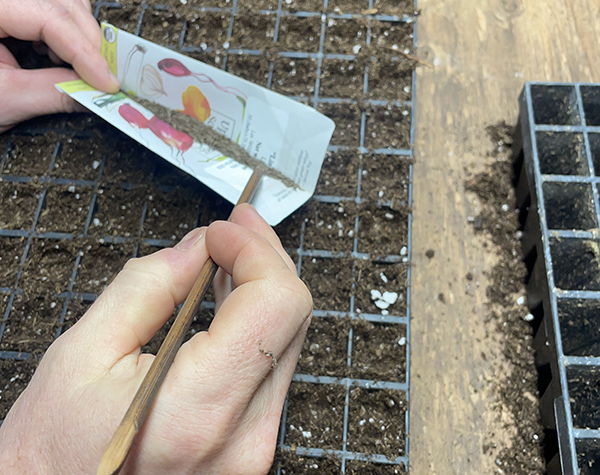
One of the simplest, and definitely cheapest, tools that I use regularly: a folded seed packet and sharpened chopstick. One end of the chopstick is sharpened to help move seeds off the packet, the other end is carved into a chisel shape, useful for when you put too many seeds into a cell and need to scoop some into the next cell.
For years before customizing the chopstick I just used a sharpened pencil and pencils with their slick, non-absorbent “lead” tip work really well, but pencils tend to also get used for writing and so the tip gets worn down and they walk away for use other places. I’ve rarely had to re-sharpen the tip of the chopstick and it doesn’t get used for anything else so it’s always at my seeding station, I just have to make sure it stays dry or it sticks to the seed. The chisel end is useful when I accidentally put too many seeds into a cell and need to move them to another cell of the seed tray.
The folded card technique is how I was taught to seed trays almost 30 years ago and I keep coming back to it because it’s so cheap and simple, and it works with pretty much any size and shape of seed and requires no set up or break down. I mostly slide the seeds off with the tip of the chopstick, but for some seeds in some situations it’s easier and faster to tap the top of the card with the chopstick, vibrating it to get the seeds to slide off the end on their own. You can buy plastic and battery powered versions of this, but I’m not sure they work any better and I’m definitely sure that they ultimately create more waste.
I’ve been asked when posting about this technique on Instagram about how it compares to other seeding methods like vacuum seeding, or other types of plate seeders, or the little plug tray seeders that are pushed row by row. Those other seeding methods tend to be faster if you’re doing many trays of the same, or similar seeds and they can definitely be a good investment if that’s what you’re doing.
With all of those there’s a learning curve as well as ongoing set up and clean up so the upfront investment in time and equipment is significant, as is the ongoing cost of maintenance. All of that means they don’t tend to be faster if you’re just doing one tray at a time, and for most of them it’s tricky to do partial trays at all. They also don’t work well with all seed sizes and shapes. One other consideration is that vacuum seeders are really loud.
For any of these higher tech systems there’s going to be a tipping point where they do make sense. It’s worth crunching the numbers before investing in them to see if they really make sense for your farm scale. Even when they do make sense, you’ll probably find yourself going back to the low-tech methods for some seed types and smaller plantings, if only to enjoy a bit of peace and quiet. When you do I highly recommend the simple card and chopstick method.
Ergonomics
As my body gets older I feel like I can’t leave out a little note on ergonomics when addressing the topic of seeding. My seeding station is set up with an inexpensive, but very effective LED shop light, and a bench top that is just the right height so I don’t have to bend over or reach up while seeding. It doesn’t take much to make sure you have good light and the right work height and that definitely pays off in the long run.
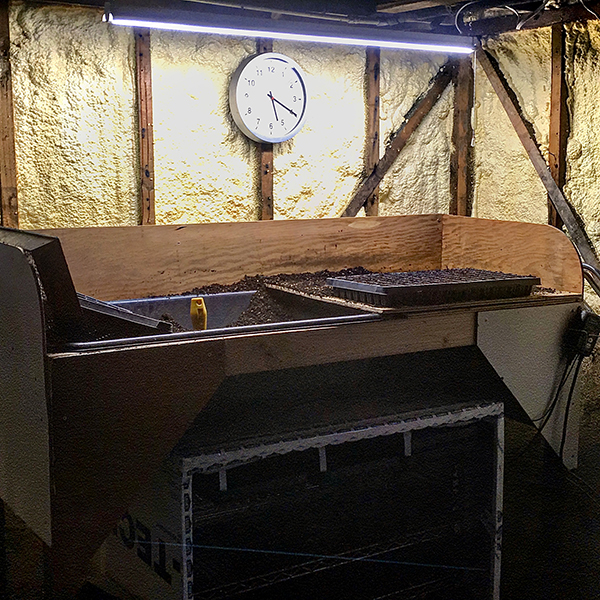
My little seeding station in the corner of my basement. This station works well for a single person and is a smaller version of ones I’ve built for larger farms. There’s a recessed mixing tub for the potting mix on the left, a benchtop on the right at a good seeding height with backsplashes to keep potting mix contained. Underneath there’s space for my simple germination chamber. The clock makes time trials super easy when collecting data for planning purposes (and keeps me from pulling out my phone)! The LED shop light was cheap and makes it easy to see what I’m doing. Plans for the germination chamber and seeding bench are in my book, Build Your Own Farm Tools, and the germination chamber design was featured in the February 2020 GFM.
My bench height is set for my seeding needs because that’s all it gets used for. When I worked for other folks and seeded in the greenhouse on folding tables I would stack trays under the tray I was seeding to get it up to a height where I wasn’t hunched over. Having a dedicated, purpose-built seeding bench feels like a bit of a luxury but seeing as how I’m seeding every week from late January into August, it’s one that is definitely worthwhile.
Josh Volk farms in Portland, Oregon, and does consulting and education under the name Slow Hand Farm. He is the author of the books Compact Farms: 15 Proven Plans for Market Farms on 5 Acres or Less, and Build Your Own Farm Tools, Equipment & Systems for the Small-Scale Farm & Market Garden, both available from Growing for Market. He can be found at SlowHandFarm.com.
Copyright Growing For Market Magazine.
All rights reserved. No portion of this article may be copied
in any manner for use other than by the subscriber without
permission from the publisher.