


Save time and money vs heating a greenhouse for germination
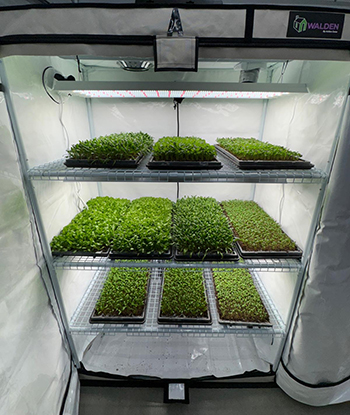
Spring looks different at Clay Bottom Farm this year. The propagation house, a polycarbonate-walled structure attached to the south side of the farmhouse/barn, is empty of its usual explosion of green vegetable seedlings getting a head start in gas-heated comfort while the snow melts on the garden beds outside. Instead, you can find the trays of vibrant starts on the shelves of two white grow tents added to the processing room this winter.
At Clay Bottom Farm, a small vegetable farm where I work in Goshen, Indiana, lean is the name of the game.
Ben Hartman, one of the owners, is the author of three books on “lean” principles in farming, including the most recent book: “The Lean Micro-Farm: How to Get Small, Embrace Local, Live Better and Work Less,” published in 2023. Hartman and his wife Rachel Hershberger are always looking for ways to simplify their farming systems and reduce waste.
“I got interested in grow tents,” Hartman said, “because they are a way to save costs and reduce waste at the same time.”
In this article, I’ll share the reasons we switched to grow tents at Clay Bottom Farm, what tents we chose and how we set them up to fit our needs, and some tips on using them from our experience so far.
Why we made the switch
At Clay Bottom Farm, we grow all of our produce on a third of an acre. This means that the space needs to be used efficiently. It also means that to be profitable, we have to take every input into account, including energy costs, time spent working, and materials purchased. Grow tents make sense for us because they can help us reduce inputs in all of these areas.
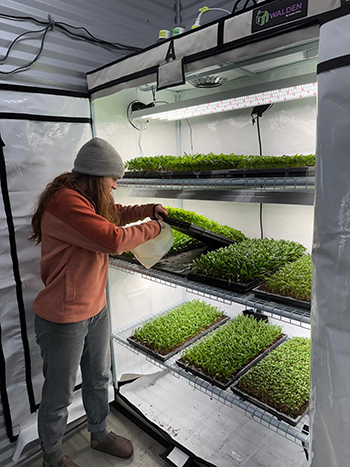
The author waters starts by filling the trays beneath them. Within minutes, the water will be soaked up and the tray will be removed. All photos courtesy of the author.
Our two tents, which we use to both germinate and grow seedlings, help us save energy (and thus, money) because they are much more efficient to heat than the outdoor propagation house we used to use. Located in the already-heated processing room, the tents are mostly heated passively; a small electric space heater in each tent provides the extra degrees needed to reach the temperature we want at a very low cost.
In warmer months, we still plan to move our plants outdoors or into the propagation house once they’ve germinated, since that will be the most cost-effective option.
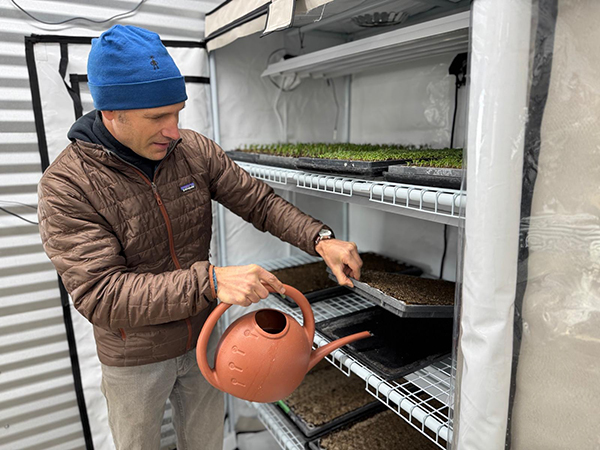
Ben Hartman waters starts. He used to do this three times a day in the propagation house. Now a few times a week is enough.
Electricity for the eight LED lights costs about 50-75 dollars a month (plus, the energy comes from our solar panels!), which is negligible compared to the several hundreds of dollars we used to spend heating the propagation house in cold-weather months. In the summer, an inline duct fan will bring cold air from our produce cooler into the tents to bring down the temperature for crops that prefer a cooler environment to germinate, like lettuce. Hartman even plans to use the tents as backup cooler space for summer produce when needed.
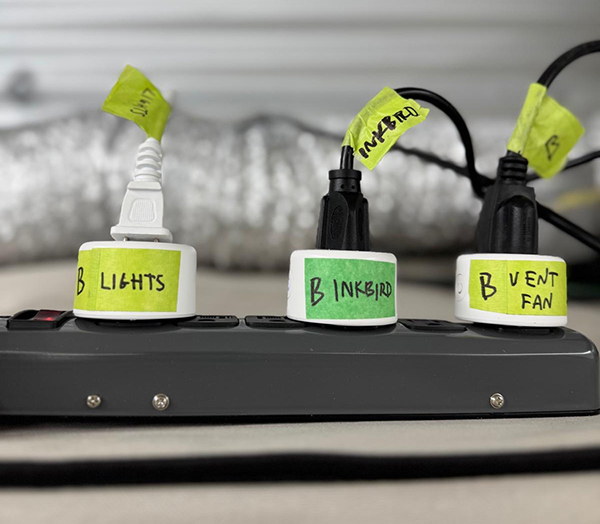
Wifi smart plugs, and a wifi Inkbird thermostat (not pictured here) allow Hartman to control the lights, fans, and temperature from his phone.
Because our tents are air-tight and small, the potting soil stays moist for days, which cuts down on the amount of time spent watering.
Hartman uses a bottom-watering system to irrigate the trays a few times a week. “It takes me like two minutes,” he said. “When they were out in the propagation house, I was often going out and watering three times a day. Three times a day versus two times a week. That’s a game-changer.”
The tents save us labor another way too. We used to germinate seeds in a repurposed refrigerator which was warm and dark inside. We checked the trays multiple times a day because we wanted to get the seedlings out into the light as soon as they germinated. Now, our seeds germinate under LED lights which means they have direct light as soon as they pop out of the soil.
Finally, Hartman believes the tents will reduce the amount of money spent on seeds.
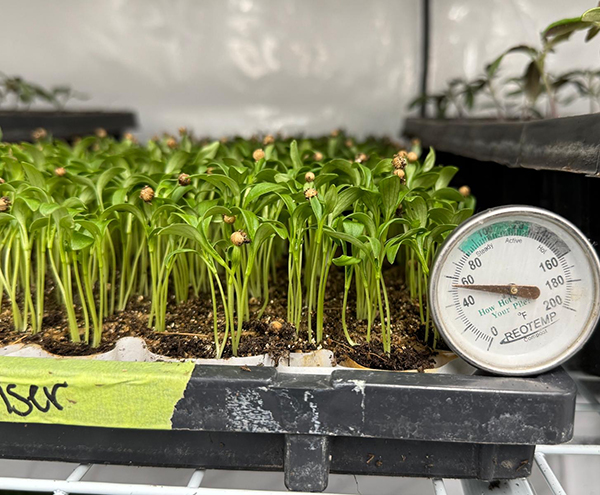
For many vegetables, “the first ten days of life is the hardest part,” Hartman said. Each plant prefers specific conditions to germinate. The potting mix needs to have just the right amount of moisture, and soil and air temperatures need to be pretty precise.
Every season, we lost whole trays because the conditions weren’t right. And this meant a loss of expensive seeds as well as time and energy. See the article in this issue on seedling and compost-based potting mix problems for more on that.
“Farming is about manipulating the plants’ environment,” Hartman said. “We can grow better plants if we give them more precisely what they want.” He believes the tents will be just as helpful for germinating cold-season plants in August and September as providing a warm environment for winter and spring germination.
Hartman and Hershberger have been growing vegetables for 19 years. When LED lights first came out several years ago, one grow light could easily cost over a thousand dollars. “Now a quality 4-lamp fixture costs less than $300,” Hartman said. “The whole (tent) kit sold by Walden for vegetables is around a thousand dollars, including the lights.”
Grow tents became popular in recent years for growing cannabis indoors, but they are now being adapted for vegetables, microgreens, mushrooms, and flowers as well.
“All these systems can come together and be not very expensive anymore,” Hartman said. That’s why he decided it was time to make the switch.
Setting up our tents
For our tents, we chose the Walden LED Grow Tent kit by Active Grow. “There are lots of tents on the market,” Hartman said, “and we certainly have not tried all of them.” But he made the decision based on a couple of factors:
Our tents are made of PEVA, which is a plastic material that is considered non-toxic for plants and people and is better at reflecting light than the mylar used in many tents. Also, our tents came with plastic splash pans at the bottom which make it easy to clean out spilled soil and water.
To fit our space, we chose two tents, each with a 2-foot by 4-foot footprint. We went with the “greens and veggies” version of the kit because it has a light spectrum engineered for our crops.
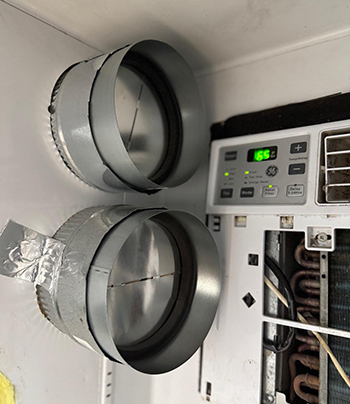
Inline fans, with backdraft dampers, pull cool air from this cooler into the tents as needed. Each fan is plugged into the “cool” plug of an Inkbird thermostat. The Inkbird controls a mini space heater, in addition to this cooling device, to maintain optimum temperatures inside the tents. (View from inside the cooler.)
First, weassembled the kits, fitting each tent with three shelves and LED lights above each shelf. We grow a fourth row of trays on the floor of the tents. We placed the tents on horse stall mats cut to size to make it easy to sweep and mop right up to the tents and to provide insulation from the cement floor. Horse stall mats are like heavier-duty versions of the anti-fatigue mats that are used to lessen the impacts of standing on concrete. Each of our tents came with an inline fan for ventilation, but we found we could have bought a similar product at a lower price from a local hardware store.
The ventilation fans fit into ports on the top of the tents. We plugged ours into GHome smart plug timers which connect to Hartman’s phone. We set the fans to turn on for ten minutes twice a day to bring in fresh air. This helps control mildew from excessive humidity.
Next, we wanted a way to bring cold air from the nearby reach-in cooler into each tent, so we used a utility knife to cut ports and fitted them with six-inch inline fans and ducts bought at a hardware store.
Lettuce, spinach, and cilantro are three of our top-selling crops at Clay Bottom Farm. We open the grow tent doors a few days before transplanting, so they can start to get acclimated to the environment.
To control the temperature in the tents, we use an Inkbird WiFi thermostat. Each tent has a small electric space heater in addition to the ducts coming from the cooler. We set the thermostat to the temperatures we want, with a 2-degree differential, and it keeps the temperature within range by alternately turning on the heater or bringing in cool air.
Right now one tent is used as a seedling and microgreen grow tent, and is set at 72 degrees F. The other is used for germination, and is set at 78 degrees F. At night, the thermostat turns off, and the tents settle to room temperature, which is 60 degrees F.
Finally, we use GHome Smart Plug timers to control the grow lights, turning them on at 6am and off at 1opm.
One more modification Hartman made was to add strips of Velcro to hold the door flaps open and out of the way when we want to work in the tents.
What we bought (per tent):
Active Grow Walden LED Grow Tent kit. We chose the “greens and veggies” version for the best light spectrum for our crops – $1045
Ours came with 3 LED lights, shelves, and 6” inline fans to bring in cool air from our adjacent reach-in cooler. We’ve since added an additional light, mounted below the bottom shelf, so we can grow plants on the floor.
4” inline duct fan for pulling in fresh air (mounted in the top) – $12
One Inkbird WiFi Digital Temperature Controller – $50
Three GHome Smart Plugs to control lights and ventilation fans remotely – $24
One mini electric space heater – $10
Extension cords – $12
Using the tents
We are still learning to use our new grow tents through trial and error. But here are some of our tips so far:
Make the best of the investment by using the tents for multiple purposes: as mentioned, we plan to use ours as germination chambers, seedling grow tents, coolers for storing tomatoes and other produce, and as a cold house for lettuce seedlings in mid-summer. We also use them to grow microgreens and shoots.
Fit them into your current infrastructure to improve efficiency. For us, using refrigerated air from our cooler allows us to avoid redundancy and keep costs down.
Cilantro starts growing strong and healthy under the grow lights. We’ve had almost 100 percent germination rates since switching to grow tents.
Make grow tents part of a paper-pot planting system. We grow almost all of our transplants using Japanese paper pots (which we buy from smallfarmworks.com) and the flats fit nicely in our grow tents. We bottom-water all of our starts by putting a tray (from paperpot.co) under each flat and adding a quarter inch of water (about a quart). Within minutes, plants and potting mix soak up the water, and we remove the trays so the roots don’t grow matted together.
Keep the doors closed while the seeds germinate. Open them periodically for ventilation and at least two days before transplanting so the seedlings can acclimate a little.
If your humidity is too low, use a crockpot with water instead of a space heater to heat your tent. This can also be hooked up to the Inkbird thermostat. We started with a crockpot but switched to a space heater because the humidity was too high.
Don’t worry about safety glasses. Unlike some growing lights that emit UV rays which are harmful for the eyes, the LED grow lights that came with our kit are safe to look at without glasses.
Conclusions
After a few months with our grow tents, we are excited by the results. Our starts have great color, aren’t leggy, and so far, have been disease-free. “We have achieved nearly 100 percent germination because the conditions are so controlled,” Hartman said.
There are some downsides. For us, the biggest may be the accessibility of the seedlings. In a propagation house, you don’t have to unzip doors and work with trays on multiple-level shelves.
“It’s physically not as handy or efficient as flat tables in a greenhouse,” Hartman said. The tents will also need to be cleaned and disinfected periodically.
For some, the upfront cost may be prohibitively high. And others may be deterred by the more complicated mechanical systems involved.
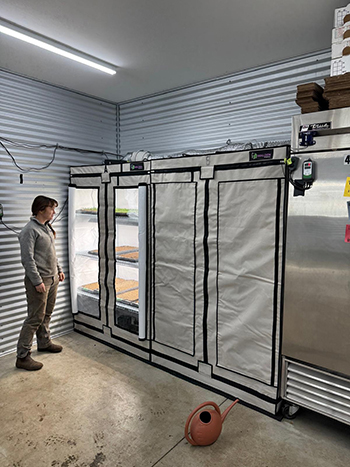
The author checks on starts in the “cool” grow tent. This one is set at 72 degrees F, while the one beside it (with doors closed) is set to 78 for crops that prefer a higher germination temperature.
Purchasing a grow tent isn’t the only way to create a more controlled space for starting transplants. Hartman believes a reach-in cooler could be set up in much the same way, with grow lights and a heater. “You wouldn’t have the handy ports that come with the tents, and you wouldn’t have the viewing windows, but it could be very similar.”
Hartman said he’s also seen growers use old box trucks for the same purpose. “A grow tent is just a handy one-stop-shop kit that you can set up in a few hours,” he said.
Sierra Ross Richer is a young farmer and journalist from Goshen, Indiana. She was drawn to farming through her love of working outdoors and her passion for sustainability. Sierra has worked at a number of small farms, including Clay Bottom Farm in Goshen, Indiana. As a freelance writer, she focuses on topics related to sustainability, agriculture, and Anabaptism. More of her writing can be found at her website, sierrarossricher.com, and on her Substack, Sierra’s Adventures in Sustainability.
Copyright Growing For Market Magazine.
All rights reserved. No portion of this article may be copied
in any manner for use other than by the subscriber without
permission from the publisher.