


This is the information sheet visitors to Waterpenny Farm can use to show themselves around the farm.
We have been cultivating 10 acres of ecologically grown vegetables here in Sperryville since 2000. Our farming methods are all ecologically based and sustainable, and we use only organic inputs (no synthetic pesticides or fertilizers). In addition to growing vegetables and flowers, we have a flock of 175 laying hens on the farm.
The farm is our family’s sole source of income. We sell at Farmer’s Markets in Charlottesville and Warrenton on Saturdays; and in Takoma Park, MD, on Sundays. We also offer 100 CSA (Community Supported Agriculture) shares, which are delivered to Arlington and at the Capital Area Food Bank in Lorton on Wednesdays and picked up on the farm on Thursdays. CSA members sign up in March for a weekly box of seasonal vegetables from the farm, from June to the beginning of October. Finally, we have a self-serve stand on the farm; self serve customers can either pay when they shop or purchase pre-paid credit on the farm.
Each year we hire 5-6 people to work as farm interns. They earn a stipend and live on the farm, and participate in all aspects of the farm. Interns have the opportunity to learn the ins and outs of our farm’s systems. Interns are vital to our farm’s success.
We have a 40-year lease on 30 acres of Mt. Vernon Farm. To find out more about our long-term lease arrangement, see the article on our website. Mount Vernon is an 800-acre farm that offers grass-fed beef, pork, & lamb (to get to their store, turn left at onto the highway at the end of our driveway, then take the first right onto Mt. Vernon Lane).
Thank you for coming to see our farm. We hope to see you while we’re here, but we’ve also set up a self-guided tour you can do on your own. It will take you all around the farm, a distance of about a mile. Bring your water bottle and wear a sun hat if it’s hot out. Just look for the numbered signs and read the descriptions below.
Before you start, look at the farm map. You will notice that our farm is divided up into 35 blocks that are each 300 feet long and 30 feet wide. Having our farm divided into equal-sized fields makes it easier for us to plan a crop rotation, avoiding putting the same family of crops in the same fields two years in a row. Our rotation also includes a fallow year in most fields every 5 years or so. This is good for the soil, varying the types of nutrients the crops use and need. It also gives us an advantage over pests, many of which are dormant underground in host fields in the winter time.
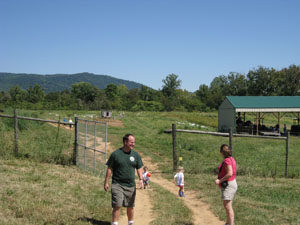
1. Deer fence. After years of having more and more deer damage to a wide variety of crops, we finally had this deer fence installed in the spring of 2007. It’s 8 feet high, 4400 feet long, and keeps all the deer out (as long as we close the gates). We noticed a big increase in production immediately after this fence was completed.
2. Asparagus. We planted this asparagus patch in 2003 and started harvesting in 2006. The varieties we chose to grow are resistant to bacterial rust. Asparagus beetles are its main pest, and our main challenge with asparagus is keeping it weeded all year. We harvest the first shoots to come up in the spring, and continue cutting it daily for 6-8 weeks (usually Mid-April to early June). The tall, fern-like fronds you see now develop from the tender shoots when they’re left to grow. They are now feeding the roots of this perennial crop.
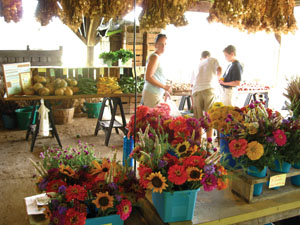
3. Flowers. We grow about ¼ acre of flowers every year. We sell cut flowers at the farmer’s markets & on the farm(Thursday afternoons and Fridays), but flowers also do a lot to attract birds, butterflies, and other beneficial insects and pollinators to our farm. We try to have something blooming most of the year, either wildflowers in the spring, or flowers and vegetables we grow in summer & fall. Zinnias and sunflowers are our mainstays, with Cinnamon Basil, Ageratum, Gomphrena, Celosia, snapdragons, statice, and strawflowers in prominent roles. We also cut many native and naturalized perennial flowers and herbs we’ve planted around the farm for our cut flower bunches. Customers can breathe easy knowing that they’re not bringing in pesticides with their beautiful bunches of flowers.
4. Blueberries. We planted 130 blueberry bushes in the spring of 2005 and had our first significant harvest in 2008. Each row is a different variety, and they ripen at different times, extending our harvest to about 6 weeks, from mid-June through July. The wooden posts and clotheslines are used to support netting we put over the field to keep the birds out when the berries are ripe. Blueberries have relatively few pest & disease problems and can be produced organically without as many problems as other small fruits.
Facing sign #4, turn right to walk between the blueberries and our pumpkin field below. Pass our young apple and Asian pear trees, then turn down hill to find #5.
5. Beneficial insect habitat. We’ve set aside several parts of our farm that rarely or never get mowed in order to provide additional habitat for beneficial insects. The Echinacea, Bee Balm, and Rudbeckia in this field were planted in 2001, while the goldenrod & many other plants are volunteers. We aim to keep our farm’s insect communities in balance by having natural levels of both vegetable pests and their predators, and providing “refuge” areas for them to live, overwinter, meet, reproduce and/or eat each other helps us do that.
6. Tomatoes. This is our second of four tomato plantings. We grow about 5,000 tomato plants every year. We stake the more fragile heirloom and cherry tomatoes to help them be more productive, but we let a lot of the hybrid tomatoes flop on the ground. This 2nd planting is basically finished, but we’ll continue to harvest from our 3rd and 4th plantings for another month or so. At peak production we pick about 3000 pounds of tomatoes each week
7. Kale. We transplanted this kale September 1st (about 3 weeks later than usual due to the weather) for harvest early October through the fall. We grow kale, lettuce, cabbage, and broccoli on white plastic mulch. The white plastic keeps the weeds down and holds in moisture the same as black plastic mulch, but while black plastic warms the soil for warm-season vegetables, white plastic helps keep the soil cooler for spring & fall crops.
Row cover. Right after planting, the kale field was covered with row cover. This gigantic white sheet is a breathable polyester fabric that keeps insects and animals away from our young transplants, while allowing light and rain to pass through. We cover many of our plants when they’re young to help them get established. When fruiting crops such as squash start to bloom, we remove the row cover so that bees can get in to pollinate. Leafy crops such as the fall kale in this field can stay covered until we’re ready to start harvesting. After getting uncovered, the plants are usually big & strong enough to withstand some pest pressure and still be productive.
To get to #8, face #7 and turn right. Walk along the edge of the fields towards the gate by the river, then on through to #8 at the tree line.
8. Irrigation 1. Walk straight ahead to see the irrigation pump. Take the path to the right to get a better look at the river, the home of our namesake water pennies, pollution-sensitive beetle larvae which live in the water. If you pick up a rock in the river and find a flat, oval-shaped, dark coppery-colored bug the size of your little fingernail, that’s a Waterpenny—treat it with care! Be sure to see the real live ones in our aquarium at the barn.
Irrigation is vital to producing high-quality vegetables. We use drip irrigation, a water-saving system that slowly puts water at the base of the plants and nowhere else. The gas-powered pump takes water out of the river, sends it through the large black sand filters to take out the sediment, then sends the water to the fields. We can irrigate about 2 acres at a time, or ten of our fields, and this small river provides all the water we need to get through dry spells. Sprinklers would be our other main alternative for irrigating, but they waste a lot of water, enhance the spread of bacterial and fungal diseases, and end up watering the weeds too. With drip irrigation we use a lot less water and only water the plants we want to grow.
9. Irrigation 2. Here you can see the system of hoses and valves that deliver water to the plants—there are yellow flags at the valves. The 2” blue hoses (called “layflat”) bring the water from the river to the field. The 1 ½ “ black hoses (called “header”) go along the edge of each field, and then the red valves connect to the drip tape running under each row of plastic. By opening & closing the valves we water different parts of the farm.
The black plastic mulch works in concert with the drip tape. It keeps the irrigation water from evaporating, suppresses weeds close to the plants, and warms the soil to speed the harvest. We have had good results on several crops using “biomulch,” a plant cellulose-based, biodegradable plastic that looks the same as the petroleum-based kind, but degrades in place rather than needing to be pulled up each year. We also use a white plastic mulch on cool-season crops like kale and lettuce. The drip tape, plastic, and row cover can all be recycled into plastic “lumber.”
10. Winter squash. We began harvesting this field of butternut squash in mid-September. We seeded it in mid-June, covered it with row cover until it flowered, uncovered it, weeded it some, and let it grow for 2 more months until the squash matured. When the vines died back and the tendril closest to the squash is dry and the color of the skin is tan all over, (a withered tendril indicates that no more sugars are being transported from the squash leaves to the squash itself) we clip the squash, let it cure in the field for a day or two, and then bring it to the barn for storage. We’ve already brought in 4 large bins of squash from this field, and still have more to go—this dry weather, combined with the ability to irrigate just the roots was great for it this season.
If you look toward the river, in the field perpendicular to this one, you’ll walk by a field recently planted in a summer cover crop of buckwheat. We use warm season cover crops where we can, and plant winter cover crops on all fields in the fall. They build the soil, providing a “green manure” for our crops. They also can have an “allelopathic” or weed-suppressing effect, especially the summer buckwheat and the winter rye. In addition, they hold the soil in place, keeping it out of the river, and keeping our rich soil community intact.
11. Roadways. The permanent grassy “roadways,” between our 300’ x 30’ fields also help to maintain our soil health. We never till these areas, leaving bacteria, fungus, and other microorganisms in the soil community intact. When we till our fields, the undisturbed microbial life in the roadways can easily colonize the tilled land (this is according to soil scientists we’ve heard speak— we haven’t seen these little guys ourselves). Having a well-balanced and vibrant soil microbial community is vital to plant health. The roadways also help minimize soil erosion in times of heavy rains, and provide more habitat for beneficial insects and pollinators, including native ground-nesting bees.
12. Summer squash. This is the third of our three plantings of summer squash. We pick a squash field 6 days/week for about 6 weeks, averaging about 100 lbs of squash every day. This field is almost finished, but we hope for a few more weeks of harvest before the frost.
Mulch. We mulched this field soon after we planted it in August. We roll out five or six 400-lb round hay bales in about 30 fields this size every year (about 150 bales or 60,000 lbs of hay total). In addition to helping keep weeds down (which it does for only some weeds), the mulch reduces rain & wind erosion, minimizes the spread of disease, keeps the vegetables clean, adds organic matter to the soil, provides habitat for soil microbes, & reduces soil compaction.
Some hayfields in our area, particularly those managed conventionally for “high quality” (meaning exclusively grass) hay for horses, are treated with the persistent broadleaf herbicide Picloram, which is devastating to broadleaf plants, including all the vegetables we grow. We learned this the hard way in 2007, when we mulched about 2 acres of our fields with hay we were sold that came from a field that had been sprayed the previous year with Grazon, a Picloram-containing herbicide. It’s illegal to sell hay for mulch that has been treated with this federally controlled substance, but you definitely should specifically ask if your mulch hay has been sprayed before you use it. We learned this from hard experience. (Composted manure from horses who have eaten hay treated with picloram will also kill your vegetable plants, so now, in Virginia, all manure isn’t good for your garden.)

13. Chickens. We have 175 egg-layers this year. They have portable coops and a portable electric netting fence (don’t touch it!) that we move about every two weeks. This gives them access to new sources of bugs & plants, which means they lay very tasty, nutritious eggs with orange-yellow yolks. We have moved them through several fields that are not in crops this year. They naturally fertilize the field and eat many pests in the process. We feed them twice daily with certified organic, soy-free feed, and we also bring them our vegetable compost. They especially like melons and leafy greens.
You can see some of the cellulose-based plastic “biomulch” exposed and starting to break down by the chickens scratching in this area. By next spring, it won’t be visible.
14. Equipment. (Please don’t climb on any equipment or tractors!) This pole barn was built in spring 2009, and is wonderful for storing tractors, equipment, and field materials out of the weather and close to the fields. On our scale we rely on a set of specialized vegetable equipment to help us prepare fields and plant about 50,000 transplants every year. We use tractors to get the fields ready, to lay the plastic mulch & drip irrigation, and to make little water-filled holes for us to put plants into. We rely on being able to get hundreds or thousands of plants in the ground in a short period of time, and our equipment helps make that possible. Of interest are the blue “spader” for tillage, the low red “plastic layer” for laying plastic and drip tape, the red and yellow “transplanter,” and the green and yellow sprayer, which we use to apply a foliar fish and kelp-based fertilizer as well as a baking soda solution to deter fungal growth on plants.
15. Barn. This barn was built as an apple packing shed in about 1940. We bought it and the other buildings on the farm in 2004 when we signed our long-term lease. We use it to store and wash vegetables, and as a place to make CSA boxes and load market trucks. We also have a self-serve stand open Tuesday through Saturday (and today) where people can buy anything we grow. Walk past the sign & into the barn, then go up the step to the left to see the signs describing where to find and how to purchase vegetables and eggs from our farm to take home and enjoy.
Copyright Growing For Market Magazine.
All rights reserved. No portion of this article may be copied
in any manner for use other than by the subscriber without
permission from the publisher.