


I’ve been using garden carts for years. The ubiquitous plywood and conduit design of carts made by companies like Carts Vermont are incredibly versatile, simple and tough. One of my carts lasted more than a decade, hauling everything from hundreds of pounds of harvested vegetables to a farmer with a broken foot. After that kind of abuse, day in and day out, in all weather, it quite literally fell apart, more or less irreparably. Ten years is a pretty good track record, so I salvaged the wheels, slapped in some new bearings, chopped off the axle and made a few changes I’d been thinking about for years.
When I thought about a few upgrades I’d like for the cart here was my wish list:
1. Wheel spacing that matches our bed spacing and clearance for short crops like greens and carrots so that we could roll over unharvested beds;
2. A handle that sits high enough so that I don’t have to bend over too far to pick it up;
3. A cargo bed that is relatively flat and doesn’t tip back too far when it’s traveling.
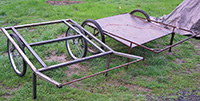
I made some measurements, salvaged a bit of angle iron and square tubing from an old rack, and I welded up my first prototype. Since building that first cart, I’ve built two more but the first is still in service four seasons later, with a few minor modifications.
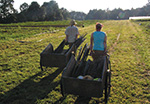
I made the first one so that we could haul it behind a potato digger. The idea was that two crew members would chase the tractor as it dug the potatoes and trailed the cart over the freshly dug tubers. All they had to do was to toss the dug potatoes into bins on the cart and then unload the cart into the truck at the end of each row. It worked well, but you had to pick up the potatoes fast to keep up with the tractor. The idea never got fully adopted on the farm for other reasons, partly having to do with getting all of those pieces in one place at one time. The cart did immediately start being used in the place of a garden cart almost everywhere else on the farm, and with its higher, easier-to-load, flat-bed platform, it became primarily a harvest cart around the farm.
The second cart I built I substituted bicycle wheels and larger-diameter square tube all around (which is what was available in the salvage pile at the steel yard at the time). I built this one for my friend Zoë at Valley Flora in Langlois, OR. It’s a bit heavier and stiffer than the first and was custom sized for her farm spacing. She uses it for harvest, but also for moving multiple sticks of 40’ aluminum irrigation pipe solo.
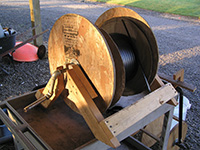
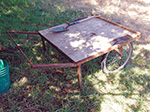
I built a third cart out of similar materials for a small farm I’ve been working with for the past three years, Skyline Farm outside of Portland, OR. For that cart, we built a harvest platform with sides that easily lift off the frame. The farm is on a hillside so it needed sides to keep bins from bouncing off on the bumpy slopes. In addition to the cargo platform we found that a 4’ x 4’ x 2’ fruit bit sits nicely on top when we want to haul larger, bulkier items. I also built a couple extra attachments to help with other tasks around the farm. Skyline Farm has no cultivating tractor to mark beds, so we use the cart wheels to mark the bed pathways after the final pass with a tractor mounted rototiller. I built a rolling bed marker that attaches to the frame of the cart and marks out the rows and in row spacing for planting (similar to the one under the ACG in my May 2009 article on dibblers). I also built a custom frame for the drip winder to make it easy to retrieve and lay out drip tape (see my November 2009 article for more how to build a simple drip winder).
There are a number of possible attachments that I’d like to try and maybe this winter I’ll get around to putting them together. Inspired by the “weedmaster” from Finland (weedmachine.co.uk), my next goal is to start mounting cultivation equipment on the cart frame, especially my favorite light weight cultivating tool, a tine rake. Three other items on my list are a shade canopy for harvest in the field, stacking racks for transporting seedlings to the field, and a bicycle hitch for moving items down farm roads to the barn.
Build your own
If you can cut metal and weld, or if you know a welder, you can probably build your own custom cart, but there are few details to keep in mind. I’ll give a few of the considerations I use in building my carts here but these are by no means hard and fast, or complete.
I like to have the main frame of the cart 20-24” high for clearance and ease of loading. I like my handle up at about 30”so that I can push it with my hips (I have a 32” inseam). I usually make the entire length of the cart 75”, with a 48” long main frame and 27” to the handle. I position the wheels about 15” from the back, which takes some of the weight off the handle, but keeps it from easily tipping over backwards. I’ve been using 1 1/2” x 1/8” wall square tube, 11/2” x 1/4” flat stock, and 1/2 inch pipe because they’re easy for me to find at the salvage yard, they’re not too heavy, and they make a very stiff and durable cart. I use 26” front bicycle wheels with the widest tires I can find, usually 2 1/4”. This is probably the most common bicycle wheel size and is used on most mountain bikes and cruisers. Bicycle wheels are relatively easy to find, even used, and usually have higher-quality bearings than cart wheels. Try to keep the cart lightweight, but you’ll have to balance that with durability and stiffness. The last cart I built is about 90 pounds, which is about as heavy as you really want it to be, especially if you have any hill; on flat ground it doesn’t matter as much.
The cost of materials for building a cart is cheap, especially if you can find used wheels and salvage steel. Even with all-new materials, you’re probably looking at around $100 total. The time to build it is the main cost, though, and I’ve estimated the built cost for one of my carts closer to $500. Maybe some day a fabricator will start offering custom farm carts and accessories, but until then you’ll have to make your own.
Josh Volk, a regular GFM contributor on tools and efficiency, farms at the edge of Portland, Oregon. He also helps farmers improve their systems. Visit www.slowhandfarm.com.
Copyright Growing For Market Magazine.
All rights reserved. No portion of this article may be copied
in any manner for use other than by the subscriber without
permission from the publisher.