#ToolsForGrowingForMarket
To hoop or not to hoop? This is a question I’ve gone back and forth on with floating row cover and insect netting for decades now. There are obvious advantages and disadvantages both ways and as with most things in farming over time I’ve come to believe there’s not one right answer in all situations. In the past few years, I’ve come back to using hoops and they’ve been showing their value.
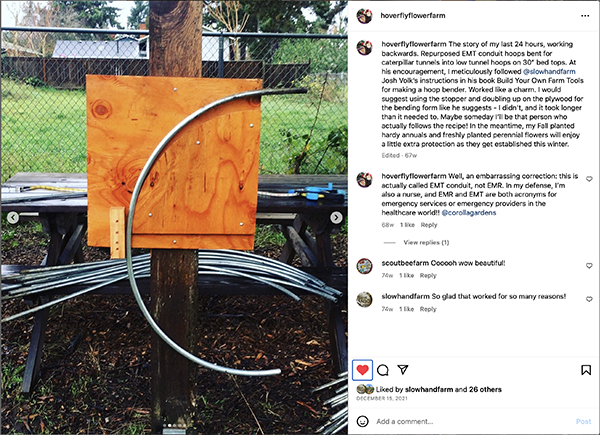 The bender Sarah made based on my plans. Just three pieces of wood and a few screws, then attached to a post in our wash pack area. More photos of the process are on her December 2021 Instagram post @hoverflyflowerfarm.
I find a few advantages with hoops versus just letting the row cover or netting float directly on top of the crop. In the early spring we’re often putting row cover over transplanted crops and the hoops keep the row cover from mechanically damaging the tender seedlings, especially if it’s windy or wet. For direct seeded crops my experience has been that the row cover in direct contact with the ground before germination can actually cause a little smearing of the surface, which may or may not impact germination, but it does make a little crust when things dry out which can complicate hoeing or cultivation.
Floating the cover directly on the crop also reduces any air flow and this has caused problems for us with mildew and molds. When we’re using row cover for frost protection there’s definitely added protection when we keep the row cover off the leaves. The row cover itself freezes hard, it’s elevated enough off the top of the crop that it’s not actually touching leaves and wicking away their heat.
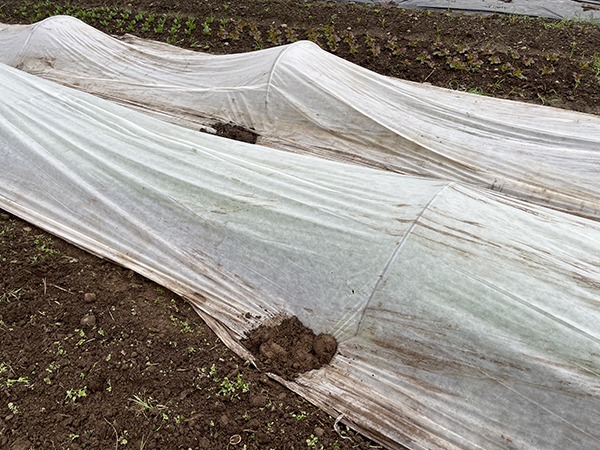 For the past few years I’ve gone back to just using a shovel and large divots of soil to hold row cover in place. I find that this works just as well, if not better for me than sand bags, there’s no plastic involved and no need to haul sandbags into and out of the fields. The key for us is one deep divot per hoop side, getting the row cover down in the hole and then replacing the divot and stepping on it. With a little practice this is fast and easy (except when we hit a pile of rocks…).
There are also disadvantages to the hoops. The primary one is simply that it takes more time and money to put a bunch of hoops out in the field before putting down row cover and when taking it back out of the field. The hoops do get in the way when we pull back the cover for hoeing. Having the row cover up off the ground can make it more prone to catching wind and blowing loose, and to ripping, especially when the hoops are very tall.
I inherited a bunch of hoops on my current farm that had been made using 10’ sections of ½” EMT conduit, bent using one of the 4’ low tunnel hoop benders that Johnny’s sells. Those hoops were always a little too high a wide for us, catching wind too easily, and extending into our pathways, making it hard to walk between beds (our beds are 4’ on center). For a number of years I eschewed them and just floated any row cover or insect net we were using directly on the crops they were covering. In addition, there was so much leverage on the relatively tall hoops that they tended to fall over when the soil got really wet as they would wiggle back and forth in the wind in the rain softened soil, eventually digging themselves out. We also have a lot of rocks, so it was hard to get the legs into the ground very far.
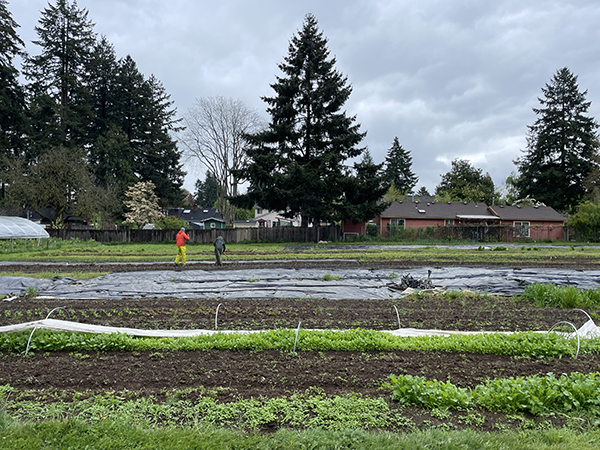
You can see how happy these turnips immediately under then hoops are, as compared to the ones in the area between the hoops where the row cover has sagged. I’m not sure why this is, but it could be because we’ve had a lot of rain and it’s being mostly deposited where the sag in the row cover is, washing away nutrients, or maybe there’s a big temperature difference? The effect isn’t as dramatic on other crops. Hoops are spaced about 3 paces apart, approximately 10’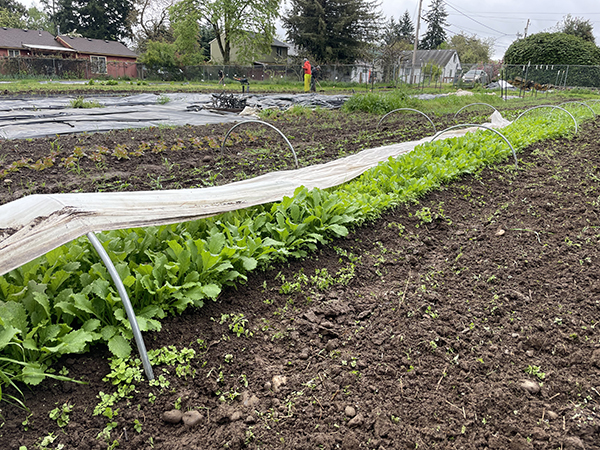
A couple of years ago Sarah Fry, of Hoverfly Flower Farm, started growing flowers in some of our beds and asked if she could use the hoops. I suggested she try re-bending them using the very simple design for a custom hoop bender I’d published in Build Your Own Farm Tools before she used them. The bender is made from scraps of plywood and a simple form for the arc is cut using a jig saw. I’d developed my version of this bender about a decade ago when working for another farm and found that it was easiest to bend half the arc from the center and then flip the conduit around to bend the other half, as opposed to trying to bend the whole arc from one side. It’s also easiest if it’s mounted vertically on a post so you can use your weight to pull down on the conduit. You’ll notice that the bending form is only a quarter arc for this reason.
To re-bend the hoops Sarah cut all of the larger hoops in half, making the lengths of conduit 5’ and then re-bent the sections into 30” wide hoops with short legs. Re-bending worked better than I expected, and those low hoops have worked great for us. They’re easier to carry (half the weight), to insert into the ground (shorter and stiffer), and they keep the row cover just high enough to make a difference when the plants are getting started without catching excessive wind. Some of the plants we grow eventually push up on the row cover, but at that point they’re plenty strong to hold up the cover without problems.
If you want more details on making and using the hoop bender, check out the book Build Your Own Farm Tools which is available in the Growing For Market online store.
Josh Volk farms in Portland, Oregon, and does consulting and education under the name Slow Hand Farm. He is the author of the books Compact Farms: 15 Proven Plans for Market Farms on 5 Acres or Less, and Build Your Own Farm Tools, Equipment & Systems for the Small-Scale Farm & Market Garden, both available from Growing for Market. He can be found at SlowHandFarm.com.
.png)

