Back in the mid-1990s, I was at a SSAWG (Southern Sustainable Agriculture Working Group) conference in Austin, Texas. I’d been hired by Potomac Vegetable Farms (PVF) in Virginia to develop a satellite property with organic sweet corn as the main crop. That goal daunted me: 15 acres of organic sweet corn on ground that had not been improved.
I looked to larger-scale organic, sustainable growers for inspiration on transitioning sizable acreage (relative to a 1-acre market garden) into a lively biologically active and productive state. A conference speaker referred to Illinois-based Midwest BioSystems for clean fertilizers. The owner told me: “I can sell you something in bag. I can sell you something in a bucket. I can sell you something in a tote. But, what you really need is some good compost. And I can’t sell you that.”
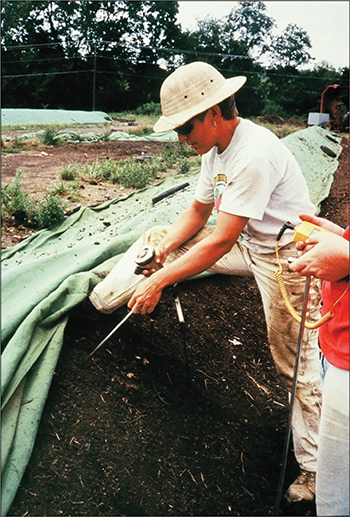 The author measuring the CO2 output of the pile.
Uh-Oh, I thought. Someone else on our team had been making “compost” for many years at PVF. The fertilizer guy told me to contact George Leidig at Autrusa Enterprises and sign up for a course on making really good compost. My teammate Jim (the hauler of horse manure and operator of the skid steer) demurred an offer to go. I decided I had to take this on.
The course was two parts. Day 1: the sell, learning why good compost was worth the hassle to make. Day 2, 3, 4 and 5: how to make it. You read that right, a weeklong composting course. YIKES. I thought I wouldn’t make it past Day 1. The class was held in Amish farming country in Bird-in-Hand, Pennsylvania. The teachers were Austrian mother and daughter duo Uta and Angelika Luebke. Uta spoke only German and her daughter translated.
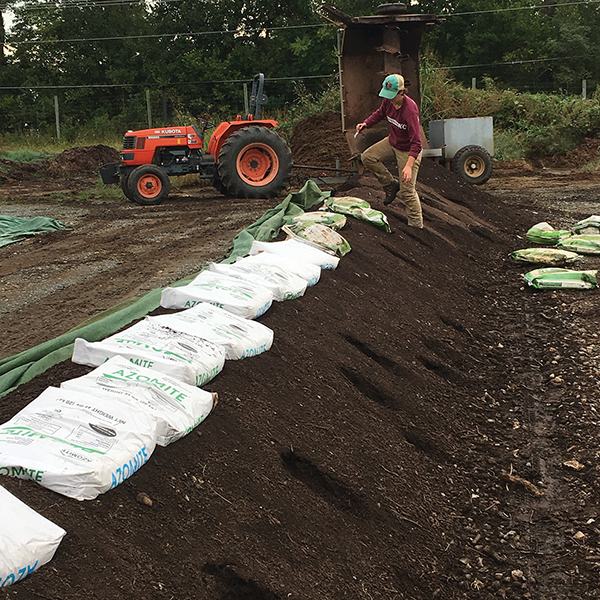 Adding Azomite to a mostly finished pile. All photos courtesy of the author.
At the end of Day 1, I was ON FIRE about the value of good compost. This was our ticket to success; I wanted to dive in. I got some back-of-the-napkin numbers from George on what it would take to get an operation set up from scratch. I drove the 2.5 hours back to the farm that evening and met with my (at the time) bosses, Hiu and Hana Newcomb. I presented all I learned that day, my enthusiasm and the napkin with figures. Hana asked if it will make us state of the art. Yes. They wanted to try it. So, I completed the training on how to make Controlled Microbial Compost (CMC). CMC is what the Luebkes called it, to differentiate the method from piling up random materials and just letting them rot.
What do I mean by high quality compost?
This is where almost no one wants to venture out in the world of compost making. The Composting Council of America has extremely loose definitions of compost. In fact, the only quality standard on their site that any certified compost must meet reads: “…meet the EPA testing limits for heavy metals and pathogens in every Compost Technical Data Sheets (CTDS) for every Seal of Testing Assurance (STA) Certified Compost product.”
Some labs offer a germination test and sometimes a CO2 generation test, but they don’t have a standard to know if the compost is good. UGH. There is no standard for pH, for nutrient content, for soluble solids (conductivity), for moisture, for Carbon to Nitrogen ratio (C:N).
Then, there is the issue of particle size which relates to all the parameters above. I didn’t worry about this as I didn’t use any wood chips. But, if you are buying compost, you better worry about it.
High quality compost will meet those measured requirements above, and it will be biologically active and broken down and stable enough to be a plant growth enhancer. Good compost is like medicine for the soil: it has nutrients and minerals, organic matter for soil conditioning, and biology to help inoculate your field. It hits all three aspects of soil: the physical, the chemical, and the biological.
Key Features of Controlled Microbial Compost (CMC)
- Highest quality compost in 8 to 10 weeks
- Windrow piles turned with mechanical turning machine (tractor pulled or self-propelled)
- Piles must be covered with compost fabric
- Piles must have some actual clay soil in them, around 5% by volume
- Piles are monitored daily for temperature and CO2 generation
Compost turner
Composting is by definition an aerobic process. That means oxygen must be present at all times in quantities to keep obligate aerobic bacteria alive. The Luebke’s taught that these “guys” (as I like to call the bacteria) are the ones that break down organic materials and don’t create any stinky or dangerous compounds that could harm crops. The corollary is that the breakdown products from an anaerobic system create plant-harmful compounds like formaldehydes and cadaverines.
So, oxygen is our primary concern. The turning machine is our main tool to keep oxygen present in the pile. Its job is to lift the material up in the air so that the CO2 (which is heavier than air) can squirt out and leave the pile and oxygen can rush back in. The turner also helps us create a homogenized and even pile in the construction stage.
Turning machines are a major infrastructure investment. Most farmers only have a tractor with a bucket to turn the windrow pile. Anyone who has spent time doing this will quickly agree that it is very slow work, takes a lot of space to accomplish, and doesn’t really do a very good job mixing or aerating. If a tractor bucket is your only option, you probably cannot afford the time to make very much compost.
Here are the standards I was taught and continue to use as a guideline:
- pH close to 7.0
- OM 12-14% wet sample, 20-25% dry sample
- C:N ratio around 10:1
- Nutrient Value or Index > than 10
- Conductivity around 2.5
- Moisture around 40%
- Temperature below 90°F
- CO2 generation less than 2% on a meter
Covers
Why do we need to cover the compost? There are many reasons. The overarching theme is that we want to control as many parts of the process as possible. So, compost covers help us: Keep the piles dry during rainy spells. Keep the piles moist and protected from sun and drought. Keep oxygen moving into the pile and CO2 out of the pile because these covers are gas-permeable (this is not like a plastic tarp, it is like a breathable Gore-Tex jacket). Keep weed seeds from the general environment off the pile.
Clay
Clay as an ingredient is not often talked about in typical compost circles. This is unique to CMC and biodynamic composters. I used fill dirt from contractors. Since I live in the Mid-Atlantic Piedmont, local soils are clay based. Some folks in sandy parts of the country use bagged kaolinite clay. The Leubke’s stressed its importance as a key to creating a stable compost. The theory being that the complex structure of the clay when combined with the microbe-created humic compounds create a more stable clay-humus crumb.
Monitor every day
Daily monitoring asks the compost each day how hard it is breathing and what its temperature is. This is what makes CMC compost a pretty significant pain-in-the-behind. But trust me, a lot changes in a day or two, until you are in the curing stage (which in the CMC system is around Week 5). If quality compost is what you are aiming for, this is non-negotiable.
Composting pad
Again, I was taught to make the best compost possible. To achieve that, we need to have a good site for all this work. Below are the characteristics of a good compost pad.
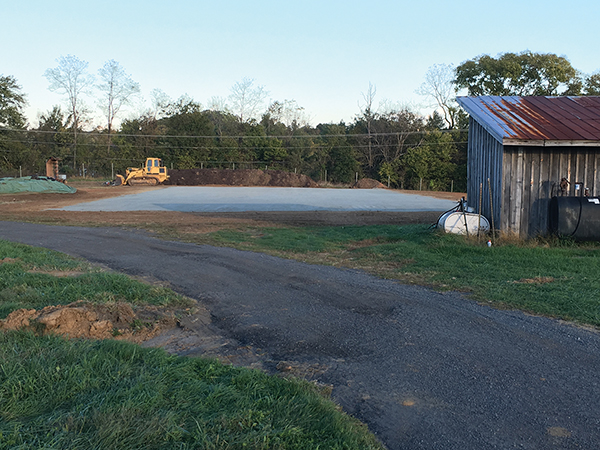
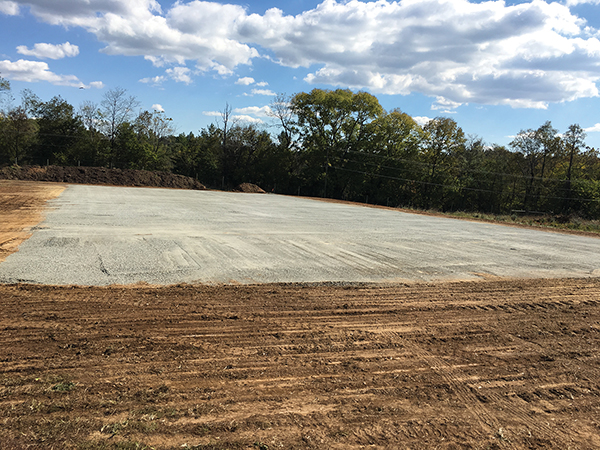 Above is the compost pad following resurfacing with a fresh layer of rock dust after almost 20 years of use.
Weatherproof: As much as you need it to be. I was a fair-weather composter, meaning I didn’t work in the dead of winter (December to February). And I didn’t have to deal with waste streams from the farm itself during the winter (like a dairy farm would). So, we had a pad made with a few inches of medium gravel covered by several inches of rock dust (what washes out of the gravel grinder). Our first pad lasted about 20 years. We then re-laid the rock dust for a new finish.
Size: You need room for the windrows themselves and drive lanes between, and plenty of room at the end of the rows to turn the equipment around. You also need room to create the piles. And, you need areas to store the ingredients, which doesn’t need to be graveled or paved, but needs to be adjacent and accessible by delivery trucks.
Grade: Optimal grade so that you can manage the flow of rainwater is a 3 percent slope the long way so that the runoff goes the same direction as the windrows run. That way the water leaves the site and doesn’t soak into the sides of the piles.
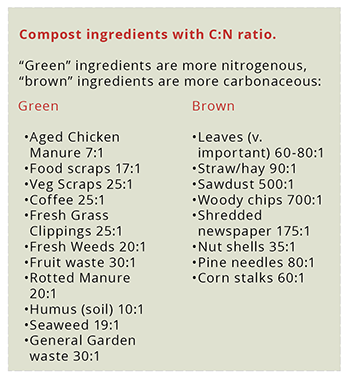
Ingredients and recipes
What to make the compost out of? Let’s face it, most of us market farmers do not generate much in the way of organic wastes. Weeds and cover crops are in the field, culls are not numerous, most livestock are not confined so the manure is difficult or impossible to collect. That means you will need to find, collect or purchase organic materials from your area. We need to balance the number and type of ingredients with cost and compostability.
I notice that would-be compost makers can get bogged down with purity. They want to have a chemical-free farm and naturally extend that concept to any imported materials. My view is that if I can’t find pure ingredients, I’ll make do with what I can find. I did not create those materials so composting them in a good way is a gift to the ecosystem. Because my composting process is so rigorous, all contaminants (except for one class of herbicides mentioned below) will be transformed and made neutral through composting. Lastly, when a commercial composter says their compost is OMRI approved, it does not mean that all the ingredients are from organic farms. The same is true for you.
Nitrogen Sources
Manures: Confined animal operations are the source of most manures available for composting. (I’ll leave ethical considerations out of this conversation.) Over the years I used conventional broiler manure, beef manure, and dairy manure. All are quite different in texture, form, and heat-generating ability. Obviously, the bedding amount and material is going to make a big difference. The most commonly available manure for free is horse. The problem is that it is more wood shavings than poop, and thus it becomes a net carbon source (unless it is with straw bedding). And if you are not going to really manage the moisture and temperature of your compost, it is a massive source of weed seeds. It also may contain herbicide residues that can survive the composting process, most notably clopyralid, aminopyralid, and picloram, sold under a variety of brand names.
Food waste: This is much more common these days. While it may be cool to use and easy to come by, it has several serious issues from the composter’s perspective. It’s extremely volatile, stinky, full of garbage (cutlery, plastic, etc.) and liquifies quickly. I would say it’s the most difficult ingredient to handle well besides carcasses or abattoir waste. You have really got to be on your game for this to go well at all. You will need to get the waste incorporated with carbon materials immediately. It’s gonna be smelly for some time period no matter what. That could be untenable for your neighbors. You will need a new pile to add food waste to every week or so. That means you will be making a significant amount of compost or you will only be able to accept food waste one week a month or so.
Greenchop from your own farm (what a haybine or silage chopper would collect): This is an appealing option at first glance. If you have equipment to make greenchop and deliver it to your pad, then it’s worth seeing if you can work with it. I suspect it will have a deficit of N in the long run, and you may need to add a second dose of chop after two to three weeks.
Vegetable Waste: You will have some, so in it goes no matter how rotten. For most of us, this is not a significant source of nitrogen.
Carbon sources
In my system, there is not the time for woody products to decompose. It takes the action of fungi to significantly break down the strong carbon bonds in lignified materials. That process takes months and months. The CMC system is fast and thus bacterially dominated. So, none to very few wood chips for me.
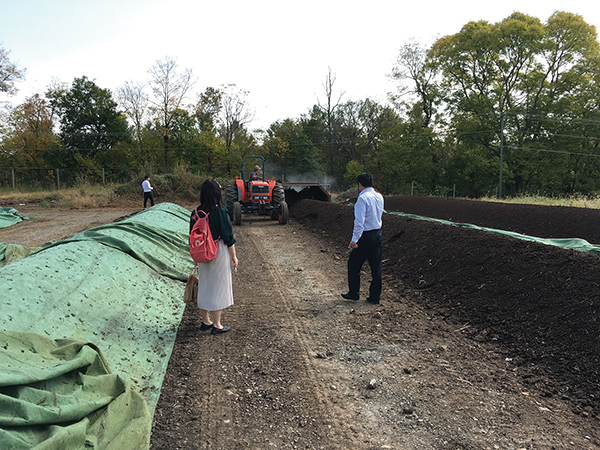 Visitors observing the compost making process. The compost turner works a lot like a rototiller mounted to the side of the tractor: a PTO-powered rotating drum quickly stirs and aerates the pile beside the tractor. Note the green blanket on the pile not being worked, which keeps the pile from getting soaked or drying out too much.
There is more information these days about using ramial wood chips made from tree branches and brush under 4 inches in diameter. These are less lignified, thus compost faster and could be a part of a bacterially dominated compost. These ramial chips are not common. You could make them yourself. But now, you are becoming a woodsman and spending even less time farming.
If your only source of carbon is conventional wood chips, then either you will have to screen them out after 10 weeks (which takes a ton of time or a serious machine), or you need to embark on a wholly different composting system that will take many months or years to create a truly decomposed compost.
Leaves: I had good access to free leaves from the neighboring town. They are an excellent source of carbon and minerals. The only real downside was they always had some trash in them as they were collected off the street.
Hay, Straw, stover, silage, etc.: All great carbon sources. And remember poor quality is perfect for this purpose. Poison ivy filled, moldy, prickers, and weed seeds in that stuff? Yep, bring it on.
Paper: Shredded newspaper would be fantastic if you could find it. Cardboard is workable, but needs to be shredded.
Recipe
Your recipe will depend on your ingredients and their state of decomposition or freshness. There is no one recipe. You’ve all heard over and over that we want a 30:1 Carbon to Nitrogen ratio for a good compost pile to get going. But what the heck does that look like? You’re just going to have to start somewhere and give it a go and see how it works. Use a C:N chart like this one (see figure 2) to give you some idea of where to begin, or use my recipe as a guideline. My recipe, which I measured in skid loader buckets, was: 1 part hay, 1 heaping manure, 1 heaping leaves, 1/3 soil, 1/3 finished compost.
Procedure
The three most common problems with most homeowner compost is that it’s too wet, doesn’t have enough carbon, and they never stop adding new material. So, it’s never done. To make serious amounts of compost, you want to make a proper pile all at once and then shepherd it through its complete composting process. Practically, you have up to 10 days after constructions to adjust the pile by adding more ingredients so it’s cooking just as you desire. Thus, you want your ingredients all around the pad and ready to construct on Day 1. (This is why working with a constant stream of food waste is so difficult.)
 Compost pad, no slope from left to right, 3% slope from near to far, so water runs off down the length of the rows, instead of soaking into the sides of the piles.
I make two windrows next to each other over the course of one or two days using a skid loader. I use the turning machine a few times to get the mix homogenized. It is not crucial that you make two rows next to each other. What matters is that the pile will shrink during the decomposition process. And when the compost is over its hottest phase, you will need to consolidate the pile into one that is still tall enough to work well with the turning machine and that will have the mass to retain a good temperature.
It is important for the pile to be similar throughout. Think about that as you are constructing and mixing. Once the pile is mixed well, has water added if needed during those turnings, and is a good height (5 feet or so for my system), I’ll put the compost cover on and walk away. If your recipe and ingredients behave, within 36 to 48 hours your pile should be steaming hot. For the next few days, job #1 is to make sure there are no hot or cold spots in the windrow to reach that homogeneity goal.
The second job is that the whole pile doesn’t get too hot or stay too cool. The target temperature is 150°F. (Organic compost regs require being at or over 131°F for three plus days, which is a very low bar in my opinion.) Why 150°F? Because that is hot enough to kill dangerous microbes and weed seeds, but not too hot to kill our friendly bacteria. And by the way, weed seeds are killed by a combination of enough moisture for the seed to imbibe and get activated, combined with the hot temperature that will roast them.
If the pile is too cold, you need to add more nitrogenous materials. Or, the pile could be too wet, which means you need to add some soil or dry carbon material, or both. If the pile is too hot, you need to add more carbonaceous materials. If the pile is too dry, you need to add water.
By the end of Week 1, the pile is homogeneous and cooking right around 150°F. From this point forward we are turning the pile whenever the CO2 generated is above 8 percent, or once a day usually. This will be the case for about three to four weeks. Yes, turning every day. Then Weeks 4 and 5 the pile should have decreased in volume by about half. That means the windrows are no longer peaked on top, but getting flat topped. That means it’s time to push the two twin piles together, or to pick up the ends of one row and put them on the middle.
Whatever method, we still want close to the original pile height as we cruise toward the finish line at Weeks 8 to10. This second half of the process requires less turning; the bacteria are slowing down and not breathing up all the oxygen as quickly. Let’s say every other day and then finally every three to five days. A compost pile is finished when it is below 90°F and doesn’t generate more than 3 to 6 percent CO2. Another rule of thumb is that you can’t distinguish any of the original materials. Transformation has occurred. Compost is made.
Phew, finally it’s ready to spread. Or it also can be stored and covered for many months and spread later. I used a tractor pulled Stoltzfus PTO powered bulk material spreader. It uses a chain system much like a traditional manure spreader, but has spin spreaders at the back end, which ensures a much more even spread pattern. I imagine the drop spreader attachment for a BCS would work perfectly on a smaller scale.
Moisture
Judging compost moisture is an art because a moisture meter isn’t available. We don’t want the compost ingredients so wet that they clump together and form balls or big lumps. That’s because there won’t be oxygen inside those balls, thus anaerobic conditions. We also don’t want the compost so dry that it is dusty. The goal is like Goldilocks: just right. Your senses judge this: hands touching and eyes watching. It should be moist enough to leave a wettish impression on your hand. And, it should be easy to tap a balled up fistful and have it disintegrate. This is similar to determining if a soil is just right for a tillage operation.
I add water with the turning machine, another bonus of such equipment. In an emergency I also have run drip line down the windrow (with the cover off) to get a lot of water out over a day. That would only be necessary if the ingredients were super dried out. Remember that once our pile is going, we will keep it covered to preserve the moisture as best we can and to keep out heavy rains so it doesn’t get soaked and go anaerobic. The end goal is a compost that is around 40 percent moisture. All along it should feel moist, not wet and not dry, and completely falling apart.
Moral of the story
If you’ve read this far, congratulations, you might just become a good compost maker. Clearly, good compost doesn’t come cheap, like most things, right? There are only two avenues by which anyone would go to the trouble to make compost. First, you generate so much waste on your farm, animal or vegetable, that you have to deal with it responsibly. I suspect not many of you fall into this category. Or secondly, you believe compost is an important component of soil health on your farm, and you can’t find any decent compost to buy. It is my contention that if you are going to bother to compost for soil reasons, then quality is what you are after. In that case, the aerobic windrow system definitely fits the bill.
Could you do it another way? Sure, there are plenty of articles and videos about making static aerobic piles. Those systems also involve equipment, material handling, and mindfulness. What I don’t know is if the resulting product is really any good. To me most compost out there is not finished, much of it so full of wood products that I would classify it as a mulch.
Now that you know what it might take to make great compost, you may decide to join forces with your friends, neighbors and farming comrades to share the cost. Or maybe you are willing now to pay a fair price (expensive) for a superior product. Or maybe you will see that using vast quantities of compost is just too costly for your operation. All of these are viable outcomes of your new knowledge. I wish you the best as you figure out the role of compost for your farm.
Ellen Polishuk farmed for 30 years at Potomac Vegetable Farms in northern Virginia. She now consults and teaches growers around the country through her business Plant to Profit. For more information, go to planttoprofit.com.