A method for increasing your production on a small footprint
Editor’s note: The following is an excerpt from Ben Hartman’s new book The Lean Micro Farm (Chelsea Green Publishing, November 2023) and is printed with permission from the publisher. In the book, Ben talks about shrinking his own farm’s footprint from an acre down to 1/3 of an acre, in an effort to prioritize family and community over work, without taking a pay cut. One of the essential parts of farming efficiently at that scale is fast, efficient bed flips, and here the author tells us how he accomplishes that on his own farm.
 This article is an excerpt from Ben Hartman’s new book, The Lean Micro Farm. Subscribers always get 20% off all books at growingformarket.com.
On tiny farms, market gardeners might flip—or transition—beds from one crop to another several times per season to make the most of every square foot. With these rotations, you effectively double or triple your production area by planting the same beds two or three times each year. That is, a 1/3-acre plot literally becomes equal to a 2/3- or 1-acre farm growing one crop per year. This justifies applying a large amount of compost to keep fertility levels high for multicropped beds.
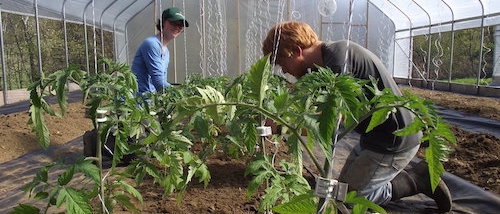
The key is to flip the beds quickly and efficiently. At Clay Bottom Farm, we flip more than 100 beds each season—easily our most burdensome task, an opportune place to lean up.
Here is the bed-flipping process we devised when we moved to our new farm. First, we cover old crops (usually without cutting) with a tarp and let the greens decay in the sun (step 1); within a few weeks, the crops will turn to mush. Next, we remove the tarp and rake any debris into the path, if needed (step 2). The bed is then ready to replant—no broadforking, chisel plowing, rotovating, hoeing, undercutting, or fertilizing required. The method is as uncomplicated as it gets.
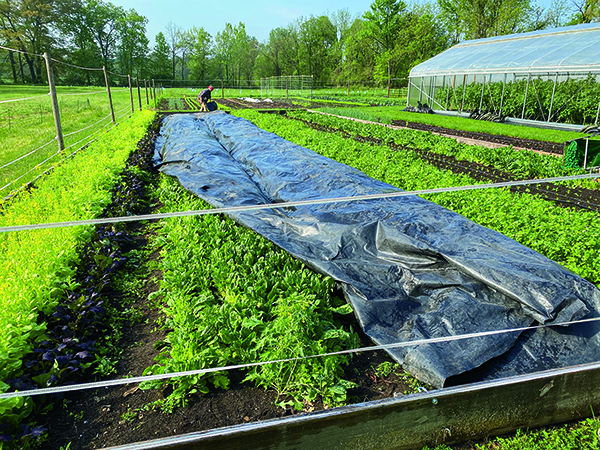
Covering a bed of spinach with a silage tarp. The spinach is not cut beforehand. In 2 weeks, we will be able to pull back the tarp and rake the bed, leaving the roots in the ground. Note that the tarp is big enough to cover two beds at a time.
The rule guiding the process is to leave roots in the ground. Roots left in place provide carbonaceous material for soil microbes to eat. Also, as they decay, roots leave air pockets behind, loosening the soil structure. The decayed plant matter also feeds the soil.
This method extracts the farmer from the growing process—you do just enough, as it were, and then walk away while nature does the rest. We save hours every season with this approach compared to conventional methods like tilling, chisel plowing, broadforking, ripping, or pulling out old crops by hand, while sparing our bodies unnecessary hard work. After sixteen years of growing, I’ve concluded that most methods promoted for bed preparation, like those just mentioned, can be skipped, especially if you are deep mulching. They don’t pass the Pareto test.
As with deep mulching, this method would be impractical in a large operation with acres in production—it would be too cumbersome to manage the tarps. Below I describe two-step bed flipping in detail.
Just smother it: a better way to flip short crops
For spinach, baby greens, head lettuce, and other “short” crops, we pull a 14’ × 75’ silage tarp over top of the beds when we are done harvesting them. This size of tarp covers two beds at a time plus the paths on either side. If we need to cover just one bed, we’ll fold the tarp in half. I recommend cutting tarps to narrow widths like this to make it easier for one person to handle them. Remember Schumacher’s advice: Design with humans in mind. Make your farming comfortable to do.
Cut tarps about 18” wider than the bed/path width you plan to cover, as the crops underneath will push the tarp up slightly. Silage tarps for market gardening are available many places online. We buy ours at a local farm supply in order to save shipping costs, which can be substantial due to the weight of the tarps.
Next, we pin down the tarps with sandbags, which we fill with driveway gravel for optimum drainage. One sandbag spaced every two paces—about 6’—keeps the tarps pinned down in the wind. If you are in an extra-windy area, choose a closer spacing. If we are using more than one tarp side by side, we make sure to overlap the edges by at least 12”.
Tip #1: Align the edge of your tarp precisely with the edge of the plot. If the tarp is misplaced even by a few inches, you’ve given weeds room to grow. They will take full advantage of the opportunity.
Tip #2: Stretch the tarps a bit as you lay them so that they are as tight to the ground as possible. The tarps kill the crops through light deprivation—occultation—and by trapping heat. The tighter your tarps, the darker and hotter it is underneath them.
Tip #3: If you’ve laid down drip tapes to irrigate, leave them in place under the tarps. They are easy to remove, if needed, after the crop has died.
Tip #4: Farm like a tree and work ahead. Tarp beds at least two weeks ahead of when you need to plant. Don’t wait until the last minute. On our farm, at least two beds are usually covered by tarps at all times in preparation for planting.
There’s no reason to mow, cut, or shred crops before covering them, unless you want to trim them down so that the tarp lays flatter. For example, we will sometimes trim cilantro and basil plants if they are knee-high or taller. We leave these trimmings on the bed surface, under the tarp, to decompose in place. In most cases, however, it’s better to save your time. Worms and microbes will sufficiently shred and chew up uncut greens.
After the greens have “melted” (died) under a tarp, we pull it off and rake the decomposed matter into a path, clearing the bed just enough to plant or transplant into it. If transplanting by hand, we will sometimes leave the residues on the surface as a kind of mulch instead of raking them off. However, raking is usually preferred.
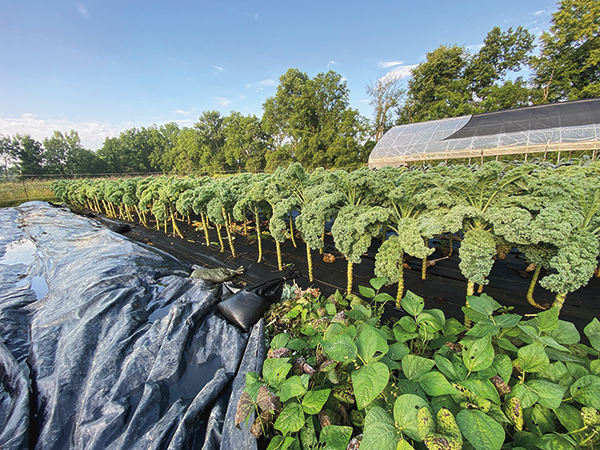
This bed of green beans was covered with a tarp and then raked a few weeks later, clearing room for the next planting while leaving roots in the ground. The bed will not be tilled before planting, though we might loosen it with sweeps or forks, if needed.
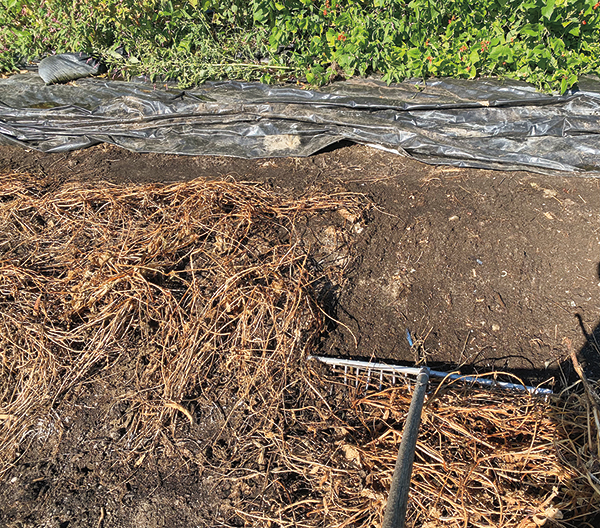
Occasionally, this mess of decomposed matter is too bulky to fit neatly in a path. In this case, we rake it into a pile at the end of a bed, creating a small compost heap that we will spread across the bed in a month or two, once the greens have more fully broken down. Alternatively, we might rake these spent greens underneath another nearby tarp—out of sight, out of mind—or add them to a compost pile near the plot. The point is to keep old plants as close to where they grew as possible, to let them enrich the soil and save yourself a backache.
There are rare occasions when we tarp a crop even before it has finished maturing. For example, in 2021, a bed of lettuce was overtaken by fast-growing Peruvian daisies that we had mistakenly let go to seed in 2020. We decided that instead of fighting the weeds, we would cover the bed with a tarp, let the daisies and lettuce melt, and start over in a few weeks with another crop.
How we store silage tarps
When a tarp is ready to be removed from a bed, we pull it onto another bed of harvested greens. If no beds are ready for a tarp, we store it in the field, flat and open, on top of another tarp. This avoids the need to fold the tarps and move them out of the field.
Doesn’t tarping kill microbes?
Short answer: Yes, many (but not all) microbes will die under a tarp, especially in midsummer, but they repopulate quickly.
According to researchers at Texas A&M University, the optimum temperature range for most soil microbes to thrive is between 60 and 85°F (16–29°C). Many fungi, bacteria, and other microbes will die when temperatures reach 145°F (63°C). However, some thermophilic (“heat-loving”) microbes thrive in soils that reach 150°F (66°C). In the heat of summer, adding a tarp can warm soils above 130°F (54°C), even in the north, thus tarps do slow down microbial life. However, bacteria and protozoa can repopulate within hours and nematodes within 30 days. The effect of tarps on soil microbes is an area of emerging research, but so far scientists agree that to speed microbial rebound, you should keep the soil full of carbon (another reason to leave plant matter and roots behind) and moist but not saturated.
Why do we irrigate under tarps?
If beds are dry, we moisten them with drip tape irrigation or with overhead sprinklers before placing tarps over them. If we plan to tarp for a long time, we will place at least two runs of drip tape across each bed, under the tarp, and irrigate the bed for the entire time a tarp is in place. We use timers on our hydrants to regulate soil moisture. We test how much to irrigate using a finger—at 2” deep, the soil should feel moist but not sticky.
We irrigate under tarps for two reasons: First, as stated above, microbes will rebound faster if the soil is moist. Second, compost is hydrophobic—that is, it is difficult to resaturate after it dries out. Keeping the deep compost moist prevents this problem.
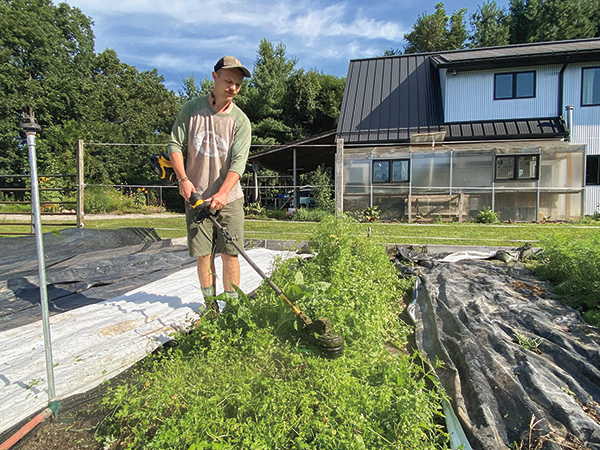
On occasion, we will trim down gangly crops before covering them, to help the tarp lay flatter. Here we are cutting cilantro with a weed eater before covering with a tarp. A scythe also works well for this job. Note that adjacent beds are temporarily covered to protect them from bits of cilantro.
How long does it take for a tarp to terminate a crop?
Decomposition time depends on the size of the plants and the weather. In mid-July, small leafy greens like arugula, covered with a tarp, will turn to mush in a few days. On the other hand, full-size Tokyo Bekana cabbage, covered in the fall, might not fully die until spring. We’ve found that from May through September—the season during which we flip beds most often—two weeks is usually sufficient for most crops to decay.
What if I don’t have time to wait?
If you have seedlings ready for immediate transplanting or if you are in a hurry to direct seed, the best approach is to remove the old crop by hand. First, we loosen roots by slicing beneath the soil surface with fixed-blade sweeps, which we buy from Hoss, attached to a wheel hoe. This is a good job for two people—one person pulling and the other guiding the tool. To help the tool dig in, we might add a sandbag or two to the middle of the wheel hoe. Alternatively, the new E-Ox electric wheel hoe from Tilmor can also be used, with the Hoss sweeps, allowing one person to complete the task. We then rake the greens into a pile, using adjustable spring tine rakes, and we carry them off with pitch forks to the compost pile.
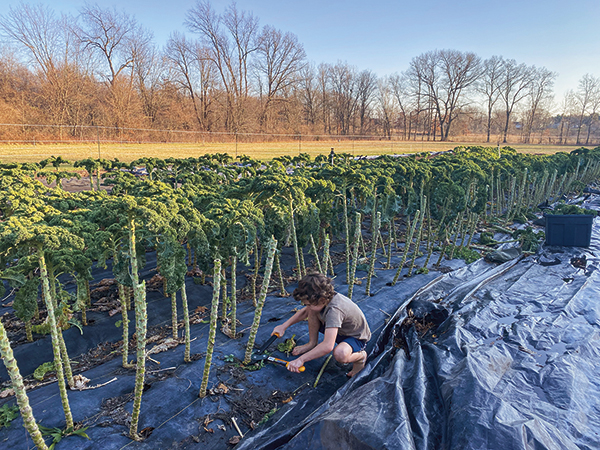
Cutting full-size kale with a pruning lopper. Later, we will remove the landscape fabric and plant around the old roots that were left in the ground.
How to prepare beds for winter
Just as trees cover the ground under their canopies with leaves each fall, it is a good idea to cover your growing beds with an inch of compost (or slightly broken-down leaves) before winter. This mulch will act like a sponge, reducing the problem of soil erosion.
If beds have greens on them going into winter, we leave the greens in the field—their roots help to “hold” the ground to prevent erosion, and freezing temperatures will kill the tops, which will be ready to rake away in the spring. In our experience, deep-mulch growing beds don’t need to be covered with tarps or with cover crops in the winter, though these practices don’t hurt. On our farm, as stated, there is not enough time to establish cover crops, because the farm is almost always filled with cash crops.
Do roots in the ground disrupt seeding/transplanting?
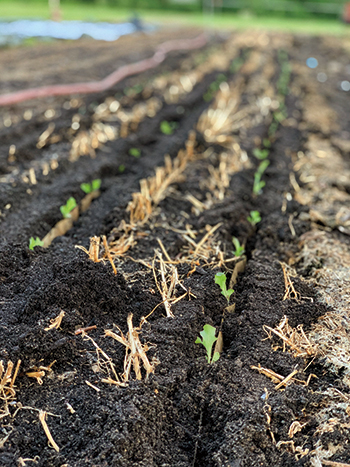
When we seed or transplant on a no-till bed, we stagger rows to avoid hitting the stubs and roots from the previous crop. For example, let’s say a bed contained three rows of basil. Following such a bed, we would seed five rows of spinach, with the old basil roots in between rows. Old roots left behind, in our experience, have never negatively impacted the growth of new crops. Also, in our experience, the Jang seeder and the paperpot transplanter push their way through old roots as long we stagger the rows as described.
Is it OK to step on beds?
A bit of treading on beds is just fine. There are many times when stepping on a bed saves effort, such as when harvesting greens or when scurrying across a plot sideways. Soils with plenty of compost can support more weight than other types of soil.
That said, it’s best to stick to paths when practical in order to preserve the soil’s structure and porosity. And it’s never a good practice to step on beds when they are very wet because wet-compaction can take a long time and considerable effort to repair.
Why we stopped rotating crops
We do not intentionally rotate crops on our farm. We’ve grown long-season kale in the same location for three seasons in a row, and we frequently follow lettuce with lettuce, tomatoes with tomatoes, and so on. As long as we apply a gentle approach to soil management—not tilling and applying compost to the surface every few seasons—we have not seen adverse effects from this practice. In fact, we wonder if microorganisms might develop multiseason symbiotic relationships with plant roots from the same species. In any case, on a tiny farm, we save a lot of planning time and simplify our work by not concerning ourselves with crop rotation.
Do I need to loosen the soil between crops?
We have found that there is rarely a need to loosen soils between crops. The compost, the fungi, and the roots left behind by old crops keep soil sufficiently loose for most crops. There are a few occasions, however, when we will loosen soils with tools—for example, to prepare beds for fall carrots, which can grow 12” in length. These carrots penetrate below the layer of deep mulch, and we have seen longer carrots in loosened soil. In spring, if the ground was compacted by snow, we might use our electric wheel hoe to skim under the surface, lifting it slightly. Mostly, however, we take a less-is-more approach to soil loosening and simply plant right after raking.
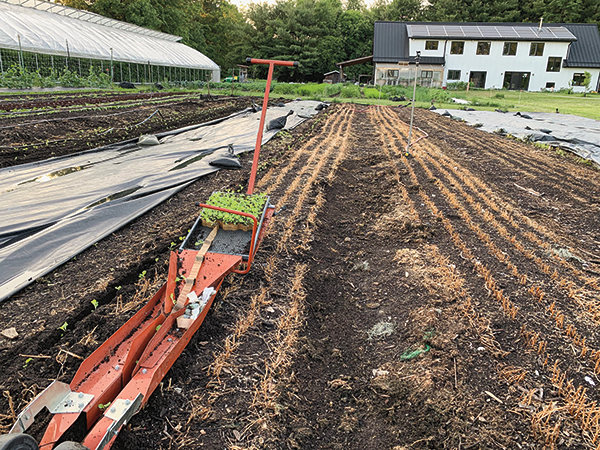
Here we are transplanting lettuce into a bed where basil grew previously. Note the stubble from the basil. In our experience, old roots left in the ground do not negatively affect growth of a new crop.
Our driving motivation in essentializing fieldwork is to cut out the superfluous steps to free up our time. When preparing beds, you really only need to terminate the old crop (by tarping or cutting it at the base) and then rake. Through deep mulching and two-step bed flipping—two streamlined micro farm methods—we shave hours per week compared to before, work less hard, and enjoy life more on and off the farm.
Ben Hartman and Rachel Hershberger own Clay Bottom Farm in Goshen, Indiana. Ben is the author of The Lean Farm, The Lean Farm Guide to Growing Vegetables, and The Lean Micro Farm, all are available from Growing for Market. Subscribers always get 20% off all books at growingformarket.com.