When I purchased a penetrometer two years ago, I had no idea the impact it would have on our farm. Initially, I wanted to confirm that our dedication to soil health had measurable results. What I didn’t realize, was how it would transform our approach to bed preparation, saving us unnecessary labor and decreasing our level of soil disturbance.
A penetrometer, also known as a soil compaction tester, measures soil compaction in pounds per square inch (psi). The penetrometer is a handheld, metal probe with a psi gauge at the top. As the probe is slowly pushed into the soil, it simulates root growth. As compaction in the soil increases, subsequent root growth decreases.
Penetrometer is a mouthful to say (we named ours Penny). It will set you back about $200. It has been a game changer on our farm and easily paid for itself in one season.
Plant roots: small but mighty
Plant roots are a lot tougher than we give them credit for. They may be small, but they have an ability to push through soil at a density of up to 300 pounds per square inch. Before Penny arrived on our farm, I used to poke my finger into the soil as a simple way to assess soil compaction.
 The penetrometer simulates root growth. Root growth decreases linearly with increasing penetration resistance, until practically stopping above 300 psi. Remember, however, that roots may still penetrate soil with a penetration resistance greater than 300 psi if natural cracks and pores are present. Caption and graph by Penn State Extension.
I chuckle at this now, as I know my finger has very little in common with the fine and crafty ways of a plant root. For example, when I insert my finger into a soil with a psi of 150, it is a challenge for me to push it through the soil. For crops’ roots, however, they can work through this level of resistance with ease.
Measuring field compaction
The penetrometer comes with two tip options, a larger one for soft soils and a smaller one for hard soils. The pressure gauge indicates resistance in psi. There are two measurement options on the gauge, so make sure to use the correct scale for the tip you are using. I recommend tightening the tip after each soil insertion.
I wish our penetrometer had a few extra threads on the probe to ensure the tip tightened securely. Losing a tip 18 inches into the soil is nearly impossible to recover and will cost you $20 plus shipping to replace — a lesson I learned the hard way.
The ideal time to measure soil compaction is when moisture levels are at field capacity, about 24 hours after a saturating rain or irrigation cycle. If the soil is too wet, your compaction reading will be underestimated. Alternatively, if your soil is too dry, compaction will be overestimated, as roots will be able to penetrate through the soil when moisture is returned.
Penetrometer readings give a fairly accurate picture of soil compaction, regardless of your soil’s texture. However, the penetrometer cannot interpret pores and crevices created by environmental elements such as earthworms, wetting and drying, freezing and thawing, and so on. Plant roots will grow through these spaces even when penetrometer readings are greater than 300 psi.
Practical tips to work soil less
Insert the penetrometer into the soil slowly, about one inch per second. Most publications recommend finding the top and bottom of your compaction zones. This is achieved by inserting the penetrometer into the soil until it reaches 300 psi. Note the depth. This is considered the top of the compaction zone.
Keep pushing the penetrometer into the soil and record where the penetration falls below 300 psi. This is the bottom of your compaction zone. If you hit 300 psi at 12 inches and as you continued to press, the gauge drops below 300 psi at 15 inches, this indicates that you have a compaction zone in your soil ranging from 12 inches to 15 inches deep.
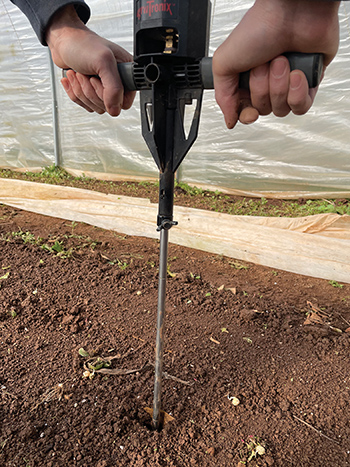 Step 1 (above): Insert the penetrometer into the soil slowly and push until gauge reaches 150-200 psi. Step 2 : Use one hand to mark the probe when the gauge hits 150-200 psi.
While it’s important to note where severe compaction levels exist on your farm, for me, I am more interested in knowing the depth at which root growth is compromised. Plant roots grow well in soil with compaction levels of 150 psi or less (see graph).
Having an accurate compaction reading takes the guesswork out of the amount of bed preparation needed for our crops to be successful. Before the penetrometer, I was grossly overestimating the amount of tillage needed for transplanting or seeding. We were broadforking and hoeing each and every bed because that was how I was taught.
With the penetrometer, however, we can accurately gauge how deep into the soil our crop roots can reach. We assess each bed accordingly, and as a result, the amount of labor and soil disturbance needed to get seeds and transplants into the ground is significantly reduced.
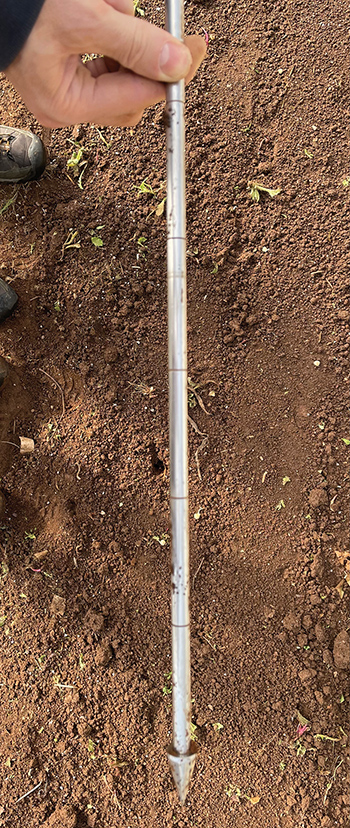 Step 3: Pull out the probe and use the 3” increments along the probe to measure the depth recorded. All photos courtesy of the author.
Why bring out the broadfork that has only 12 inch long tines, when your compaction zone at 150 psi starts at 16 inches or even 18 inches? It’s also worth noting that most tillage equipment (tiller, disc, chisel plow) only reach about 12 inches deep (NRCS, Tillage equipment Pocket Identification Guide, 2017).
I think it’s safe to say, we are working the soil harder than is necessary. Our crops don’t need loose soil up to our elbows to grow well.
First field trial
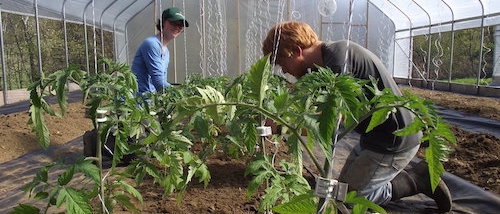
The first spring I had Penny, I wanted to see for myself if our crops would actually grow in soil that felt compacted. I allocated two beds that reached a compaction level of 150 psi at a 12 inches depth. The soil felt unbelievably hard.
We literally chiseled kale plants into the soil with Hori Hori knives. It was frustrating, slow going, and I didn’t have much hope for those poor plants. However, after a slow start, the kale not only grew, but thrived throughout the season. I share this anecdote because I feel it’s important to note that just because a plant root can grow in hard and compacted soil, doesn’t mean that chiseling your crops in the ground is the way to go.
Like all things farming, growers need to find the balance that works best for their farm. The penetrometer will tell you whether or not a plant’s roots are capable of growing in the current soil condition. However, it’s up to the grower to assess whether or not those conditions are conducive for efficient transplanting or seeding.
Bed prep assessment
We assess each of our beds with the penetrometer before seeding or transplanting. We take three to five measurements throughout a 100-foot bed, in the center as well as on the edges. Our crop plan is flexible, so that when a bed shows only 12 inches of soil depth before hitting 150 to 200 psi, we plant shallow rooted crops such as spinach, arugula, mustards, and lettuces.
Crops such as broccoli, cabbage and kale need a deeper rooting zone, so I try to make sure those beds have 16 inches to 18 inches before hitting 150 psi. For the deepest rooting crops, such as tomatoes, peppers and squash, I want at least 18 inches before Penny hits 150 psi. It’s not an exact science, but it has worked well for us and has saved us infinite hours of labor prepping beds.
In general, our farm’s soil reaches a compaction level of 150 psi at a depth of 12 to 24 inches. After taking a measurement with the penetrometer, I sink a Hori Hori into the ground in several spots to mimic transplanting. If the soil is workable, I prep the beds with a little bit of compost and a quick pass of the rake.
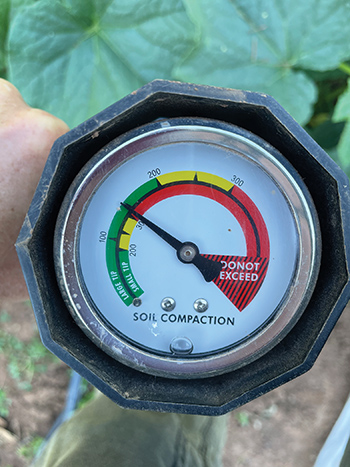 The penetrometer gauge is easy to read and has scales for both the small and large tip.
If the soil feels too hard to transplant or seed into, I first ensure the soil has ample moisture before taking any further action. Pre-moistening beds before transplanting is key when trying to minimize soil disturbance. For example, I recently (this February) sunk Penny into one of our greenhouse beds and the psi gauge read that I had 12 inches to 15 inches before hitting 200 psi.
That is plenty of depth for the peas and lettuces I was planting. However, as I began to make a furrow for the pea seed, the soil was not cooperating. Instinctively, I grabbed the broadfork, but after a few short minutes, I stopped. We broadforked these beds last year. What the heck!?
It dawned on me that our greenhouses had not received any irrigation in months. The cold and cloudy days of the Pacific Northwest aren’t cause for much evapotranspiration in the winter months. I irrigated the bed and waited a few hours for the soil to drain. When I returned, the soil was soft and crumbly. I was able to run the furrower down the bed with ease.
Correcting compaction without deep tillage
Pre-moistening beds may be a simple solution once greater compaction issues have been resolved. What if compaction is more than just an irrigation issue? Compaction is commonplace on most farms and is caused by repeated tillage, heavy equipment, rain, and working the soil when it’s too wet. When the soil is compacted, crop vigor and yield are compromised.
Aggregates, soil particles glued together by bacteria and fungi, play a critical role in minimizing soil compaction and are sensitive to tillage. Decreasing soil disturbance, while simultaneously supporting the soil’s biology with high quality compost or cover crops, are important measures in correcting soil compaction.
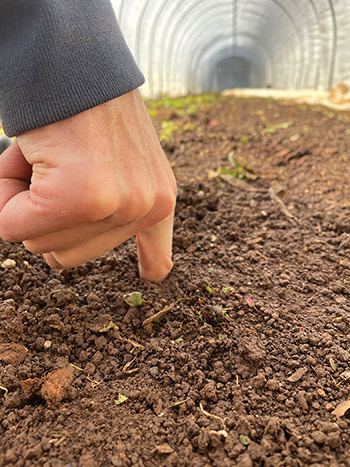 The compaction reading for this soil was 150 psi at 15”, and yet a finger cannot even push all the way into the soil. The penetrometer simulates root growth much more accurately.
The ability to seed and transplant into beds with little to no soil disturbance has taken a few years for us to accomplish. Our first year of minimizing tillage, we found the need to broadfork and hoe compacted soil in order to get transplants into the ground. We laid compost onto the surface of the soil before broadforking so we could feed and encourage the soil’s biology at the compaction zone.
Year two of our no-till system, we eliminated the hoe in most of the beds and switched to the hula (stirrup) hoe. This tool broke up soil compaction in the top few inches of soil and minimized damage to aggregates. Year three, our goal was to use only a rake for bed preparation and we were successful in that strategy.
Reducing tillage has been an integral part of improving the soil biology on our farm. Fewer weeds, pests, diseases and less labor are just some of the benefits we’ve experienced in just a few short years. I can’t give Penny all of the credit, but having a tool that gives us the confidence to seed and plant into beds without excessive soil disturbance has been an absolute game changer.
Jen Aron has been a farmer and educator for the past 12 years and currently lives and farms at Blue Raven Farm in Corbett, Oregon. Jen is passionate about soil health and offers classes, consulting, and full-day workshops. You can find her at blueravenfarm.org and on Instagram @blue_raven_farm.