There is much ado of late about winter farming, with abundant information on intensive spacings, fertilization regimens, season extension structures, disease prevention, and creative marketing schemes, making it seem easy to start a winter farm by simply emulating the experts. That said I’ve found a surprising dearth of details about the actual costs of starting such a farm, so I thought I’d share our winter farm’s story of expenses in its first year of operation.
My partner Katherine Creswell wrote the first article in this series in the February 2017 Growing for Market about starting a farm with only one implement. We arrived on the raw land that would become our farm in May 2016 with the goal of selling unheated high tunnel crops beginning in November 2016 and continuing through the winter. The idea was to open new ground, bring power and water to the site, build two high tunnels, create a website, and purchase seeds and supplies, all with money we had saved working salaried farm jobs for the last few years. This would be a cash flow farm; by the time the start-up capital ran low, we would have significant farm income to fuel the next round of expansion.
Through simple living, the two of us had saved $80,000 together between 2013 and 2016, while managing two separate farms for other people. Thus our startup capital was—you guessed it—$80,000, which would cover all farm startup costs and all our living expenses until October 2016, at which point one of us would find a job for six months through the winter—the last non-farm income either of us would ever have. One major benefit was that the land was in my family, freeing us from a lease or mortgage that might otherwise have cramped our budget. The downside was that while cleared of trees, it was raw land: no fences, no history of inputs to build the soil, no outbuildings, and—rather significantly—no electricity or running water.
Power and water
Upon arrival in May, the first item of business was therefore utilities. After multiple quotes from drilling companies, we had a 38-foot well dug immediately adjacent to the planned site of our propagation tunnel. The total cost was $13,000, which included a 1 hp 20 gpm pump, control box, and associated pipes and wiring ($2,978), pressure tank set below the frost line in the well ($790), two frost-free hydrants separated by 20 feet ($190: one inside our propagation house for indoor irrigation and one outside for everything else), the actual drilling ($2,500), the well casing ($586), the surface seal ($2,500) and the tax, permits, and labor ($3,456). Each driller to whom we talked had a minimum drilling charge equivalent to a 96 foot well, so the cost of our well would not have changed dramatically until we hit that depth. We hit abundant water and pressure at 15 feet, and saw no reason to drill further than the state minimum requirement of 38 feet.
For electricity, we had the power company install a transformer on an existing pole, and the transformer’s $2,800 price tag was dropped to $200 because we were a commercial operation with a large predicted electricity load. The power company figured they would make up the cost of the transformer by selling us electricity over the coming decades. We then hired an electrician to bring 200-amp service 300 feet from the transformer to our propagation house, which would also serve as the centralized hub of our farm.
This long run took very thick aluminum wire, buried 18” underground in conduit at a price of $4.56 per foot, for wire and conduit combined. With a small fee from the power company ($200), the electrician’s materials ($2,834) and labor ($1,555) we had two 20-amp circuits on a 200-amp panel, for a total cost of $4,589. It should be noted too that we rented a mini excavator for $200 to dig the 300-foot trench for the wire. It was late May 2016, and even though our winter-farm-to-be lacked seeds, supplies, high tunnels, soil amendments, and even plowed ground, we had already spent almost one-quarter of our budget.
Soil prep and amendments
The next step was to prepare the soil for intensive growing that fall. We bought a BCS 739 walk-behind tractor ($3,290) with an 11hp motor, and a rotary plow ($1,408) as our only attachment (see the February 2017 GFM article for more information about our choice of soil working tools).
We purchased soil amendments per our soil tests. They included 50 yards of food-waste compost ($1,307 delivered), limestone ($168), soybean meal ($748), kelp meal ($93), blood meal ($72), sul-po-mag ($175), and peat moss ($1,134) for a total soil amendment cost of $3,697, or $.50 per cultivated square foot. This may seem extremely high (it is!) but our philosophy is to get a high quality saleable crop from every seed we plant, and we think no expense should be spared when it comes to soil preparations.
High tunnels and propagation
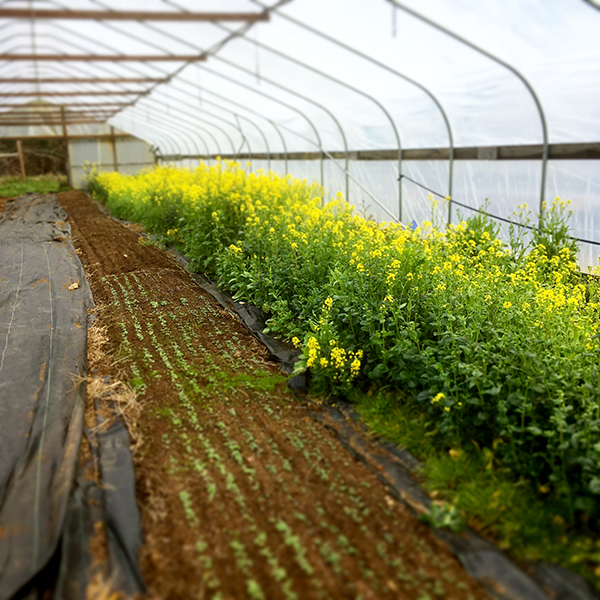
With soil prep well under way, we began constructing our high tunnels. The first was a 34’x144’ gothic tunnel, with single poly covering, polycarbonate end walls with steel framing, and six-foot bow spacing. Each bow is trussed, and the kit included four wind braces, five-foot ground posts, and thermostatically controlled roll-up sidewalls. The two low-voltage motors ($250 each) and the controller ($770) needed to automate our sidewalls were certainly a luxurious expenditure for first-year farmers. We had both used them at our previous jobs, though, and we could not bring ourselves back to the Stone-Age idea of manually venting our tunnels. As comfort, we’ve been told by multiple sources that this automation will pay for itself in about a year with saved labor and more precise temperature control. All told, the tunnel set us back $14,500 ($2.96 per square foot), which included not only the structure and ventilation but also a drainage trench and buried blue board insulation around both sidewalls. The labor bill for the tunnel was exactly $0, as all of the labor was our own, save for some help from family and friends raising the bows and pulling the plastic.
We purchased this tunnel from Nolt’s Midwest Produce Supplies, and given our contentment with the company, a quick review seems pertinent. Nolt’s is a great purveyor of market farming equipment, with a wide selection of high quality field-tested supplies, a vast base of knowledge with which to answer questions over the phone, and prices lower than any others we’ve found. The company does have two flaws. First, it can take many tries to reach them over the phone to place an order. I spent over an hour hitting redial before I reached them to buy our tunnels, all the while thinking there must be something better I could be doing with my time. The second flaw was that the interval between placing the order and actually receiving our tunnels was over five weeks, so if you have a small window during which to build a tunnel, it is best to order early.
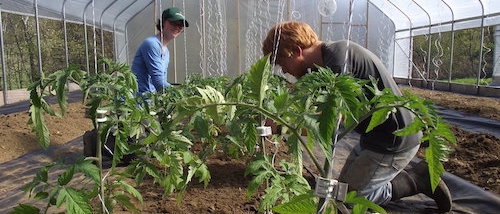
Back to the farm! After visiting Eliot Coleman’s farm, we decided to copy his idea of housing propagation space, the walk-in cooler, and wash/pack in a single high tunnel that was also used for in-ground growing. Coleman claims that a high tunnel is one of the cheapest structures per square foot that one can build, and to use it as a control center for all of the farm’s goings on made sense to us. Accordingly, we set aside about 1000 square feet of our 34’x144’ tunnel as our propagation space. We covered the floor with landscape fabric beneath six inches (20 yards) of ¾”minus shale, which together cost $567. We hung a 175,000 Btu Reznor propane heater, which cost $2,480 for the unit and freight, and an additional $42 for a rented 120 gallon propane tank, $163 for 100 gallons of propane, $200 for heater hookup and inspection, and $130 for wiring the heater and thermostat to the electrical panel, bringing the total to $3,015.
Our seedling benches were made per plans from Brian Bates of Bear Creek Organic Farm, who used cinder blocks, framing lumber, and landscape fabric to build simple, low cost, high utility benches. Our 360 square feet of bench space cost $363. Bates got his bench costs down to $.55 per square foot, due either to local differences in material prices or his significantly larger surface area of benches.
We decided to keep our wash/pack setup very simple in the first year, so that as we expand we can customize the washroom setup to our exact needs. We use three Tubtrugs ($17.45 each) filled with water to triple wash our greens, and a salad spinner ($249) to spin them dry. A digital scale ($164) weighs our produce as it is bagged out of the spinner. Our only non-leafy crop this winter was carrots, which we clean in bulb crates ($2 each, used, from a tulip farm) with a garden hose ($1.12 per foot) and pistol-grip sprayer ($5).Five more Tubtrugs and 8 more bulb crates serve as our harvest containers, and a few serrated Victorinox knives ($8.15 each) were all we needed for winter harvest tools.
Another 120 square feet of our propagation house was filled with a 10’x12’ walk-in cooler, constructed of framing lumber, blue board insulation, painted OSB sheathing, a CoolBot and an 18,000 Btu window air conditioner. Ron Khosla, the inventor of the CoolBot, has an excellent discussion of DIY walk-in cooler design on his website (storeitcold.com) and in the Nov/Dec 2009 issue of GFM. An electrician wired the air conditioner ($600) to our electrical panel for $200, the rest of the labor was our own, and materials cost $2700, for a total cost of $3500, or $29.17 per square foot. It should be noted that this cooler was completed in the spring of 2017 with money from the previous winters’ produce sales, and was therefore not included in our original $80,000 budget.
Our second tunnel is an 18’x96’ structure, also purchased from Nolt’s Midwest Produce Supply but manufactured by CropKing. We had planned to build a second large tunnel with help from NRCS funding, but we learned that we weren’t yet eligible for the grant because we had no land in production, so we down-sized to the 18’x96’, which we could afford without external funding. It has a single layer polyfilm covering, polyfilm endwalls with 2x4 framing, four-foot bow spacing, a wind brace kit, and no trusses. We purchased 3’ ground posts and motors and a controller to provide thermostatically controlled roll-up sidewalls. The total cost of the structure was $5,850 or $3.44 per square foot, and as above, all the labor was our own.
Two quick notes about high tunnel construction: First, our larger tunnel, with more structural elements, higher quality end walls, and more sidewall height came in at a lower cost per square foot than the smaller, lower tech tunnel. This is a great reason to build big tunnels. Second, both tunnels together took about 6 weeks to complete, much of which was spent hand-digging the 100 holes we needed for our ground posts. The structures themselves came together very quickly and with basic tools we already had. I had prior experience with high tunnel construction, but still maintain that their design and completion is remarkably straightforward.

Seeds and supplies
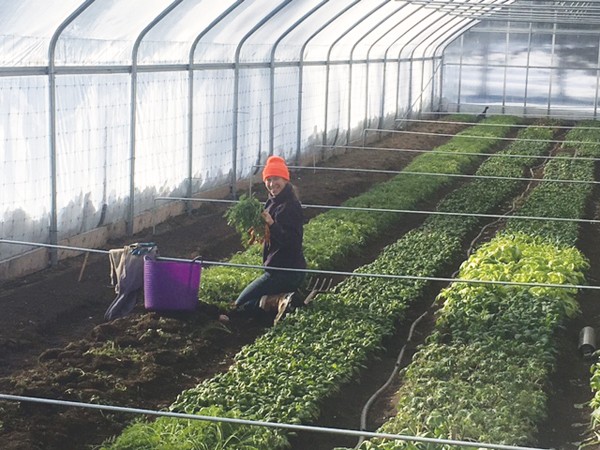
In 2016 we had 7,300 square feet of cultivated space, 1,700 of which is outdoors and the remainder is under high tunnel protection. We planted the usual winter suspects, including lettuce, carrots, spinach, kale, chard, arugula, mustards, bok choi, and cilantro. Our total seed costs for August through February plantings (October through April harvests) was $750, or $.10 per square foot.
With a few exceptions, our yet unmentioned supplies need little discussion. The table below illustrates these expenses. The two categories that seem worth explaining are irrigation and our inner cover used to protect high tunnel crops from cold in deep winter. For irrigation we ran 2” vinyl lay-flat hose ($0.33 per foot) from our hydrant to our two plots. From the corner of each plot, we used more lay-flat, running perpendicular to our beds, which would serve as header hose. From there, parallel to our beds, we ran two lines of upright micro-sprinklers per plot, spaced five feet apart in-row and 10 feet apart between lines. (See Katherine Creswell’s Feb 2017 GFM article for more information on our irrigation system.) This created a simple, cost effective, three-season irrigation system. We took down the sprinklers and blew out the lines with the onset of freezing temperatures in the late fall.
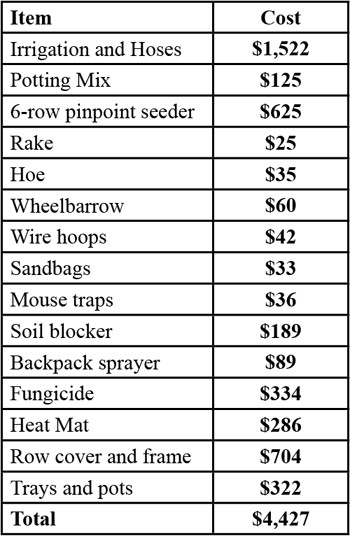
The other item that needs discussing is our inner cover for mid-winter high tunnel crop protection. We used Typar T-518, which offers more frost protection and more light transmission than Agribon-30. Additionally it is extremely resistant to tears, which is a major benefit when dealing with frozen row cover in the winter. Nolt’s Produce Supply sells it in custom dimensions, so we purchased two large sheets, each of which completely covers one of our tunnels. The 40’x130’ sheet for our larger tunnel cost $312, which is $.06 per square foot, or more than twice the cost of Agribon-30 ($.026 per square foot). We are confident it will last more than twice as long as Ag-30, making it a worthwhile expense. We built a frame out of ½” EMT that sits 18” over our beds to support the row cover. This makes for quick covering and uncovering of each entire house, and traps more heat (due to favorable surface area to volume ratios) than covering each individual bed. Frames for both tunnels together cost $160. The rest of our miscellaneous expenses are detailed in the table below.
Marketing
We decided to keep our marketing costs to a minimum in our first year, operating under the assumption that fresh local produce in the winter would sell itself. Using the following basic marketing strategies, we were able to sell everything we could grow. First and most prominent on the list was a website, through which we pre-sell our produce directly to customers, who then pick up their orders weekly at a central location in town. The website is hosted through Squarespace, and we paid $375 for the design and hosting. Second was 100 tri-fold brochures ($131), 500 business cards ($12), and thirty 8.5”x11” posters ($31) to hang around town. Coupled with a late fall guest appearance at the local farmer’s market, these were enough to build a customer email list of just over 100 people—more than enough for the current size of our farm. Though it is beyond the scope of this article, we cannot downplay the marketing advantage we gained from launching our farm in the winter when no other local farms were selling fresh vegetables.
The future
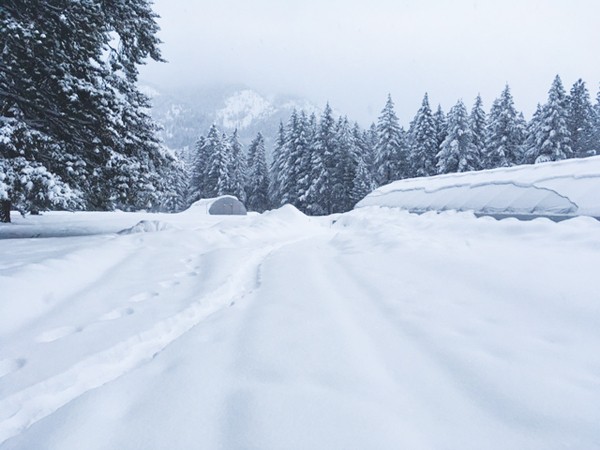
We learned a lot during our first winter of growing in Idaho, and even though we had high startup costs per square foot of cultivated space, we think there are a few additional necessities for effectively running a winter farm. In fact, there are three major items in our budget to prepare us for next winter. The first, after nine feet of snow last winter, is a snow blower. Snow shedding off the tunnels quickly piles up along the sidewalls, and though we now know it is physically possible to shovel all that snow, it is not enjoyable. We plan to buy a Berta 2-stage snow blowing attachment ($1,700) for our BCS next winter.
The second upgrade will be a larger heater for our bigger tunnel. We sized our current heater for propagation use only, but found quickly that multiple cloudy, well-below-freezing days in a row will leave all crops temporarily un-harvestable. A larger heater, turned on during those cold cloudy spells, will ensure we always have access to our winter produce, and we estimate it will cost between $3,500 and $4,000, including the unit, electrical, propane tank and hookup. Sales of our summer CSA shares will pay for this winter improvement.
The final upgrade is simply more space, both in tunnels and in the field. We have calculated that our field space expansion costs—soil amendments, row cover, irrigation, seeds, and supplies—are $.90/square foot, and we plan to add about 10,000 square feet this summer. We also plan to buy two 14’x100’ caterpillar tunnels from Farmer’s Friend LLC (farmersfriendllc.com, $1,250 each) which we will use as movable tunnels for late fall and early spring production. In addition, we applied last fall for a NRCS high tunnel grant, which we received and will build a 34’x96’ structure this summer.
In all, starting a winter farm is more capital intensive than starting a summer equivalent. Many summer farms exist without high tunnels, for example, but growing in the winter in our climate would be impossible without them. That said, except the inner cover for deep winter growing, everything we purchased to start our winter farm will also be used for summer growing. While it costs more to start a winter farm than a summer farm, then, we also have higher cash flow than our summer-only equivalent and can grow high value summer crops with our winter infrastructure. We think diving straight into 52-week-per-year harvests will allow for faster farm expansion and higher initial incomes than spending less and earning less with a summer-only farm. As noted before, we are running the whole operation on cash flow, and this balance might be skewed if we were carrying debt.
If you are carefully following along, you will have noticed that this article has accounted for significantly less than our initial $80,000. The difference covers our non-farm expenses between May and October 2016, a small cabin that we built and now live in, and trivial farm expenses like a gas can, a box of screws, or a handful of zip ties. All told, we spent $57,000 on the farm between May and October, and an additional $3,500 on capital costs to date, paid for by winter produce and winter off-farm work. I have purposefully excluded seeds, supplies, and soil amendments purchased for 2017 summer growing, so as to focus the discussion on our winter startup costs. Talk is cheap and predictions are hard to make, but we think our current winter farming setup has “profitability” written all over it. Stay tuned for another article detailing the income side of our balance sheet.
After farming in Maine for many years, Katherine Creswell and Spencer Nietmann moved to north Idaho to start Moose Meadow Farm in Clark Fork in 2016. They market their certified organic vegetables year-round via an online marketplace on their website and a free-choice CSA.


 If you’ve been a subscriber to Growing For Market (or even if you haven’t), you’re probably familiar with the many advantages of no-till agriculture. No-till methods can reduce a farm’s carbon footprint, promote complex soil biology, and preserve and build organic matter.

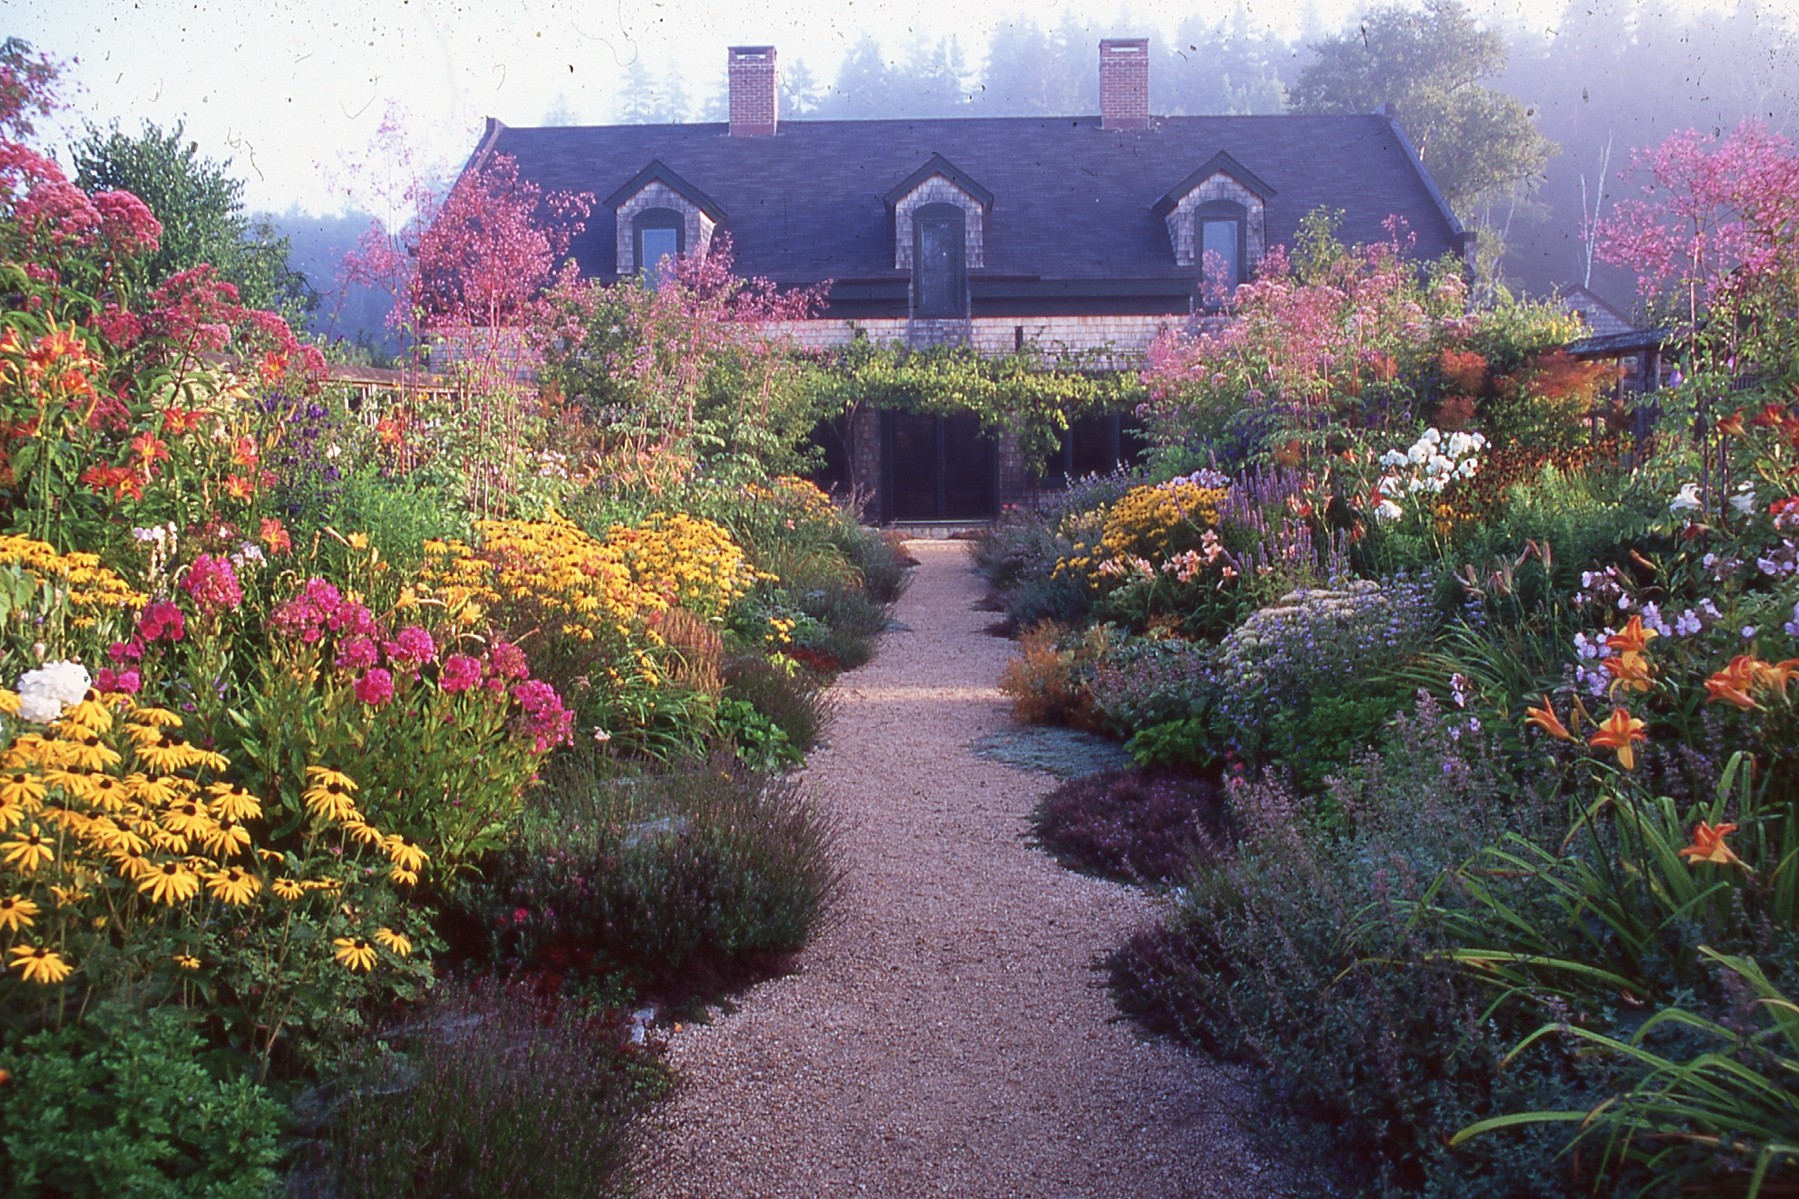 Since its founding in 1968 by my husband Eliot Coleman, Four Season Farm has sought to produce the best vegetables possible, using soil-based organic methods, on a small amount of land. When I showed up in 1991, Eliot had begun to pioneer winter vegetable production, and I was delighted to give up the landscape design business I’d run in Connecticut and grow veggies with him. Then, about 10 years ago, flowers started to creep in.

 It’s not too late for online/preorder seedling sales, farmers market custom bags, and We Give a Share
 Farmer to Farmer Profile
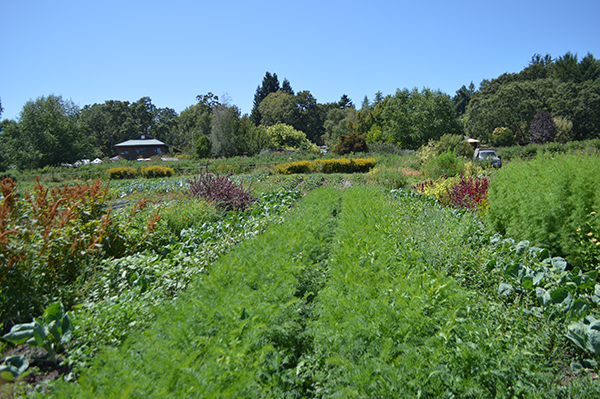
 Why is the flower micro-farm best suited to a laser focus on one or two enterprises versus a balance of several? It is because of the long maturity of flower crops and the specific and conflicting demands of different types of flower enterprises. For example, some of the most common ways for farms to sell their flowers are at a farmers market, wholesale, from a flower stand/truck, a CSA, and weddings/events. These outlets can be compared on their need for similar types and quantities of flowers.


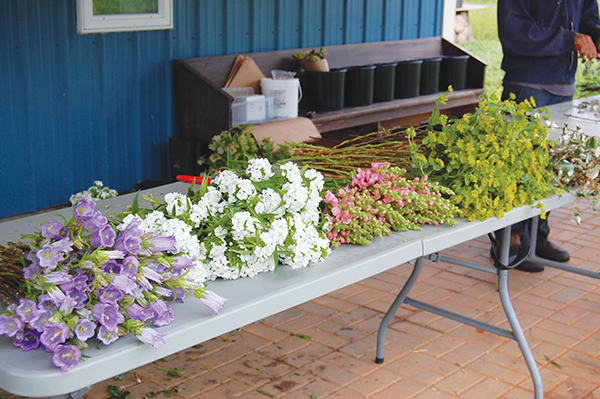
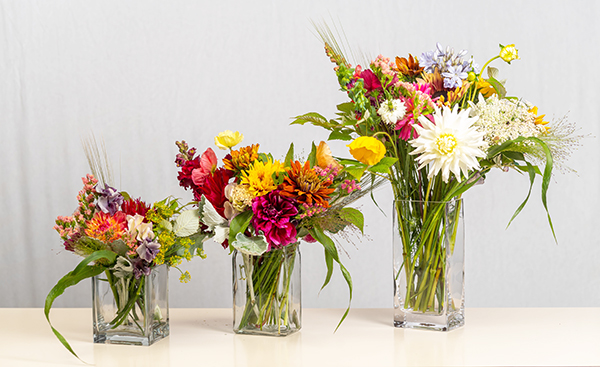 For most established growers, the easiest place to start selling flowers will be mixed bouquets and single stem/small bunch retail sales. These are the flowers you can sell to your existing customers and they are easy to incorporate into farmers market, CSA, and grocery sales. But there are lots of other outlets out there, including florists, weddings and events, business subscriptions, value added products, and wholesalers.
 I made a trek out to Wisconsin in June. I’ve been lucky enough to visit this gorgeous state a few times, and I was glad to return. Wisconsin is the state with the second most organic acres in the country, behind California. It’s been an important crucible for the organic ag movement since the beginning. Out of the 177 of Chris Blanchard’s Farmer to Farmer podcasts, 21 featured Wisconsin-based businesses. From that list I chose two farms to visit and interview for this column.
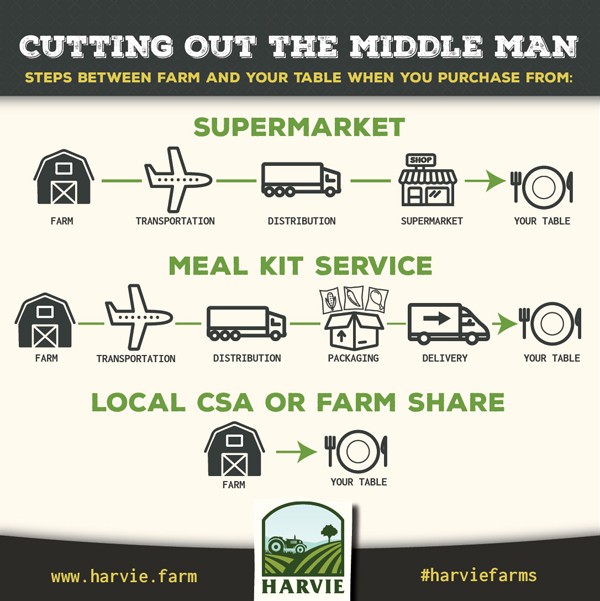 “CSA is dead” is a refrain I have heard from multiple farms in the past few years. I started to hear rumblings of a problem with the CSA model in 2014 through the CSA Farmer Discussion group that I manage on Facebook which brings together over 2,500 CSA farmers from all over the world. Farmers reported that they were having trouble attracting and retaining membership.
.jpg "Brookfield Farm: Farmer to Farmer Profile")
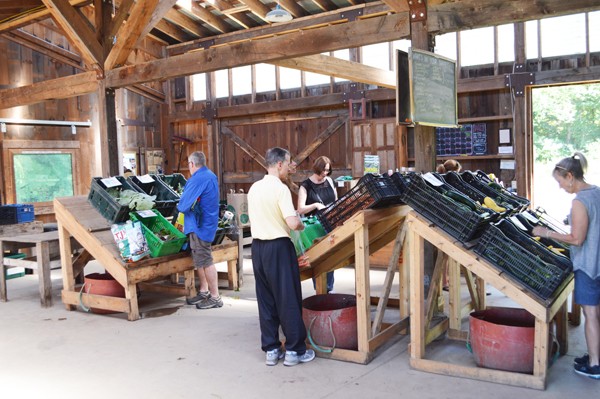 It’s an incredibly cool, clear and dry July day in Massachusetts as I make my way to Brookfield Farm. Dan has arranged for me to visit at 2PM on a Thursday so I can see this bustling CSA farm at distribution time. I arrive just before the appointed hour, and see the last details of the setup being handled by apprentice Ellen. Dan and Karen are bustling around the corner, checking that the room is ready for the deluge of customers to come.
 Getting to High Ground Organics means going through the belly of the beast of California’s agricultural sweet spot – the Central Coast. This is where high value crops are grown right to the property line, right next to towns and suburbs, cheek by jowl. The proximity to the Pacific Ocean mitigates the climate of this region so it’s never that hot and never that cold; they can grow and harvest strawberries from March to October.