The following excerpt, published in the September 2021 Growing for Market Magazine, is from Josh Volk’s new book Build Your Own Farm Tools: Equipment & Systems for the Small-Scale Farm & Market Garden (Storey Publishing, August 2021) and is reprinted with permission from the publisher.
You’ll find that the word tools is used loosely throughout the book. The three tools in this chapter are also sometimes called furniture. They are basic pieces you can build for a greenhouse to make it a better place to produce healthy seedlings for your farm or garden.
These three pieces of greenhouse furniture are tools I’ve use weekly for years now to help me grow all of the seedlings for my own little farm. Together, they make a complete system that streamlined my workflow and allows me to work safely and efficiently. And they also help create the right conditions for growing consistent, strong seedlings. Read on for insights into the designs and instructions on building your own versions of these tools.
Simple seedling bench
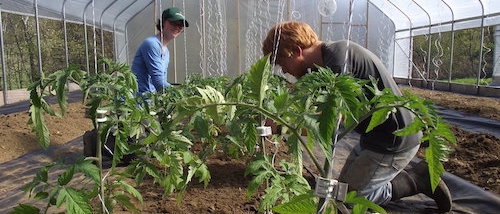
This simple, lightweight yet sturdy bench is used for growing seedlings in plug trays in our greenhouse. We’ve been using benches like this one for decades and have made several design refinements along the way. It’s built with basic off-the-shelf lumber in standard sizes. It’s also easy to customize to get the height, width, and length just right for your needs.
In this example, the bench is 36 inches tall, 42 inches wide, and 8 feet long. I’m 6 feet tall, and I found 36 inches a convenient height for the bench, allowing me to comfortably pick up and set down the trays (my elbow height is about 41 inches, for reference). This height also means I don’t need to bend over to get a good look at the plants. You can vary the height of your bench simply by changing the length of the legs.
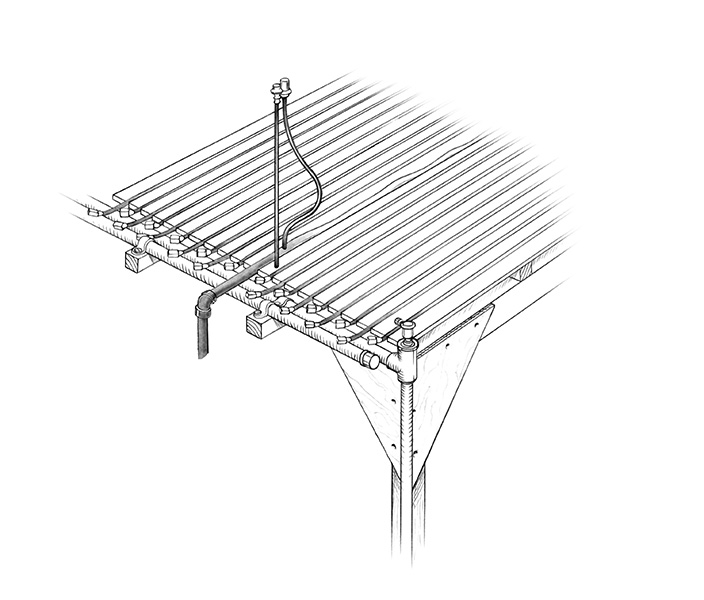 Figure 1: Small sprinklers mounted on metal posts integrate well with the table for watering seedlings. Additional wooden blocks provide support for the bottom heat manifold. With a bottom heat system that uses spaghetti tubing, you can lay the tubing in the gaps between lath strips to keep it perfectly spaced. Foam insulation slides in from the side to support the spaghetti tubing. An airlock valve is an essential part of a bottom heat system, which you can purchase from some greenhouse suppliers. All images by Michael Gellatly
Design notes
The bench consists of a basic lumber frame reinforced with plywood at the corners. The frame is topped with evenly spaced wood strips, called lath, that measure about ¼ × 1¼ × 48 inches. Lath is commonly sold in bundles of 50 strips. The gaps between the strips allow for airflow and water drainage and provide spaces for laying in tubing for bottom heat (see Figure 1).
At 42 inches wide, the bench is designed to fit multiple rows of seedling trays that measure 10 × 20 inches (commonly called 1020 trays or “ten-twenties”). The trays are actually a bit longer than 20 inches, so the extra 2 inches of bench width means the trays don’t hang off the edges, where they might get bumped. The 42-inch width also allows enough space for irrigation tubing down the center of the benchtop if you integrate sprinklers into the bench (again, see Figure 1).
Project overview
Approximate materials cost: $45
Time to build: 2–4 hours
Level of complexity: Moderate
Suggested tools
Saw
Framing square
Drill
Pneumatic stapler or basic hammer
Recommended materials
1/2” CDX plywood, at least 32” × 48”
Five 96” lengths of 2×4
Two 96” lengths of 2×2
Forty-two 48” lengths of wood lath strips, typically 5/16” × 11/2”
11/2” screws
21/2” screws
1” staples (1/4” crown or larger) or 4d (11/2”) common nails
How to build it
1. Cut the triangular gussets. Mark two 16”-wide strips on the end of a full-width sheet of ½” plywood. Then, mark both edges of each strip at 16” intervals and join the marks to make three 16” squares. Draw diagonal lines between the marks to create two triangles per square.
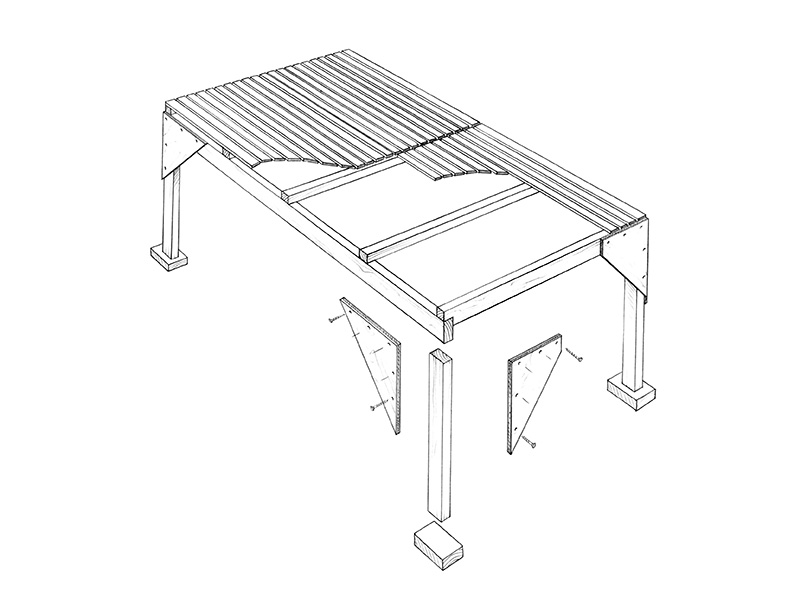 Figure 2
Cut the strips from the sheet, then cut along the diagonals and cross marks to make the triangles. You need only two triangles from the second strip, for a total of eight. (It’s helpful to trim about an inch off the sharp points of each triangle at this point to keep them from catching and snagging pants pockets after they’re installed on the benches; see figure 3.)
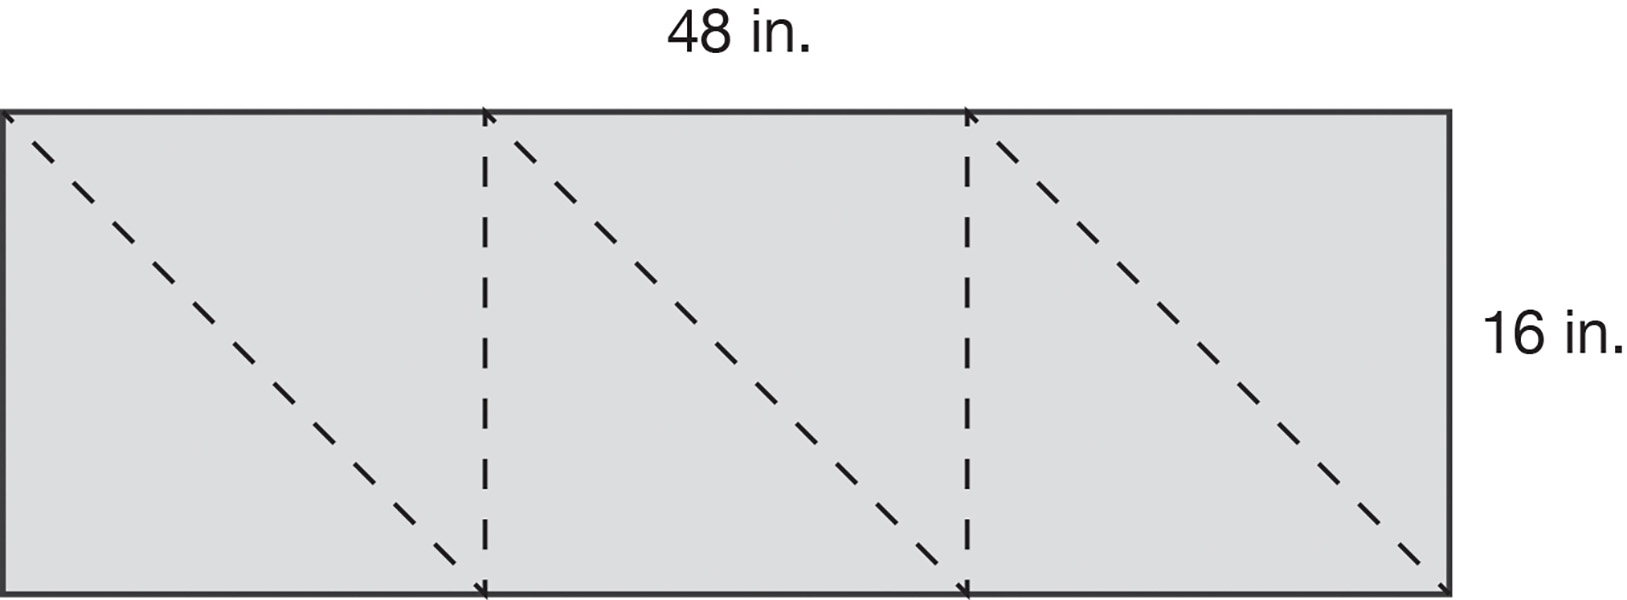 Figure 3
2. Cut the 2× pieces. Cut four pieces of 2×4 at 29½” (or the length you’ve determined) for the legs. Cut two 2×4 pieces at 96” for the sides of the frame (full 8-foot 2×4s are often a little longer than 96”). Cut two 2×4 pieces at 42” for the ends of the frame. Cut three 2×2 pieces at 42” for the crosspieces.
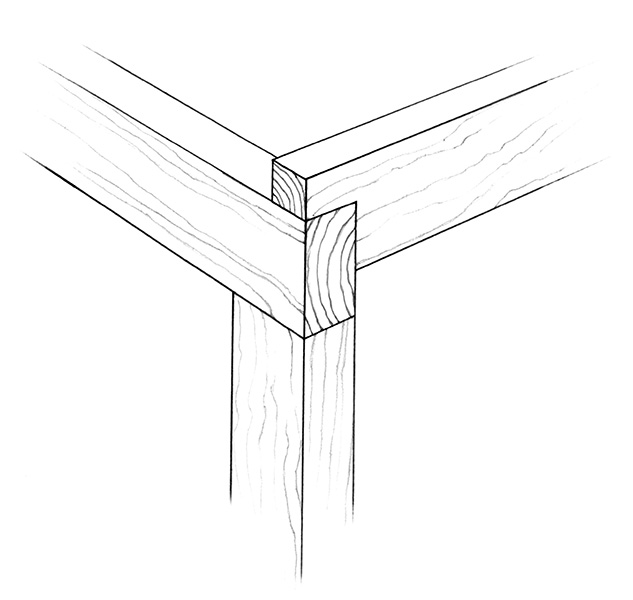 Figure 4
3. Notch the end pieces. Notch both ends of the 42” 2×4 end pieces so that they are left with stubs about 1½” thick and 1½” long on each end. This allows them to sit on top of the 2×4 frame sides at the same height as the 2×2 crosspieces (which are actually 1½” square).
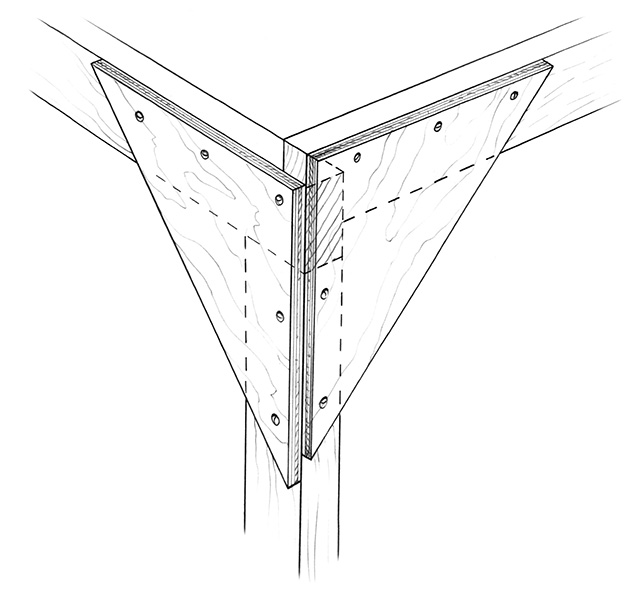 Figure 5
4. Assemble the sides and legs. Position one of the plywood gussets over one of the 2×4 side pieces so the square edges of the gusset are flush with the top and end of the side piece. Fasten the gusset in place with three 1½” screws along its top edge. Butt one of the legs against the bottom of the side piece, as shown, flush with the gusset. Check the leg with a framing square to make sure it is square to the side piece, then fasten the gusset to the leg with two screws. Repeat the same process to assemble the other side and leg pieces.
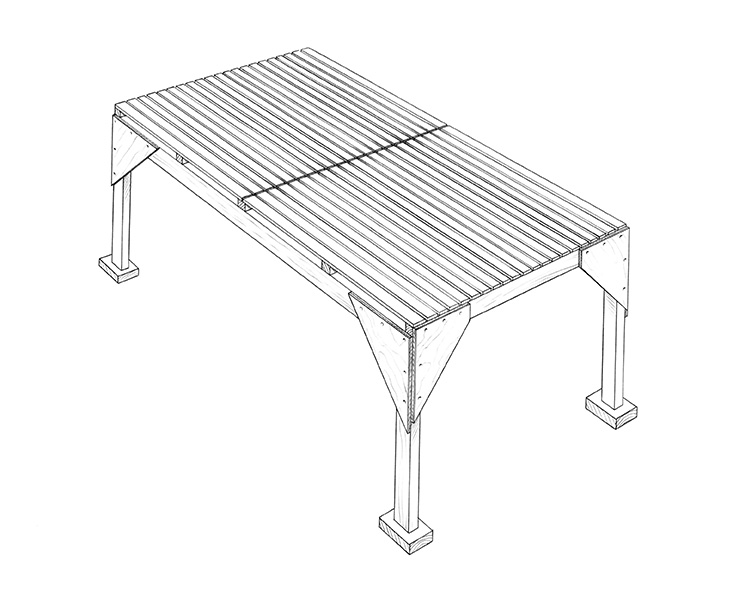 Figure 6
5. Join the sides and ends. Attach two gussets to each of the 2×4 end pieces, flush with the top edge and end of the 2×4 so that the plywood covers the notch. Stand up the two side-and-leg assemblies and fit them together with the two end assemblies. The notches should rest squarely on the top edges of the side pieces. Clamp the parts together at the corners (or have a helper hold them), check each corner with a framing square, and then fasten each gusset to the adjoining leg with two 1½” screws.
6. Add the crosspieces. Measuring from the outside edge of one of the end pieces, mark the top edge of each side piece at 24”, 48”, and 72”. Position a 2×2 crosspiece across the bench frame so the crosspiece is centered on two opposing marks. Drill a pilot hole through each end of the 2×2 and fasten it to the side pieces with a single 2½” screw in each end. Install the remaining two crosspieces the same way.
7. Install the lath. Spread 21 pieces of lath evenly across the bench top so their ends are flush with the center of the middle crosspiece. The two outer slats should be flush with the ends of the crosspieces. Fasten the slats to the end pieces and crosspieces with a pneumatic stapler, if you have one, or use 4d common nails (the large heads on common nails help hold down the lath). Repeat the process at the other end of the bench. The slats on either end should match up at the center of the middle crosspiece.
Note: The width of lath can vary, and the actual gap between the strips doesn’t matter much. As long as there’s at least 1/8” between them, water will drain nicely. I have found a bit of variation in quality of lath from different suppliers. (I’ve had much better luck getting good-quality lath from a reputable lumberyard than from big box stores.) If you have a choice, go with thicker strips (not necessarily wider), and avoid using any pieces that have large knots or are already cracked or split.
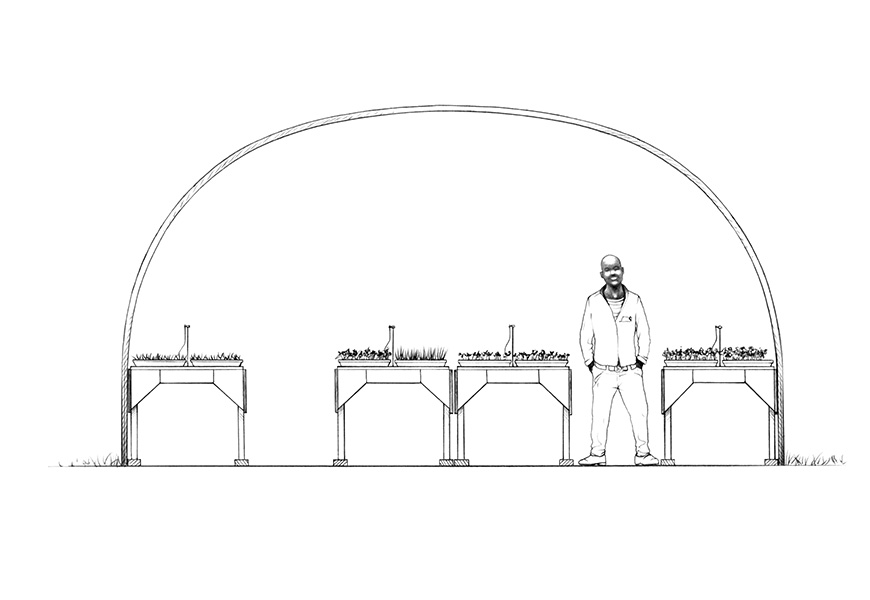 Figure 7: In a 20'-wide greenhouse, you can fit four benches and two 36"-wide pathways with good access to all of your seedlings.
Using the benches
At our farm, we use these benches for starting all of our seedlings. Occasionally in the late season we also use the benches for curing onions or squash. I have all of our benches set up with automatic irrigation to save time and to free us from being tied to the greenhouse every day of the week.
To avoid having dripping irrigation nozzles hanging above the benches, I integrate upright Ein-Dor sprinklers mounted on thin metal rods installed into the benchtops. Holes drilled partway into the center of the 2×4 end piece and 2×2 crosspieces are the perfect places to insert the metal rods and stand up the sprinklers. I then run the distribution tube for the sprinklers down the center of the benchtop and loop the spaghetti tube that feeds the sprinklers under one of the lath slats to hold the tubing in place.
I use sprinkler heads designed to throw water in a 4-foot radius and mount them every 2 feet (on the crosspieces) for more even coverage, which is more important to me than the wasted water from overspray. We set up every bench with its own valve so we can turn each bench’s water supply on or off, and there is a hose connection between each set of benches that makes it easy to separate the benches and move them around if needed.
Between waterings and when there aren’t any seedling trays on the benches, most of the wood dries out, so we haven’t had any trouble with wood rot. The exception is the bottom of the bench legs, which tend to wick water from the ground and start to rot eventually. To protect the bench legs, I place each one on a scrap piece of 2×4 that is at least 4 inches long. These sacrificial pieces will rot first, but they can be replaced much more easily than the bench legs. The scrap wood also helps distribute the pressure of the bench legs on the ground, keeping them more stable.
I’ve also used these benches with a spaghetti-tubing hot water system to provide bottom heat to seedling flats. The spaces between the lath hold the spaghetti tubing in place perfectly, without the need for plastic spacers. To run this kind of system, you need to add sheets of stiff foam board insulation just below the lath to support the spaghetti tubes and to hold in the heat; 1/2-inch XPS foam board works well because of its stiffness and durability, but polyiso (or, technically, polyisocyanurate) is also a good option and has the added advantage of a foil face that helps reflect heat back up toward the roots. EPS foam board is inexpensive and also has a foil face, but I’ve found it a bit too delicate to work well for this application.
The foam board pieces should span the width of the table and fit between the crosspieces, making them approximately 42 inches wide and either 221/2 inches or 213/4 inches long, depending on which section you’re filling. To support the foam board, you can attach wooden runners made of lath strips or 1× lumber to the sides of the crosspieces to create a little lip for the edges of the insulation to sit on. This is easiest to do before you attach the lath for the benchtop, but I’ve done it after the fact as well. Leave just a small gap between the bottom of the benchtop lath and the top of the insulation, no more than 1/8 inch, to allow water to run off.
I’ve found it’s best to angle this gap a bit so that the insulation has a slight slope, which will encourage water to drain to one side of the bench before it pools in the middle of the foam board and causes sagging. This also allows you to slide the foam board in and out from the side to clean it, as it inevitably collects debris.
Josh Volk farms in Portland, Oregon, and does consulting and education under the name Slow Hand Farm. He is the author of the book Compact Farms: 15 Proven Plans for Market Farms on 5 Acres or Less and Build Your Own Farm Tools, both available from Growing for Market. He can be found at SlowHandFarm.com.