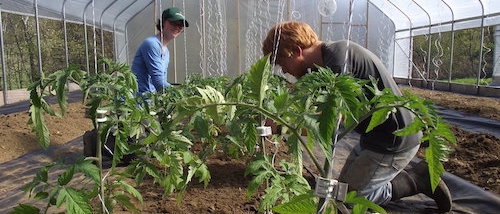
Producing herbs for sale to retail and restaurant accounts differs from producing commercial vegetables—especially when it comes to managing the harvest. Harvests need to happen fast, and need to be managed in a way that makes the next harvest easy.
When we first started growing perennial herbs, we would harvest only the plants that seemed ready, and only harvest what we needed from each plant. This worked fine when we were harvesting small quantities for our farm stand in Maine and farmers market sales in Iowa, but as our production grew, we found that we had a patchwork quilt of regrowth size and quality that was difficult to harvest efficiently. A plant with eight inches of nice leaves would be right next to one that had been mowed to the ground, or a plant would be half-harvested while the other half was going to flower. And pretty soon, some plants were overgrown and woody, while the remaining plants were over-harvested to meet demand.
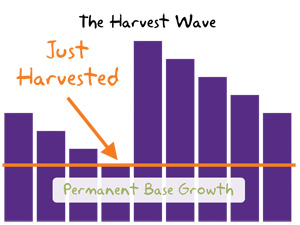
At the time, we were rotationally grazing sheep, and I had been reading about proper management of pastures in rotational grazing. I thought that we could apply some of the same principles to growing and harvesting herbs: harvest everything in a “paddock” to the same level; create a “wedge” of growth; manage plants for vegetative, not reproductive, growth; and manage our “grazing” to match the variable growth rates throughout the year.
Most of our herbs at Rock Spring Farm were planted as full 150-foot (and later, 300-foot) beds, with two rows per bed, so our “paddock” size was determined by how many feet of bed we harvested. At the beginning of the season, harvest started at the west end of the bed and proceeded eastward, with both rows harvested at the same pace. When we reached the end of the bed, we either started over again at the beginning of the bed, or we moved to the west end of the next bed and started harvesting there.
Rotational grazers call the resulting growth pattern a “grazing wedge”; at Rock Spring Farm, we called it “the harvestwave”.
We always sought to harvest our herbs when the surface of their leaves was dry, but still early in the day. As soon as the dew was off, the harvest crew would begin their work in the herb field. If we had been trying to achieve maximum essential oil content, we would have harvested in the late afternoon or early evening — but shelf life was a more important consideration for our market, so we focused on getting the herbs out of the field and into the walk-in cooler before they had absorbed the day’s field heat.
Maintaining herb plants is an important part of harvesting them. A clean, even cut at harvest sets the stage for an easier, higher quality harvest the next time. Cleaning the plants up right away sets the stage for regrowth, so after the day’s harvest was securely in the cooler, the herb harvest crew immediately returned to the herb field to begin the maintenance process.
We placed an emphasis on doing this right away, because when a plant invests in growing new leaves, those new leaves have to draw on other plant resources before they start to return their own energy to the plant. I didn’t want the plants to start re-growing only to be cut back three days or a week into a fresh round of green growth before it had a chance to contribute to the plant’s overall energy reserves — the classic model for overgrazing.
As part of my weekly field walks, I monitored each herb bed for signs of imminent flowering. To keep the plants growing vegetatively, I didn’t want them to even think about reproduction, so as soon as I saw the beginnings of flower buds, we would cut that crop back right away.
Once a plant goes into reproductive mode, it stays in reproductive mode until it thinks it’s done; if you cut back a flowering thyme plant, it just puts out more flowers. If you miss cutting back and the plant has started to flower, wait to cut it back until the flowers turn brown, indicating that they are no longer receptive and that any pollination that is going to happen is already done - but don’t wait for seeds to set before you cut the crop back!
Having an abundance of crop available is a critical factor for being able to manage flowering. Usually, we had enough previously-harvested crop that was still in a vegetative mode that cutting back the ready-to-mature part of a bed didn’t represent a supply-management problem.
When we had a CSA, this cutting back was an occasion to offer that herb to our membership. If we didn’t have enough to fill the boxes, or if we had already overwhelmed our members with a particular herb, we simply threw the remaining crop on the ground.

In the spring, our herbs grew rapidly as days got longer and the weather warmed up. We established anticipated flowering dates based on our experience with the varieties we grew. Three weeks before the anticipated flowering, we would cut back half of the un-harvested crop; the remaining crop would continue growing for harvest, and the cut back crop would be ready to harvest when we finished harvesting the initial crop. This allowed us to dodge the flowering issue altogether and maintain a consistent supply.
In the fall, as growth slowed down, the plants would stop trying to flower, and we would allow them to put on large amounts of vegetative growth, stockpiling large quantities of herbs to help manage our supply for the huge week of Thanksgiving. Harvests taken after September 1 were not followed by any further cutting back, in order to allow the crop to maximize its energy reserves; with growth slowing down, we were unlikely to see enough regrowth to harvest again before the end of the growing season around November 1.
Because our clamshell packages were eight inches long, we always tried to harvest herbs to that same length. While packaging a thousand clamshells of herbs a week would take about 20 labor hours, harvesting those same herbs could take as few as six. With ample returns per square foot in the field, it made more sense to harvest in such a way as to make the packing easier, even if it lowered our yields.
That’s not to say that we never compromised. It was difficult to fill a clamshell with chives cut to just eight inches, and we did experience crop shortages that forced us to harvest crops that were larger or smaller than we would have liked. On the other hand, the ability to use longer or shorter stems was one of the advantages of selling herbs in clamshells as opposed to bunches.
Our favorite harvesting tool was a needle nose shears from Johnny’s Selected Seeds. The two-inch cutting surface provided a nice balance between precision and harvesting a sufficient quantity of crop with each cut, and the spring that helps re-open the blades after each cut allowed harvesters to work for extended periods of time. As an additional bonus, the overall length of the tool, at just under eight inches, was exactly the same length as our ideal cut, providing a nice guide for workers in the field.
Harvested herbs were stacked in two tidy rows in the harvest tote, with the cut ends all facing the same direction, to facilitate the work in the packing house. Our herb harvest totes, shallow stack-and-nest totes, had vented sides and bottoms to allow for rapid cooling, but the vented bottoms also allowed soil and other contaminants to infiltrate the package. Nesting the harvest tote inside of a designated “drag tote” kept the bottom of the harvest tote clean, and prevented any soil-borne contamination from coming in contact with the harvested herbs.
Different perennial herbs were treated differently as we harvested and cut them back, according to their growth habits. In all cases, we harvested to make the work as easy as possible in the packing house; and cut the plants back evenly to promote even, easy-to-harvest regrowth. For cutting back, we found that the snips and produce knives were too small, so we used hedge shears instead; a pair with telescoping handles soon became a crew favorite since it extended our reach and didn’t require bending over quite as far.
Spearmint and peppermint grow as a solid bed, with rhizomes spreading right at ground level. After harvesting with the needle nose snips, we would return with a pair of hedge shears to cut everything right down to the ground. I had a hard time convincing myself and my employees that it was really okay, but the rhizomes and roots have enough energy to regrow quickly. By getting right down next to the rhizomes, new, lush growth came right from the rhizome rather than branching out from the stubs of cut stems, ensuring that the next harvest would be full of tender stems rather than hard, dried ends.
The roots of both thyme and oregano mound up slightly as the plants mature, and the very base of the plant gets somewhat woody. For these crops, we harvested our eight-inch stems, then cut back to just above the woody mound - the ideal result looked like a crew cut. By cutting back to just above the spreading, woody stems, we encouraged the new growth to emerge evenly and lushly from the stems or the roots.
While you want to handle any herb gently, thyme is extremely sturdy and springy, and able to take a lot of abuse. Oregano, on the other hand, bruises easily and should be handled with care.
Sage has a strong central stem and grows as a large bush. It isn’t as tolerant of cutting back, so we harvested about one-third of the plant each time. To harvest quickly, we gently grabbed a handful of leaves—“Hold the air around the leaves, not the leaves!”—and cut the stems of the entire handful to an eight-inch length. A gentle flick of the cut ends dislodged any cut leaves before we put the produce in the harvest tote. Any rogue leaves or branches, especially those growing on the sides of the plant, were cut back; usually, we did this as part of the harvest process.
Because we grew rosemary in pots, we treated it with a little more preciousness. Each stem was harvested individually, selecting only those that were eight inches or longer and harvesting only a third of the total leaf volume at any one time.
I never did feel that we got the hang of how best to harvest tarragon. The early growth would spring from the ground in a solid, even clump which we cut right to the ground. But later harvests were stem-by-stem grudge matches trying to avoid harvesting woody growth. Gentle handling is a must, as tarragon bruises if you look at it funny.
Chives require a very different harvesting approach from the other herbs. The relatively wispy stems didn’t fill a clamshell very easily, and achieving a decent yield required the harvest of sixteen-inch or longer leaves. To harvest chives, we grasped the entire plant no less than eight inches above the ground, so that the hand was above any leaves that had fallen over, and sliced through the leaves just above the point at which some dry sheathes were evident. A firm shake and a ruffling of the cut ends caused the short and fallen-over leaves to fall out of the bunch.
Cut tips on young chive leaves turn hard and yellow as the tubular leaves elongate, and this looks bad in a clamshell or bulk bag. To avoid this, we used a serrated bread knife to slice the remainder of the plant just below the surface of the soil, removing the bulk of the underground portion of the bulb but leaving the apical meristem intact; you should get right to the bottom of the fleshy part of the bulb, but not cut into the roots.
We grew dill and cilantro alongside of our salad mix, seeding a new crop every seven days. Harvesting any given patch of dill or cilantro just once provided us with the highest yield per unit of effort expended and made weed control and fertility management relatively easy. Seeded thickly, these could be harvested quickly and efficiently with a regular produce knife, such as the Johnny’s stainless steel produce knife that we used to harvest just about everything else on the farm. Gently grasping a handful of leaves and cutting to eight inches was fast and easy, and provided both harvest and cutting back in one step; the best workers could get two or three handfuls before they had to put the herbs in the harvest tote.
Chris Blanchard provides consulting and education for farming, food, and business through Flying Rutabaga Works. As the owner and operator of Rock Spring Farm, in northeast Iowa, since 1999, Chris raised 20 acres of vegetables, herbs, and greenhouse crops, marketed through a 200-member year-round CSA, food stores, and farmers markets. Prior to 1999, Chris managed student farms, worked as an intern, packing house manager, plant breeding assistant, and farm manager, and provided consulting for a major organic processor, in California, Wisconsin, Iowa, Maine, and Washington state. His workshops, writing, and consulting throughout the country about farm business concepts, food safety, organic vegetable production, and scaling-up have gained a reputation for fresh approaches, down-to-earth information, and honesty. Email [email protected]


 Have you ever lost precious seedlings in your greenhouse to frost? How about tossing a flat or two out due to heat stress or a missed watering? Or better still, stared at a tray of seeds that won’t germinate, with smoke coming out of your ears, because you’re sure someone (not you!) mis-watered them at a critical moment? Have you ever shrugged to yourself reading the growing instructions on a seed packet that says “Germinates best at 70 Fahrenheit” while standing in your 85-90 degree greenhouse? You’ve started to look into a germination chamber to solve some of these issues, but they look pricey and have limitations like not being able to handle as many flats as you’d like to start at once.
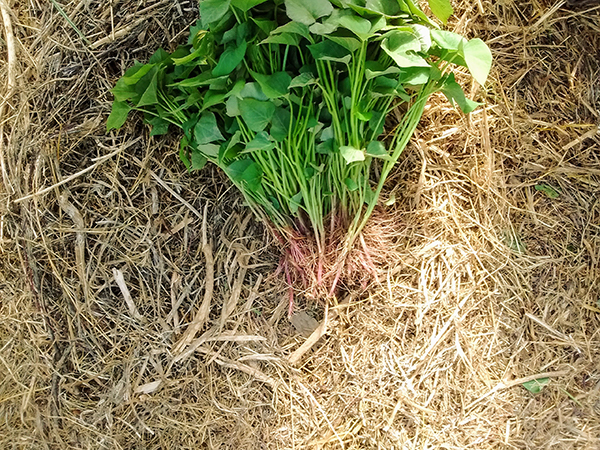 Sweet potatoes are grown from “slips,” pieces of stem with a few leaves from a mother root, not from seeds or replanted roots. We used to buy bare-root slips for transplanting because we didn’t know how to grow our own and had heard it wasn’t easy. We have been growing our own for many years now. We prefer the flexibility and reliability it gives us.